Categories
Express JavaScript Nodejs

Tracking Response Time of Express App Responses

To gauge the performance of our apps, we need to measure the response time of our API.

To do this with our Express app, we can use the response-time package.

Installation

response-time is available as a Node package. We can install it by running:

npm install response-time

Then we can import it by writing:

const responseTime = require('response-time');

responseTime([options])

We can set various options by passing an object into the optional options parameter.

It’ll create a middleware that adds a X-Response-Time header to responses.

The options object takes the following properties:

digits

The digits property is a fixed number of digits to include in the output, which is always in milliseconds. The default is 3.

header

The name of the header to be set. It defaults to X-Response-Time.

suffix

The suffix property is a boolean property to indicate if units of measure should be added to the output. The default value is true.

responseTime(fn)

The function creates a middleware that records the response time of a request and makes it available to our own function fn. fn has the signature (req, res, time) where time is a number in milliseconds.

Examples

Simple Example

We can use the responseTime package without any options or function passed in:

const express = require('express');  
const bodyParser = require('body-parser');  
const responseTime = require('response-time')  
const app = express();  
app.use(bodyParser.json());  
app.use(bodyParser.urlencoded({ extended: true }));

app.use(responseTime());

app.get('/', (req, res) => {  
  res.send('foo');  
});

app.listen(3000);

Then we get a X-Response-Time response header with a value like 0.587ms.

We can check the response header on an HTTP client like Postman.

Passing in Options

We can change the options for the header returned with the response. For example, we can write the following to change the number of digits sent:

const express = require('express');  
const bodyParser = require('body-parser');  
const responseTime = require('response-time')  
const app = express();  
app.use(bodyParser.json());  
app.use(bodyParser.urlencoded({ extended: true }));

app.use(responseTime({  
  digits: 5  
}))

app.get('/', (req, res) => {  
  req.id = 1;  
  res.send('foo');  
});

app.listen(3000);

Then we get a X-Response-Time response header with a value like 0.71987ms.

Passing in Our Own Function

We can pass a function into the responseTime function as follows:

const express = require('express');  
const bodyParser = require('body-parser');  
const responseTime = require('response-time')  
const app = express();  
app.use(bodyParser.json());  
app.use(bodyParser.urlencoded({ extended: true }));

app.use(responseTime((req, res, time) => {  
  console.log(`${req.method} ${req.url} ${time}`);  
}))

app.get('/', (req, res) => {  
  req.id = 1;  
  res.send('foo');  
});

app.listen(3000);

Then we get something like:

GET / 2.9935419999999997

from the console.log.

It’s useful if we want to manipulate the response time data or log it ourselves.

Conclusion

We can get the response time in the response header of a request with the response-time package.

It has a responseTime function which returns a middleware that we can use with the use method of express or express.Router() .

The function can either take an options object and or a function with the req, res, and time parameters to get the request, response, and response time respectively.

Categories
JavaScript Vue

Event Handling in Vue.js Components

Vue.js is an easy to use web app framework that we can use to develop interactive front end apps.

In this article, we’ll look at how to handle events in Vue components, including how to use v-model with custom components and passing data between parent and child.

Listening to Child Components Events

We can send events from a child component to the parent to run code in the parent component.

For example, if we want to add a button to each post to change the font of the page, we can do that as follows:

src/index.js :

Vue.component("post", {  
  props: ["post"],  
  template: `  
    <div>  
      <h2>{{post.title}}</h2>  
      <div>{{post.content}}</div>  
      <button v-on:click="$emit('change-font')">  
        Change Font  
      </button>  
    </div>  
  `  
});

new Vue({  
  el: "#app",  
  data: {  
    posts: [{ title: "Foo", content: "foo" }, { title: "Bar", content: "bar" }],  
    font: ""  
  },  
  methods: {  
    changeFont() {  
      this.font = this.font === "" ? "courier" : "";  
    }  
  }  
});

We added the changeFont method to let us change the font in the Vue app. This will be called when the change-font event is emitted from the post component.

The change-font event is emitted from post when the Change Font button is clicked.

The event is emitted with the $emit method. The string we passed in is the name of the event.

index.html :

<!DOCTYPE html>  
<html>  
  <head>  
    <title>App</title>  
    <meta charset="UTF-8" />  
    <script src="https://cdn.jsdelivr.net/npm/vue/dist/vue.js"></script>  
  </head> <body>  
    <div id="app">  
      <div v-bind:style="{'font-family': font}">  
        <post  
          v-for="post in posts"  
          v-bind:post="post"  
          v-on:change-font="changeFont"  
        ></post>  
      </div>  
    </div> <script src="src/index.js"></script>  
  </body>  
</html>

In the template, we have the v-bind:style attribute to set the font of the div dynamically with v-bind:style=”{‘font-family’: font}”.

When the change-font event is received, then the changeFont method will be called to toggle the font between Courier and the default.

The $emit method also takes a second argument with the value that we want to send back to the parent.

For example, we can rewrite the font change code as follows:

src/index.js :

Vue.component("post", {  
  props: ["post"],  
  template: `  
    <div>  
      <h2>{{post.title}}</h2>  
      <div>{{post.content}}</div>  
      <button v-on:click="$emit('change-font', 'courier')">  
        Change Font  
      </button>  
    </div>  
  `  
});

new Vue({  
  el: "#app",  
  data: {  
    posts: [{ title: "Foo", content: "foo" }, { title: "Bar", content: "bar" }],  
    font: ""  
  },  
  methods: {  
    changeFont(font) {  
      this.font = this.font === font ? "" : font;  
    }  
  }  
});

In the code above, we passed in 'courier' to the $emit function. The item in the second argument will be available as the $event in the parent component.

index.html :

<!DOCTYPE html>  
<html>  
  <head>  
    <title>App</title>  
    <meta charset="UTF-8" />  
    <script src="https://cdn.jsdelivr.net/npm/vue/dist/vue.js"></script>  
  </head> <body>  
    <div id="app">  
      <div v-bind:style="{'font-family': font}">  
        <post  
          v-for="post in posts"  
          v-bind:post="post"  
          v-on:change-font="changeFont($event)"  
        ></post>  
      </div>  
    </div> <script src="src/index.js"></script>  
  </body>  
</html>

In the template, we pass in $template , which contains 'courier' to the changeFont method.

The changeFont method toggles the font between the font that we passed in as the argument and an empty string.

So it does the same thing as before.

This lets us pass data from a child component to a parent component.

Using v-model on Components

v-model is the same as the v-bind:value and v-on:input together. This means that:

<input v-model="text">

is the same as:

<input v-bind:value="text" v-on:input="text= $event.target.value" >

Since components take props and emit events, we can combine the value propr and the input event binding into the v-model directive.

For example, we can use it to make our own custom input as follows:

src/index.js :

Vue.component("styled-input", {  
  props: ["value"],  
  template: `  
    <input  
      v-bind:style="{'font-family':'courier'}"  
      v-bind:value="value"  
      v-on:input="$emit('input', $event.target.value)"  
    >  
  `  
});

new Vue({  
  el: "#app",  
  data: {  
    text: ""  
  }  
});

In the code above, we created the style-input component to change the font of the input to Courier.

Also, we use v-bind:value to get the value of the value prop and emit the input event as the text is inputted into the input box.

index.html :

<!DOCTYPE html>  
<html>  
  <head>  
    <title>App</title>  
    <meta charset="UTF-8" />  
    <script src="https://cdn.jsdelivr.net/npm/vue/dist/vue.js"></script>  
  </head> <body>  
    <div id="app">  
      <styled-input v-model="text"></styled-input>  
      <br />  
      {{text}}  
    </div> <script src="src/index.js"></script>  
  </body>  
</html>

In the code above, we can use v-model to bind to the text data field since v-model is the same as combining v-bind:value with v-on:input .

styled-input emitted the input event and takes the value prop, so we can merge them together into v-model .

Conclusion

We can emit events with the $emit from a child component to the parent. It takes 2 arguments. The first argument is the string for the event name, and the second argument is the object that we want to pass to the parent.

The parent can access the object passed from the child by listening to the event with the v-on directive and then retrieve them item pass from the child with the $event object.

v-bind:value and v-on:input is the same as v-model , so v-bind:value and v-on:input can be combined into one and v-model can be used with custom components.

This lets us create custom inputs easily.

Categories
JavaScript Mega-Guides Vue

Vue Router Mega-Guide

Vue.js is an easy to use web app framework that we can use to develop interactive front end apps.

In order to create a single-page app with Vue.js, we have to map URLs to components so that when users go to a URL, it’ll show the corresponding component.

In this article, we’ll look at how to create some simple routes with the Vue Router.

Getting Started

We can use by Vue Router by adding a script tag with the URL for the Vue Router library.

We can make a simple app as follows:

src/index.js :

const Foo = { template: "<div>foo</div>" };  
const Bar = { template: "<div>bar</div>" };

const routes = [  
  { path: "/foo", component: Foo },  
  { path: "/bar", component: Bar }  
];

const router = new VueRouter({  
  routes  
});

new Vue({  
  el: "#app",  
  router  
});

index.html :

<!DOCTYPE html>  
<html>  
  <head>  
    <title>App</title>  
    <meta charset="UTF-8" />  
    <script src="https://unpkg.com/vue/dist/vue.js"></script>  
    <script src="https://unpkg.com/vue-router/dist/vue-router.js"></script>  
  </head>  
  <body>  
    <div id="app">  
      <div>  
        <router-link to="/foo">Foo</router-link>  
        <router-link to="/bar">Bar</router-link>  
      </div>  
      <router-view></router-view>  
    </div>  
    <script src="src/index.js"></script>  
  </body>  
</html>

In the code above, we defined 2 components Foo and Bar in src/index.js .

Then we mapped them to routes with:

const routes = [  
  { path: "/foo", component: Foo },  
  { path: "/bar", component: Bar }  
];

const router = new VueRouter({  
  routes  
});

Then we created a new Vue instance with:

new Vue({  
  el: "#app",  
  router  
});

In the template, we have router-links to map the routes to a tags with the URLs to correspond to the routes we define:

<router-link to="/foo">Foo</router-link>  
<router-link to="/bar">Bar</router-link>

Then we have router-view to show the components that are mapped to routes:

<router-view></router-view>

In the end, we should get:

Foo Link Bar Linkfoo

when we click on Foo Link .

and:

Foo Link Bar Linkbar

when we click on Bar Link .

Once we injected the router, we also get access to this.$router .

We can use it to navigate between routes. For example, we can write the following:

src/index.js :

const Foo = { template: "<div>foo</div>" };  
const Bar = { template: "<div>bar</div>" };

const routes = [  
  { path: "/foo", component: Foo },  
  { path: "/bar", component: Bar }  
];

const router = new VueRouter({  
  routes  
});

new Vue({  
  el: "#app",  
  router,  
  methods: {  
    goBack() {  
      window.history.length > 1 ? this.$router.go(-1) : this.$router.push("/");  
    }  
  }  
});

index.html :

<!DOCTYPE html>  
<html>  
  <head>  
    <title>App</title>  
    <meta charset="UTF-8" />  
    <script src="https://unpkg.com/vue/dist/vue.js"></script>  
    <script src="https://unpkg.com/vue-router/dist/vue-router.js"></script>  
  </head>  
  <body>  
    <div id="app">  
      <div>  
        <router-link to="/foo">Foo Link</router-link>  
        <router-link to="/bar">Bar Link</router-link>  
        <a href="#" @click="goBack">Go Back</a>  
      </div>  
      <router-view></router-view>  
    </div>  
    <script src="src/index.js"></script>  
  </body>  
</html>

Then when we click the Foo Link and Bar Link links a few times then click Go Back , we’ll see it’ll go back to the previous routes that we navigated to.

Route Parameters

We can get route parameters with the this.$route.params object.

For example, we can write an app that shows the URL parameter that’s passed in as follows:

src/index.js :

const User = {  
  computed: {  
    username() {  
      return this.$route.params.username;  
    }  
  },  
  template: `<div>{{username}}</div>`  
};

const routes = [{ path: "/user/:username", component: User }];

const router = new VueRouter({  
  routes  
});

new Vue({  
  el: "#app",  
  router  
});

index.html :

<!DOCTYPE html>  
<html>  
  <head>  
    <title>App</title>  
    <meta charset="UTF-8" />  
    <script src="https://unpkg.com/vue/dist/vue.js"></script>  
    <script src="https://unpkg.com/vue-router/dist/vue-router.js"></script>  
  </head>  
  <body>  
    <div id="app">  
      <div>  
        <router-link to="/user/foo">Foo</router-link>  
        <router-link to="/user/bar">Bar</router-link>  
      </div>  
      <router-view></router-view>  
    </div>  
    <script src="src/index.js"></script>  
  </body>  
</html>

The :username in “/user/:username” is the parameter, so we can get what passed in after /user/ by using this.$route.params.username .

We added a computed property username which returns this.$route.params.username so we can use:

`<div>{{username}}</div>`

to show the username URL parameter.

We can also have multiple parameters in one route.

For example, we can write the following:

src/index.js :

const Name = {  
  template: `<div>  
    {{$route.params.firstName}}   
    {{$route.params.lastName}}  
  </div>`  
};

const routes = [{ path: "/name/:firstName/:lastName", component: Name }];

const router = new VueRouter({  
  routes  
});

new Vue({  
  el: "#app",  
  router  
});

index.html :

<!DOCTYPE html>  
<html>  
  <head>  
    <title>App</title>  
    <meta charset="UTF-8" />  
    <script src="https://unpkg.com/vue/dist/vue.js"></script>  
    <script src="https://unpkg.com/vue-router/dist/vue-router.js"></script>  
  </head>  
  <body>  
    <div id="app">  
      <div>  
        <router-link to="/name/Jane/Doe">Jane</router-link>  
        <router-link to="/name/Mary/Smith">Mary</router-link>  
      </div>  
      <router-view></router-view>  
    </div>  
    <script src="src/index.js"></script>  
  </body>  
</html>

Then when we click on the links, we get the first name and last name that we passed into the URL parameters.

:firstName and :lastName are matched to the params by position.

Reacting to Params Changes

We can watch the $route object to watch for param changes. Routes that the same name but different params use the same components. They won’t be re-rendered from scratch, so the lifecycle hooks won’t be called.

For example, we can write the following:

src/index.js :

const Name = {  
  data() {  
    return {  
      oldName: "",  
      newName: ""  
    };  
  },  
  watch: {  
    $route(to, from) {  
      this.oldName = from.params.name;  
      this.newName = to.params.name;  
    }  
  },  
  template: `<div>  
    Old: {{oldName}}   
    New: {{newName}}  
  </div>`  
};

const routes = [{ path: "/name/:name", component: Name }];

const router = new VueRouter({  
  routes  
});new Vue({  
  el: "#app",  
  router  
});

index.html :

<!DOCTYPE html>  
<html>  
  <head>  
    <title>App</title>  
    <meta charset="UTF-8" />  
    <script src="https://unpkg.com/vue/dist/vue.js"></script>  
    <script src="https://unpkg.com/vue-router/dist/vue-router.js"></script>  
  </head>  
  <body>  
    <div id="app">  
      <div>  
        <router-link to="/name/Jane">Jane</router-link>  
        <router-link to="/name/Mary">Mary</router-link>  
      </div>  
      <router-view></router-view>  
    </div>  
    <script src="src/index.js"></script>  
  </body>  
</html>

In the code above, we have the Name component that’s mapped to a route that takes the name route parameter.

Also, Name has watcher for the $route object that takes the to and from parameters. They are the previous and current routes respectively.

So when we click back and forth between links, we’ll see the old parameter and new parameter displayed.

Catch all / 404 Not found Route

We can add * as a wildcard character for routes.

For example, we can use:

path: '*'

to match all routes and:

path: '/user-*'

to match anything that begins with user- .

For example, we can use the wildcard character as follows:

src/index.js :

const Foo = { template: "<p>foo</p>" };  
const Bar = { template: "<p>bar</p>" };  
const NotFound = { template: "<p>not found</p>" };  
const routes = [  
  { path: "/foo", component: Foo },  
  { path: "/bar", component: Bar },  
  { path: "*", component: NotFound }  
];

const router = new VueRouter({  
  routes  
});

new Vue({  
  el: "#app",  
  router  
});

index.html :

<!DOCTYPE html>  
<html>  
  <head>  
    <title>App</title>  
    <meta charset="UTF-8" />  
    <script src="https://unpkg.com/vue/dist/vue.js"></script>  
    <script src="https://unpkg.com/vue-router/dist/vue-router.js"></script>  
  </head>  
  <body>  
    <div id="app">  
      <div>  
        <router-link to="/foo">Foo</router-link>  
        <router-link to="/bar">Bar</router-link>  
      </div>  
      <router-view></router-view>  
    </div>  
    <script src="src/index.js"></script>  
  </body>  
</html>

When we go to any URL other than /foo or /bar , we’ll see the ‘not found’ message.

We can use the wildcard character with other text as follows:

src/index.js :

const Foo = { template: "<p>foo</p>" };  
const Bar = { template: "<p>bar</p>" };  
const routes = [  
  { path: "/foo*", component: Foo },  
  { path: "/bar", component: Bar }  
];

const router = new VueRouter({  
  routes  
});

new Vue({  
  el: "#app",  
  router  
});

index.html :

<!DOCTYPE html>  
<html>  
  <head>  
    <title>App</title>  
    <meta charset="UTF-8" />  
    <script src="https://unpkg.com/vue/dist/vue.js"></script>  
    <script src="https://unpkg.com/vue-router/dist/vue-router.js"></script>  
  </head>  
  <body>  
    <div id="app">  
      <div>  
        <router-link to="/foo">Foo</router-link>  
        <router-link to="/bar">Bar</router-link>  
      </div>  
      <router-view></router-view>  
    </div>  
    <script src="src/index.js"></script>  
  </body>  
</html>

Then we see foo when we go to any URL that starts with foo .

Regular Expressions

We can use regular expressions to match route parameters. For example, we can write:

src/index.js :

const Foo = { template: "<p>foo {{$route.params.id}}</p>" };  
const Bar = { template: "<p>bar</p>" };  
const routes = [  
  { path: "/foo/:id(\d+)", component: Foo },  
  { path: "/bar", component: Bar }  
];

const router = new VueRouter({  
  routes  
});

new Vue({  
  el: "#app",  
  router  
});

index.html :

<!DOCTYPE html>  
<html>  
  <head>  
    <title>App</title>  
    <meta charset="UTF-8" />  
    <script src="https://unpkg.com/vue/dist/vue.js"></script>  
    <script src="https://unpkg.com/vue-router/dist/vue-router.js"></script>  
  </head>  
  <body>  
    <div id="app">  
      <div>  
        <router-link to="/foo">Foo</router-link>  
        <router-link to="/bar">Bar</router-link>  
      </div>  
      <router-view></router-view>  
    </div>  
    <script src="src/index.js"></script>  
  </body>  
</html>

Then when we go to /foo/1 we see foo 1 . If what comes after /foo/ isn’t a number, then we won’t see anything.

Redirect

We can add redirects from one route to another by adding the redirect property to a route.

For example, we can add a redirect as follows:

src/index.js :

const Bar = { template: "<div>bar</div>" };  
const routes = [  
  { path: "/foo", redirect: "/bar" },  
  { path: "/bar", component: Bar }  
];

const router = new VueRouter({  
  routes  
});

new Vue({  
  el: "#app",  
  router  
});

index.html :

<!DOCTYPE html>  
<html>  
  <head>  
    <title>App</title>  
    <meta charset="UTF-8" />  
    <script src="https://unpkg.com/vue/dist/vue.js"></script>  
    <script src="https://unpkg.com/vue-router/dist/vue-router.js"></script>  
  </head>  
  <body>  
    <div id="app">  
      <router-view></router-view>  
    </div>  
    <script src="src/index.js"></script>  
  </body>  
</html>

Then when we go to /#/bar in the browser, we get bar displayed.

A redirect can also target a named route. For example, we can write:

src/index.js :

const Bar = { template: "<div>bar</div>" };  
const routes = [  
  { path: "/foo", redirect: { name: "bar" } },  
  { path: "/bar", component: Bar, name: "bar" }  
];

const router = new VueRouter({  
  routes  
});

new Vue({  
  el: "#app",  
  router  
});

index.html :

<!DOCTYPE html>  
<html>  
  <head>  
    <title>App</title>  
    <meta charset="UTF-8" />  
    <script src="https://unpkg.com/vue/dist/vue.js"></script>  
    <script src="https://unpkg.com/vue-router/dist/vue-router.js"></script>  
  </head>  
  <body>  
    <div id="app">  
      <router-view></router-view>  
    </div>  
    <script src="src/index.js"></script>  
  </body>  
</html>

Then we get the same result.

We can also set the redirect property to a function. For instance, we can set it to a function that returns a route as follows:

src/index.js :

const Bar = { template: "<div>bar</div>" };  
const routes = [  
  { path: "/foo", redirect: to => "bar" },  
  { path: "/bar", component: Bar }  
];

const router = new VueRouter({  
  routes  
});

new Vue({  
  el: "#app",  
  router  
});

Then we get the same result as the previous examples.

Navigation guards aren’t applied on routes that redirect, only on its target. Alias

A redirect means that when a user visits /foo then the URL will be replaced by /bar and then matched as /bar .

An alias means of /foo that’s set as /bar means that when the user visits /bar , the URL remains /bar , but it’ll be matched as if the user is visiting /foo .

For example, we can define a route with an alias as follows:

src/index.js :

const Foo = { template: "<div>foo</div>" };  
const routes = [{ path: "/foo", component: Foo, alias: "/bar" }];

const router = new VueRouter({  
  routes  
});

new Vue({  
  el: "#app",  
  router  
});

index.html :

<!DOCTYPE html>  
<html>  
  <head>  
    <title>App</title>  
    <meta charset="UTF-8" />  
    <script src="https://unpkg.com/vue/dist/vue.js"></script>  
    <script src="https://unpkg.com/vue-router/dist/vue-router.js"></script>  
  </head>  
  <body>  
    <div id="app">  
      <router-view></router-view>  
    </div>  
    <script src="src/index.js"></script>  
  </body>  
</html>

Then we get foo when we go to /#/foo or /#/bar .

An alias lets us map any route to any URL without being constrained by the nesting structure of the routes.

This is handy for mapping a URL that we want for a nested route.

For example, if we define an alias for a nested route as follows:

src/index.js :

const Foo = {  
  template: `<div>  
    foo  
    <router-view></router-view>  
  </div>`  
};  
const Bar = { template: "<div>bar</div>" };  
const routes = [  
  {  
    path: "/foo",  
    component: Foo,  
    children: [{ path: "/bar", component: Bar }]  
  }  
];

const router = new VueRouter({  
  routes  
});

new Vue({  
  el: "#app",  
  router  
});

index.html :

<!DOCTYPE html>  
<html>  
  <head>  
    <title>App</title>  
    <meta charset="UTF-8" />  
    <script src="https://unpkg.com/vue/dist/vue.js"></script>  
    <script src="https://unpkg.com/vue-router/dist/vue-router.js"></script>  
  </head>  
  <body>  
    <div id="app">  
      <router-view></router-view>  
    </div>  
    <script src="src/index.js"></script>  
  </body>  
</html>

Then when we go to /#/foobar , we get:

foobar

displayed on the screen.

We also get the same thing displayed if we go to /#/foo/bar .

Therefore, we don’t have to follow the usual convention for nested route URLs if we use an alias.

Adding Meta Fields to Routes

We can add meta fields to routes so that they can be checked in navigation guards and components.

For example, we can add a meta field indicating which fields need authentication and then check if an auth token is stored in local storage as follows:

src/index.js :

const Login = {  
  template: "<div>login</div>"  
};  
const Profile = {  
  template: "<div>profile</div>"  
};  
const routes = [  
  {  
    path: "/",  
    component: Login  
  },  
  {  
    path: "/profile",  
    component: Profile,  
    meta: { requireAuth: true }  
  }  
];

const router = new VueRouter({  
  routes  
});

router.beforeEach((to, from, next) => {  
  if (to.meta.requireAuth) {  
    if (!localStorage.getItem("token")) {  
      next("/");  
    } else {  
      next();  
    }  
  } else {  
    next();  
  }  
});

new Vue({  
  el: "#app",  
  router  
});

index.html :

<!DOCTYPE html>  
<html>  
  <head>  
    <title>App</title>  
    <meta charset="UTF-8" />  
    <script src="https://unpkg.com/vue/dist/vue.js"></script>  
    <script src="https://unpkg.com/vue-router/dist/vue-router.js"></script>  
  </head>  
  <body>  
    <div id="app">  
      <router-view></router-view>  
    </div>  
    <script src="src/index.js"></script>  
  </body>  
</html>

The code above has a global beforeEach guard to check if meta field with requiredAuth set to true .

Then if it is, we’ll check if localStorage.token exists, and then complete navigation if it’s present.

Otherwise, we cancel navigation of the current route and navigate to / .

In all other cases, we continue with the navigation.

Accessing Route Meta Field within Components

We can access the meta field in components using the $route.meta field.

For example, we can write the following to get the id meta field displayed in our template:

src/index.js :

const User = {  
  template: "<div>user {{$route.meta.id}}</div>"  
};

const routes = [  
  {  
    path: "/",  
    component: User,  
    meta: { id: 1 }  
  }  
];

const router = new VueRouter({  
  routes  
});

new Vue({  
  el: "#app",  
  router  
});

index.html :

<!DOCTYPE html>  
<html>  
  <head>  
    <title>App</title>  
    <meta charset="UTF-8" />  
    <script src="https://unpkg.com/vue/dist/vue.js"></script>  
    <script src="https://unpkg.com/vue-router/dist/vue-router.js"></script>  
  </head>  
  <body>  
    <div id="app">  
      <router-view></router-view>  
    </div>  
    <script src="src/index.js"></script>  
  </body>  
</html>

Then we should see user 1 displayed since we have $route.meta.id in our template.

Adding Transition Effect

We can apply transition effects to router-view the same way as any other component.

For example, we can apply per-route transition by writing the following:

src/index.js :

const Foo = {  
  template: `  
    <transition name="slide">  
      <div>foo</div>  
    </transition>  
  `  
};

const Bar = {  
  template: `  
    <transition name="fade">  
      <div>bar</div>  
    </transition>  
  `  
};

const routes = [  
  {  
    path: "/foo",  
    component: Foo  
  },  
  {  
    path: "/bar",  
    component: Bar  
  }  
];

const router = new VueRouter({  
  routes  
});

new Vue({  
  el: "#app",  
  router  
});

src/styles.css :

.fade-enter-active,  
.slide-enter-active {  
  transition: all 0.3s ease;  
}  
.fade-leave-active,  
.slide-leave-active {  
  transition: all 0.8s cubic-bezier(1, 0.5, 0.8, 1);  
}  
.fade-enter,  
.fade-leave-to,  
.slide-enter,  
.slide-leave-to {  
  transform: translateX(10px);  
  opacity: 0;  
}

index.html :

<!DOCTYPE html>  
<html>  
  <head>  
    <title>App</title>  
    <meta charset="UTF-8" />  
    <script src="https://unpkg.com/vue/dist/vue.js"></script>  
    <script src="https://unpkg.com/vue-router/dist/vue-router.js"></script>  
    <link href="src/styles.css" type="text/css" />  
  </head>  
  <body>  
    <div id="app">  
      <router-link to="foo">Foo</router-link>  
      <router-link to="bar">Bar</router-link>  
      <router-view></router-view>  
    </div>  
    <script src="src/index.js"></script>  
  </body>  
</html>

Then we see that there’s fade effect as we transition from one route to another by clicking the links.

We can then use different names for each route.

Route-Based Dynamic Transition

We can also do route based dynamic transitions by combining a watcher for $route and dynamically setting the transition name as follows:

src/index.js :

const Foo = {  
  template: ` 
    <transition name="slide">  
      <div>foo</div>  
    </transition>  
  `  
};

const Bar = {  
  template: `  
    <transition name="fade">  
      <div>bar</div>  
    </transition>  
  `  
};

const routes = [  
  {  
    path: "/foo",  
    component: Foo  
  },  
  {  
    path: "/bar",  
    component: Bar  
  }  
];

const router = new VueRouter({  
  routes  
});

new Vue({  
  el: "#app",  
  router,  
  data: {  
    transitionName: ""  
  },  
  watch: {  
    $route(to, from) {  
      this.transitionName = to.path === "/bar" ? "slide-right" : "slide-left";  
    }  
  }  
});

src/styles.css :

.slide-left-enter-active,  
.slide-right-enter-active {  
  transition: all 0.3s ease;  
}  
.slide-left-leave-active,  
.slide-right-leave-active {  
  transition: all 0.8s cubic-bezier(1, 0.5, 0.8, 1);  
}  
.slide-right-enter,  
.slide-right-leave-to {  
  transform: translateX(10px);  
  opacity: 0;  
}

.slide-left-enter,  
.slide-left-leave-to {  
  transform: translateX(-10px);  
  opacity: 0;  
}

index.html :

<!DOCTYPE html>  
<html>  
  <head>  
    <title>App</title>  
    <meta charset="UTF-8" />  
    <script src="https://unpkg.com/vue/dist/vue.js"></script>  
    <script src="https://unpkg.com/vue-router/dist/vue-router.js"></script>  
    <link href="src/styles.css" type="text/css" />  
  </head>  
  <body>  
    <div id="app">  
      <router-link to="foo">Foo</router-link>  
      <router-link to="bar">Bar</router-link>  
      <transition :name="transitionName">  
        <router-view></router-view>  
      </transition>  
    </div>  
    <script src="src/index.js"></script>  
  </body>  
</html>

Then when we click on Foo , bar fades away by sliding to the left. And when we click Bar , foo fades away by sliding to the right.

Global Before Guards

Router parameter or query changes won’t trigger enter or leave navigation guards.

We can watch the $route object or use the beforeRouteUpdate in-component guard to check those changes.

For other route changes, we can use navigation guards to run checks before navigating to a route.

The beforeEach method takes a callback as follows:

const router = new VueRouter({ ... })  
  
router.beforeEach((to, from, next) => {  
  // ...  
})

The 3 parameters are the following:

  • to — the target route object being navigated to
  • from — the current route that’s being navigated from
  • next — a function that’s called to resolve the hook

The next function takes one argument. It can take on several possible values.

If nothing is passed in, then we can navigate to the next route. If we pass in false , then the current navigation is aborted.

If we pass in '/' or { path: '/' } , then we redirect to the / route. The current navigation is aborted and a new one is started. We can also set the replace and name properties like as we do with router.push or router.replace .

We can also pass in an Error instance since Vue 2.4.0, then the navigation will be aborted and the error will be passed to callbacks registered via router.onError() .

We should only call next once in our guard.

For example, we can create a navigation guard to check navigation as follows:

src/index.js :

const Login = { template: "<div>login</div>" };  
const Profile = { template: "<div>profile</div>" };  
const routes = [  
  {  
    path: "/",  
    component: Login  
  },  
  {  
    path: "/profile",  
    component: Profile  
  }  
];

const router = new VueRouter({  
  routes  
});

router.beforeEach((to, from, next) => {  
  if (to.path === "/") {  
    return next();  
  } if (!localStorage.getItem("token")) {  
    next("/");  
  } else {  
    next();  
  }  
});

new Vue({  
  el: "#app",  
  router  
});

index.html :

<!DOCTYPE html>  
<html>  
  <head>  
    <title>App</title>  
    <meta charset="UTF-8" />  
    <script src="https://unpkg.com/vue/dist/vue.js"></script>  
    <script src="https://unpkg.com/vue-router/dist/vue-router.js"></script>  
  </head>  
  <body>  
    <div id="app">  
      <router-view></router-view>  
    </div>  
    <script src="src/index.js"></script>  
  </body>  
</html>

In the code above, our navigation guard first checks if we’re going to / , if we are, then we let them navigate to it.

Otherwise, we check if localStorage.token is defined. If it is, then we let them through. Otherwise, we go back to / .

Therefore, if localStorage.token is defined, then we can go to /#/profile and see profile displayed. Otherwise, we get redirected back to /#/ and see login.

Global Resolve Guards

Vue Router also has router.beforeResolve , which is similar to router.beforeEach but it’s called right before navigation is confirmed, and after all in-component guards and async route components are resolved.

Global After Hooks

We can also run code after navigation is done with the afterEach hook.

For example, we can use it as follows:

src/index.js :

const Foo = { template: "<div>foo</div>" };  
const Bar = { template: "<div>bar</div>" };  
const routes = [  
  {  
    path: "/",  
    component: Foo  
  },  
  {  
    path: "/bar",  
    component: Bar  
  }  
];

const router = new VueRouter({  
  routes  
});

router.afterEach((to, from) => {  
  alert(`Navigated to ${to.path}`);  
});  
new Vue({  
  el: "#app",  
  router  
});

index.html :

<!DOCTYPE html>  
<html>  
  <head>  
    <title>App</title>  
    <meta charset="UTF-8" />  
    <script src="https://unpkg.com/vue/dist/vue.js"></script>  
    <script src="https://unpkg.com/vue-router/dist/vue-router.js"></script>  
  </head>  
  <body>  
    <div id="app">  
      <router-view></router-view>  
    </div>  
    <script src="src/index.js"></script>  
  </body>  
</html>

Then we get an alert box that shows where we navigate to when we navigate.

Note that it doesn’t have the next function in the callback signature because it can’t go to the next route.

Per-Route Guard

We can also define navigation guards per route. For example, we can define it as follows:

src/index.js :

const Login = { template: "<div>login</div>" };  
const Profile = { template: "<div>profile</div>" };  
const routes = [  
  {  
    path: "/",  
    component: Login  
  },  
  {  
    path: "/profile",  
    component: Profile,  
    beforeEnter: (to, from, next) => {  
      if (!localStorage.getItem("token")) {  
        next("/");  
      } else {  
        next();  
      }  
    }  
  }  
];

const router = new VueRouter({  
  routes  
});

new Vue({  
  el: "#app",  
  router  
});

index.html :

<!DOCTYPE html>  
<html>  
  <head>  
    <title>App</title>  
    <meta charset="UTF-8" />  
    <script src="https://unpkg.com/vue/dist/vue.js"></script>  
    <script src="https://unpkg.com/vue-router/dist/vue-router.js"></script>  
  </head>  
  <body>  
    <div id="app">  
      <router-view></router-view>  
    </div>  
    <script src="src/index.js"></script>  
  </body>  
</html>

The beforeEnter hook for /profile checks if localStorage.token is defined. If it is, then we let them through. Otherwise, we go back to / .

Therefore, if localStorage.token is defined, then we can go to /#/profile and see profile displayed. Otherwise, we get redirected back to /#/ and see login.

The signature is the same as the global beforeEach callback.

Programmatic Navigation

We can navigate through routes programmatically in addition to using router-link to create a link to let users navigate through routes.

router.push(location, onComplete?, onAbort?)

To do this, we can use the $router instance available to a component to navigating routes programmatically.

router.push(…) is called when a router-link link is clicked. We can call it ourselves to programmatically navigate to routes.

For example, we can define routes and navigate through them programmatically as follows:

src/index.js :

const Foo = { template: "<p>foo</p>" };  
const Bar = { template: "<p>bar</p>" };

const routes = [  
  {  
    path: "/foo",  
    component: Foo  
  },  
  {  
    path: "/bar",  
    component: Bar  
  }  
];

const router = new VueRouter({  
  routes  
});

new Vue({  
  el: "#app",  
  router,  
  methods: {  
    goTo(route) {  
      this.$router.push(route);  
    }  
  }  
});

index.html :

<!DOCTYPE html>  
<html>  
  <head>  
    <title>App</title>  
    <meta charset="UTF-8" />  
    <script src="https://unpkg.com/vue/dist/vue.js"></script>  
    <script src="https://unpkg.com/vue-router/dist/vue-router.js"></script>  
  </head>  
  <body>  
    <div id="app">  
      <div>  
        <a href="#" @click='goTo("foo")'>Foo</a>  
        <a href="#" @click='goTo("bar")'>Bar</a>  
      </div>  
      <router-view></router-view>  
    </div>  
    <script src="src/index.js"></script>  
  </body>  
</html>

In the code above, we have the goTo method that takes a string for the route that we want to go to.

In the method, we call this.$router.push(route); to go to the route we want to reach.

So when we click on Foo we see foo , and when we click on Bar we see bar .

We can also pass in an object as follows:

this.$router.push({ path: route });

Also, we can go to named routes when $router.push . To do this, we write:

src/index.js :

const Foo = { template: "<p>foo</p>" };  
const Bar = { template: "<p>bar</p>" };

const routes = [  
  {  
    name: "foo",  
    path: "/foo",  
    component: Foo  
  },  
  {  
    name: "bar",  
    path: "/bar",  
    component: Bar  
  }  
];

const router = new VueRouter({  
  routes  
});

new Vue({  
  el: "#app",  
  router,  
  methods: {  
    goTo(name) {  
      this.$router.push({ name });  
    }  
  }  
});

index.html :

<!DOCTYPE html>  
<html>  
  <head>  
    <title>App</title>  
    <meta charset="UTF-8" />  
    <script src="https://unpkg.com/vue/dist/vue.js"></script>  
    <script src="https://unpkg.com/vue-router/dist/vue-router.js"></script>  
  </head>  
  <body>  
    <div id="app">  
      <div>  
        <a href="#" @click='goTo("foo")'>Foo</a>  
        <a href="#" @click='goTo("bar")'>Bar</a>  
      </div>  
      <router-view></router-view>  
    </div>  
    <script src="src/index.js"></script>  
  </body>  
</html>

In the code above, we defined named routes by adding the name property to our routes by writing:

const routes = [  
  {  
    name: "foo",  
    path: "/foo",  
    component: Foo  
  },  
  {  
    name: "bar",  
    path: "/bar",  
    component: Bar  
  }  
];

Then we can go to a route by name as follows in the goTo method:

this.$router.push({ name });

We can pass in route parameters as follows:

router.push({ name: 'user', params: { userId: '123' } })

The following won’t work:

router.push({ path: 'user', params: { userId: '123' } })

We can go to routes with query strings as follows:

router.push({ path: 'user', query: { userId: '123' } })

or:

router.push({ name: 'user', query: { userId: '123' } })

We can also go on a path with a route parameter as follows:

router.push({ path: `/user/123` });

For example, we can use them as follows:

const Foo = { template: "<p>foo {{$route.query.id}}</p>" };  
const Bar = { template: "<p>bar</p>" };

const routes = [  
  {  
    path: "/foo",  
    component: Foo  
  },  
  {  
    path: "/bar",  
    component: Bar  
  }  
];

const router = new VueRouter({  
  routes  
});

new Vue({  
  el: "#app",  
  router,  
  methods: {  
    goTo(path, query) {  
      this.$router.push({ path, query });  
    }  
  }  
});

Then we see foo 1 when we click on Foo since we take a query string with id as the key.

It’s the same as going to /#/foo?id=1 in the browser.

The same rules apply for the to property of the router-link component.

In Vue Router 2.2.0 or later, we can optionally provide a onComplete and onAbort callbacks to router.push or router.replace as the 2nd and 3rd arguments.

In Vue Router 3.1.0+. router.push and router.replace will return promises and we don’t need to pass in the 2nd and 3rd arguments to handle those cases.

If our destination is the same as the current route and only the parameters are changing, like /users/1 to /users/2 , then we have to use beforeRouteUpdate hook to react to changes.

router.replace(location, onComplete?, onAbort?)

router.replace acts like router.push except that no new history entry is added.

router.replace(…) is the same as <router-link :to=”…” replace> .

router.go(n)

We can use router.go to go forward or backward by passing in an integer for the number of steps to go forward or back. Negative is backward and positive is forward.

For example, we can use it as follows:

src/index.js :

const Foo = { template: "<p>foo</p>" };  
const Bar = { template: "<p>bar</p>" };

const routes = [  
  {  
    path: "/foo",  
    component: Foo  
  },  
  {  
    path: "/bar",  
    component: Bar  
  }  
];

const router = new VueRouter({  
  routes  
});

new Vue({  
  el: "#app",  
  router,  
  methods: {  
    forward() {  
      this.$router.go(-1);  
    },  
    back() {  
      this.$router.go(1);  
    }  
  }  
});

index.html :

<!DOCTYPE html>  
<html>  
  <head>  
    <title>App</title>  
    <meta charset="UTF-8" />  
    <script src="https://unpkg.com/vue/dist/vue.js"></script>  
    <script src="https://unpkg.com/vue-router/dist/vue-router.js"></script>  
  </head>  
  <body>  
    <div id="app">  
      <div>  
        <router-link to="foo">Foo</router-link>  
        <router-link to="bar">Bar</router-link>  
        <a href="#" @click="forward">Forward</a>  
        <a href="#" @click="back">Back</a>  
      </div>  
      <router-view></router-view>  
    </div>  
    <script src="src/index.js"></script>  
  </body>  
</html>

We have to forward and back methods to go forward and backward respectively.

router.go will fail silently if no such history record exists.

Nested Routes

We need nested routes to organize routes where components are nested multiple levels deep.

For example, we have to find a way to organize routes like:

/user/bar/profile                       
/user/bar/posts

into one coherent place.

Defining Nested Routes

We can define nested routes by adding a children array in the route entry, and then in the parent route’s template we have to add router-view to display the children routes.

For example, we can write the following:

src/index.js :

const Profile = { template: "<p>{{$route.params.user}}'s profile</p>" };  
const Posts = { template: "<p>{{$route.params.user}}'s posts</p>" };  
const User = {  
  template: `  
    <div>  
      <p>user - {{$route.params.user}}</p>  
      <router-view></router-view>  
    </div>  
`  
};  
const routes = [  
  {  
    path: "/user/:user",  
    component: User,  
    children: [  
      { path: "posts", component: Posts },  
      { path: "profile", component: Profile }  
    ]  
  }  
];

const router = new VueRouter({  
  routes  
});

new Vue({  
  el: "#app",  
  router  
});

index.html :

<!DOCTYPE html>  
<html>  
  <head>  
    <title>App</title>  
    <meta charset="UTF-8" />  
    <script src="https://unpkg.com/vue/dist/vue.js"></script>  
    <script src="https://unpkg.com/vue-router/dist/vue-router.js"></script>  
  </head>  
  <body>  
    <div id="app">  
      <div>  
        <router-link to="/user/foo">Foo User</router-link>  
        <router-link to="/user/foo/posts">Foo Post</router-link>  
        <router-link to="/user/foo/profile">Foo Profile</router-link>  
      </div>  
      <router-view></router-view>  
    </div>  
    <script src="src/index.js"></script>  
  </body>  
</html>

In the code above, we have:

const routes = [  
  {  
    path: "/user/:user",  
    component: User,  
    children: [  
      { path: "posts", component: Posts },  
      { path: "profile", component: Profile }  
    ]  
  }  
];

to define the child routes.

The Posts and Profile components are like any component we defined as usual.

However, the User component has the router-view to display them content of the Posts and Profile components.

In the template, we have 3 router links to go to the root and child routes:

<router-link to="/user/foo">Foo User</router-link>  
<router-link to="/user/foo/posts">Foo Post</router-link>  
<router-link to="/user/foo/profile">Foo Profile</router-link>

Then we should see:

Foo User Foo Post Foo Profile  
user - foofoo's posts

when we go to /#/user/foo/posts or click on Foo Post .

And we should see:

Foo User Foo Post Foo Profileuser - foofoo's profile

when we go to /#/user/foo/profile or click on Foo Profile.

When we go to /#/user/foo or click on Foo User , we see:

Foo User Foo Post Foo Profileuser - foo

Any nested path that starts with / will be treated as the root path. This lets us use component nesting without having to use a nested URL.

Also, the parent and child routes all have access to the same route parameters.

For example, we can add a UserHome component and a route for it to the example above as follows:

src/index.js :

const Profile = { template: "<p>{{$route.params.user}}'s profile</p>" };  
const Posts = { template: "<p>{{$route.params.user}}'s posts</p>" };  
const UserHome = { template: "<p>{{$route.params.user}} home</p>" };  
const User = {  
  template: `  
    <div>  
      <p>user - {{$route.params.user}}</p>  
      <router-view></router-view>  
    </div>`  
};  
const routes = [  
  {  
    path: "/user/:user",  
    component: User,  
    children: [  
      { path: "", component: UserHome },  
      { path: "posts", component: Posts },  
      { path: "profile", component: Profile }  
    ]  
  }  
];

const router = new VueRouter({  
  routes  
});

new Vue({  
  el: "#app",  
  router  
});

index.html :

<!DOCTYPE html>  
<html>  
  <head>  
    <title>App</title>  
    <meta charset="UTF-8" />  
    <script src="https://unpkg.com/vue/dist/vue.js"></script>  
    <script src="https://unpkg.com/vue-router/dist/vue-router.js"></script>  
  </head>  
  <body>  
    <div id="app">  
      <div>  
        <router-link to="/user/foo">Foo User</router-link>  
        <router-link to="/user/foo/posts">Foo Post</router-link>  
        <router-link to="/user/foo/profile">Foo Profile</router-link>  
      </div>  
      <router-view></router-view>  
    </div>  
    <script src="src/index.js"></script>  
  </body>  
</html>

Now when we go to /user/foo or click on Foo User , we see:

Foo User Foo Post Foo Profileuser - foofoo home

Everything else remains the same.

Per-Route Guard

We can also define navigation guards per route. For example, we can define it as follows:

src/index.js :

const Login = { template: "<div>login</div>" };  
const Profile = { template: "<div>profile</div>" };  
const routes = [  
  {  
    path: "/",  
    component: Login  
  },  
  {  
    path: "/profile",  
    component: Profile,  
    beforeEnter: (to, from, next) => {  
      if (!localStorage.getItem("token")) {  
        next("/");  
      } else {  
        next();  
      }  
    }  
  }  
];

const router = new VueRouter({  
  routes  
});

new Vue({  
  el: "#app",  
  router  
});

index.html :

<!DOCTYPE html>  
<html>  
  <head>  
    <title>App</title>  
    <meta charset="UTF-8" />  
    <script src="https://unpkg.com/vue/dist/vue.js"></script>  
    <script src="https://unpkg.com/vue-router/dist/vue-router.js"></script>  
  </head>  
  <body>  
    <div id="app">  
      <router-view></router-view>  
    </div>  
    <script src="src/index.js"></script>  
  </body>  
</html>

The beforeEnter hook for /profile checks if localStorage.token is defined. If it is, then we let them through. Otherwise, we go back to / .

Therefore, if localStorage.token is defined, then we can go to /#/profile and see profile displayed. Otherwise, we get redirected back to /#/ and see login.

The signature is the same as the global beforeEach callback.

In-Component Guards

We can define navigation guards inside a component, the hooks are the following:

  • beforeRouteEnter
  • beforeRouteUpdate
  • beforeRouteLeave

For example, we can use them as follows:

beforeRouteEnter

If we want to check if a token is present before proceeding to a route, we can write some like the following code:

src/index.js :

const Login = { template: "<div>login</div>" };  
const Profile = {  
  data() {  
    return { user: "foo" };  
  },  
  template: "<div>profile</div>",  
  beforeRouteEnter(to, from, next) {  
    if (!localStorage.getItem("token")) {  
      return next("/");  
    }  
    next(vm => {  
      alert(\`You're logged in as ${vm.user}`);  
    });  
  }  
};  
const routes = [  
  {  
    path: "/",  
    component: Login  
  },  
  {  
    path: "/profile",  
    component: Profile  
  }  
];

const router = new VueRouter({  
  routes  
});

new Vue({  
  el: "#app",  
  router  
});

index.html :

<!DOCTYPE html>  
<html>  
  <head>  
    <title>App</title>  
    <meta charset="UTF-8" />  
    <script src="https://unpkg.com/vue/dist/vue.js"></script>  
    <script src="https://unpkg.com/vue-router/dist/vue-router.js"></script>  
  </head>  
  <body>  
    <div id="app">  
      <router-view></router-view>  
    </div>  
    <script src="src/index.js"></script>  
  </body>  
</html>

In the code above, we have the beforeRouteEnter hook to check if the token is present in local storage. If it is then, we proceed. Otherwise, we go back to / .

If we proceed, then next is called with a callback with vm , which is the component object as the parameter. Therefore, we can get the user property from vm in the next callback.

In the end, we should see ‘You’re logged in as foo’ alert box displayed if a localStorage.token is defined.

Only beforeRouteEnter accepts a callback for next since the component isn’t available before navigation is done.

beforeRouteUpdate

We can use beforeRouteUpdate as follows:

src/index.js :

const Profile = {  
  data() {  
    return {  
      id: undefined  
    };  
  },  
  template: "<div>id: {{id}}</div>",  
  beforeRouteUpdate(to, from, next) {  
    this.id = to.params.id;  
    next();  
  }  
};  
const routes = [  
  {  
    path: "/profile/:id",  
    component: Profile  
  }  
];

const router = new VueRouter({  
  routes  
});

new Vue({  
  el: "#app",  
  router  
});

index.html :

<!DOCTYPE html>  
<html>  
  <head>  
    <title>App</title>  
    <meta charset="UTF-8" />  
    <script src="https://unpkg.com/vue/dist/vue.js"></script>  
    <script src="https://unpkg.com/vue-router/dist/vue-router.js"></script>  
  </head>  
  <body>  
    <div id="app">  
      <router-view></router-view>  
    </div>  
    <script src="src/index.js"></script>  
  </body>  
</html>

Then when we go /#/profile/1 , then /#/profile/2 , we’ll see id: 2 displayed.

beforeRouteUpdate watches for route updates, so it does nothing when the route first loads.

beforeRouteLeave

We can use beforeRouteLeave to run code before a user navigates away from a route.

For example, we can use it as follows:

src/index.js :

const Profile = {  
  template: "<div>profile</div>",  
  beforeRouteLeave(to, from, next) {  
    const answer = window.confirm("Are you sure you want to leave?");  
    if (answer) {  
      next();  
    } else {  
      next(false);  
    }  
  }  
};  
const routes = [  
  {  
    path: "/profile",  
    component: Profile  
  }  
];

const router = new VueRouter({  
  routes  
});

new Vue({  
  el: "#app",  
  router  
});

index.html:

<!DOCTYPE html>  
<html>  
  <head>  
    <title>App</title>  
    <meta charset="UTF-8" />  
    <script src="https://unpkg.com/vue/dist/vue.js"></script>  
    <script src="https://unpkg.com/vue-router/dist/vue-router.js"></script>  
  </head>  
  <body>  
    <div id="app">  
      <router-view></router-view>  
    </div>  
    <script src="src/index.js"></script>  
  </body>  
</html>

In the code above, we have the beforeRouteLeave hook that runs before a user tries to leave a route.

We have:

const answer = window.confirm("Are you sure you want to leave?");

to ask the user if he wants to leave. If he clicks OK, then the navigation will continue by calling next() . Otherwise, next(false) is called and navigation is canceled.

Full Navigation Resolution Flow

The full flow for navigation resolution is as follows:

  1. navigation triggered
  2. beforeRouteLeave called
  3. global beforeEach guard called
  4. beforeRouterUpdate in component called
  5. beforeEnter in route configs called
  6. resolve async route components
  7. beforeEnter in activated components called
  8. global beforeResolve guards called
  9. navigation confirmed
  10. global afterEach hooks called
  11. DOM updates triggered
  12. callbacks passed to next in beforeRouteEnter called

Data Fetching

We sometimes have to fetch data from the server when a route is activated. For example, we may want to fetch user data when a route is loaded.

With Vue Router, we can fetch data after navigation or before.

When we fetch data after navigation, we perform the navigation first, then fetch data in the component’s lifecycle hook and display a loading state while data is being fetched.

When we fetch data before navigation, we fetch the data as the route enters a navigation guard, then perform the navigation after data is fetched.

Fetching After Navigation

We can fetch data after navigation by navigation and render the component first, the fetch the data in the component’s created hook.

This gives us the opportunity to display a loading state while the data is being fetched and we can also handle loading differently in each view.

For example, we load data after navigation as follows:

src/index.js :

const User = {  
  data() {  
    return {  
      user: {}  
    };  
  },  
  created() {  
    this.fetchData();  
  },  
  watch: {  
    $route: "fetchData"  
  },  
  methods: {  
    async fetchData() {  
      this.user = await Promise.resolve({ id: this.$route.params.id });  
    }  
  },  
  template: `      
    <div>user: {{user.id}}</div>      
  `  
};

const routes = [  
  {  
    path: "/:id",  
    component: User  
  }  
];

const router = new VueRouter({  
  routes  
});

new Vue({  
  el: "#app",  
  router  
});

index.html :

<!DOCTYPE html>  
<html>  
  <head>  
    <title>App</title>  
    <meta charset="UTF-8" />  
    <script src="https://unpkg.com/vue/dist/vue.js"></script>  
    <script src="https://unpkg.com/vue-router/dist/vue-router.js"></script>  
  </head>  
  <body>  
    <div id="app">  
      <router-view></router-view>  
    </div>  
    <script src="src/index.js"></script>  
  </body>  
</html>

In the code above, we have the User component that has the fetchData to fetch data by resolving a promise and setting the result to this.user . This is done each time the $route object changes.

So when we go to /#/1 , we get user: 1 , and when we go to /#/2 , we get user: 2 .

We can add a loading state to fetchData as follows:

const User = {  
  data() {  
    return {  
      user: {},  
      loading: true  
    };  
  },  
  created() {  
    this.fetchData();  
  },  
  watch: {  
    $route: "fetchData"  
  },  
  methods: {  
    async fetchData() {  
      this.loading = true;  
      this.user = await Promise.resolve({ id: this.$route.params.id });  
      this.loading = false;  
    }  
  },  
  template: `    
    <div>    
      <div v-if='!loading'>user: {{user.id}}</div>      
      <div v-if='loading'>Loading</div>  
    </div>  
  `  
};

const routes = [  
  {  
    path: "/:id",  
    component: User  
  }  
];

const router = new VueRouter({  
  routes  
});

new Vue({  
  el: "#app",  
  router  
});

Then when the data loads in fetchData , we have this.loading set to true . Otherwise, it’s set to false .

Fetching Before Navigation

we can fetch data before navigating to a new route by using the beforeRouteEnter hook.

Then in the next hook, we can pass in a callback that calls a method in our component to set the data.

For example, we can write the following code to do that:

src/index.js :

const User = {  
  data() {  
    return {  
      user: {},  
      loading: true  
    };  
  },  
  async beforeRouteEnter(to, from, next) {  
    const user = await Promise.resolve({ id: to.params.id });  
    next(vm => vm.setUser(user));  
  },  
  async beforeRouteUpdate(to, from, next) {  
    const user = await Promise.resolve({ id: to.params.id });  
    this.setUser(user);  
    next();  
  },  
  methods: {  
    setUser(user) {  
      this.loading = true;  
      this.user = user;  
      this.loading = false;  
    }  
  },  
  template: `    
    <div>    
      <div v-if='!loading'>user: {{user.id}}</div>      
      <div v-if='loading'>Loading</div>  
    </div>  
  `  
};

const routes = [  
  {  
    path: "/:id",  
    component: User  
  }  
];

const router = new VueRouter({  
  routes  
});

new Vue({  
  el: "#app",  
  router  
});

index.html :

<!DOCTYPE html>  
<html>  
  <head>  
    <title>App</title>  
    <meta charset="UTF-8" />  
    <script src="https://unpkg.com/vue/dist/vue.js"></script>  
    <script src="https://unpkg.com/vue-router/dist/vue-router.js"></script>  
  </head>  
  <body>  
    <div id="app">  
      <router-view></router-view>  
    </div>  
    <script src="src/index.js"></script>  
  </body>  
</html>

In the code above, the beforeRouteEnter hook loads the data before the component is fully loaded, so we have to call next(vm => vm.setUser(user)); to set data.user . vm is the component instance, so the setUser method is a property of vm .

When the route parameter updates, beforeRouteUpdate will be called. We can get the data and call this.setUser directly since the component is already loaded.

Then when we go to /#/1 , we get user: 1 , and when we go to /#/2 , we get user: 2 .

It’s also a good idea to display a progress bar or some kind of indicator while data is loading.

Conclusion

Vue Router is the choice for routing for a Vue app.

It supports many common features like route parameters, route guards, nested routes, and more.

Integration with Vue is solid since it’s made by the same team.

Categories
JavaScript Mega-Guides Vue

Vue.js Mega-Guide

Vue.js is an easy to use web app framework that we can use to develop interactive front end apps.

In this article, we’ll look at the basics of building a Vue app.

Script Tag

We can include the Vue.js framework with a script tag.

To do this we can write:

<script src='https://vuejs.org/js/vue.js'></script>

before our app code loads. The URL above has the development version, which has all the warnings but it’s not minified.

To include the production version, we can write:

<script src='https://vuejs.org/js/vue.min.js'></script>

To fix the version to 2.6.11, we can write:

<script src="https://cdn.jsdelivr.net/npm/vue@2.6.11"></script>

We can also import the module in our browser if we don’t need to support Internet Explorer as follows:

<script type="module">     
  import Vue from 'https://cdn.jsdelivr.net/npm/vue@2.6.11/dist/vue.esm.browser.js' 
</script>

The vue.esm.browser.js file is already optimized for browsers so it can be used without creating too many requests.

Example

To create our first app, we can create the index.html file as follows:

<!DOCTYPE html>  
<html>  
  <head>  
    <title>Parcel Sandbox</title>  
    <meta charset="UTF-8" />  
    <script src="https://vuejs.org/js/vue.js"></script>  
  </head> <body>  
    <div id="app"></div>  
    <script src="./src/index.js"></script>  
  </body>  
</html>

Then in src/index.js , we can add:

new Vue({  
  template: "<div>{{ 'hello' }}</div>",  
  el: "#app"  
});

Then we should see hello on the screen, since we have a div with the ID app , which is used by Vue.js to render our Vue instance.

The Vue.js compiler is responsible for converting the template into HTML.

In the template above, 'hello' is a JavaScript string, which was converted to HTML text when the Vue compiler runs.

We specified that the template has a div with the text 'hello' in it.

Different Builds of the Vue.js Framework

There are several different builds of the Vue.js framework. They’re:

  • Full — Builds that have the compiler and the runtime. That’s the one we used in the example above.
  • Compiler — Code that’s responsible for compiling template strings into JavaScript render functions
  • Runtime — Code that’s responsible for creating Vue instances, rendering and updating virtual DOM, etc.
  • UMD — A module that can be directly included with a script tag. It includes the runtime and the compiler
  • CommonJS — A module that can be used with older bundlers like Browserify or Webpack 1.
  • ES Module — New to version 2.6. It can be used directly by browsers via <script type='module'> or be used with bundlers like Webpack 2 or Rollup.

Runtime and Compiler

The runtime is used for creating the Vue instance via new Vue .

The compiler is for compiling templates specified by the template option.

This means that:

new Vue({  
  template: "<div>{{ 'hello' }}</div>",  
  el: "#app"  
});

needs the compiler and:

new Vue({  
  el: "#app",  
  render(h) {  
    return h("div", "hello");  
  }  
});

doesn’t.

Template syntax will be much more convenient when our apps get more complex.

When we’re using vue-loader or vueify , templates inside .vue files are precompiled into JavaScript, so we don’t need the compiler in the final bundle.

When we don’t need to use the compiler, then we should use the runtime only build since it’s 30% smaller.

We can include different builds depending on the bundler that we’re using. For example, in Parcel, we can write:

"alias": {       
  "vue" : "./node_modules/vue/dist/vue.common.js"     
}

in package.json .

Vue CLI

We can Vue-CLI automatically create our app and build it so we don’t have to worry about which bundles to choose.

To install it, we can run:

npm install -g @vue/cli

or:

yarn global add @vue/cli

We can then create a project with it by running:

vue create project

or run:

vue ui

to show the GUI to let us create a Vue project in our browser.

Also, we can run the Vue CLI directly with npx by running:

npx vue create project

Running vue create will present us with a wizard with various options like:

Vue CLI v3.11.0  
┌───────────────────────────┐  
│  Update available: 4.1.2  │  
└───────────────────────────┘  
? Please pick a preset: Manually select features  
? Check the features needed for your project: (Press <space> to select, <a> to toggle all, <i> to invert selection)  
>(*) Babel  
 ( ) TypeScript  
 ( ) Progressive Web App (PWA) Support  
 ( ) Router  
 ( ) Vuex  
 ( ) CSS Pre-processors  
 (*) Linter / Formatter  
 ( ) Unit Testing  
 ( ) E2E Testing

This screen is presented when we choose Manually Select Features . We can choose Default if we don’t want to choose anything from this screen.

To run the Vue UI, we can run:

npx vue ui

Then our browser will automatically go to http://localhost:8000/project/select, where we see a Create link to create a project.

We can then create a project by clicking Create a new project here once we clicked on the Create tab.

Characteristics of the Vue Instance

Each Vue.js app begins by defining a new Vue instance. The Vue constructor takes an options object that takes various properties.

We often use vm to refer to a Vue instance, where vm stands for ViewModel.

A Vue app roughly follows the Model-View-ViewModel pattern, where the ViewModel has the business logic of the app, View has the markup that users see, and Model has the data.

For example, we can define a Vue instance as follows:

const vm = new Vue({ });

Each Vue app consists of a root Vue instance and it’s created with new Vue . We can organize it in a tree for easier maintenance.

Data and Methods

The options object that pass into the Vue constructor can have data and methods.

For example, if we define a Vue instance as follows:

const vm = new Vue({  
  el: "#app",  
  data: { foo: "bar" }  
});

Then when we add:

console.log(vm.foo);

below our vm definition, we get 'bar' since data.foo has the value 'bar' .

In other words, if we have:

const data = { foo: "bar" };  
const vm = new Vue({  
  el: "#app",  
  data  
});  
console.log(vm.foo === data.foo);

Then the console.log will log true .

When the data changes, the app will re-render with the new data.

If we create a new property in vm and set it as follows:

let data = { foo: "bar" };  
const vm = new Vue({  
  el: "#app",  
  data  
});  
vm.a = 1;

The app won’t re-render. On the other hand, if we write:

let data = { foo: "bar", a: 1 };  
const vm = new Vue({  
  el: "#app",  
  data  
});

Then the app will re-render. This means that we have to put our data that we want to render in the data field.

If we freeze the object that we pass to data with Object.freeze() , then the Vue app won’t re-render since properties can’t be changed, so new changes can’t propagate since they aren’t set in the object.

So if we have:

let data = { foo: "bar", a: 1 };  
Object.freeze(data);  
const vm = new Vue({  
  el: "#app",  
  data  
});

No changes can be made after the initial render since we froze data with Object.freeze .

The Vue instance also exposes a number of instance properties and methods.

They’re prefixed with the $ so that we know they’re part of the Vue instance.

$el

We have the $el property to get the DOM element that the Vue instance resides in.

For example, if we have:

let data = { foo: "bar" };  
const vm = new Vue({  
  el: "#app",  
  data  
});

console.log(vm.$el === document.getElementById("app"));

Then the console.log will log true since our Vue instance resides in an element with ID app .

$data

The $data property will get us the value of the data property that we set in the options object that we passed into the Vue constructor.

So if we have:

let data = { foo: "bar" };  
const vm = new Vue({  
  el: "#app",  
  data  
});

console.log(vm.$data === data);

Then we get true from the console.log since data references the same object as vm.$data since we set it as the value of the data property of the options object that we passed into the Vue constructor.

$watch

$watch is an instance method that lets us watch for changes in the data object that we set as the value of the options object.

For example, if we have:

let data = { foo: "bar" };  
const vm = new Vue({  
  el: "#app",  
  data  
});

vm.$watch("foo", (newValue, oldValue) => {  
  console.log(newValue, oldValue);  
});

in src/index.js and:

<!DOCTYPE html>  
<html>  
  <head>  
    <title>Hello</title>  
    <meta charset="UTF-8" />  
    <script src="https://cdn.jsdelivr.net/npm/vue/dist/vue.js"></script>  
  </head> <body>  
    <div id="app">  
      <input type="text" v-model="foo" />  
    </div>  
    <script src="./src/index.js"></script>  
  </body>  
</html>

in index.html . Then when we type in something to the input box, we should get some console.log output from:

vm.$watch("foo", (newValue, oldValue) => {  
  console.log(newValue, oldValue);  
});

This is because changes are constantly being watched in the data.foo property. v-model automatically updates the value for foo as we type into the box.

So as we’re typing, the changes to foo are being watched and it’s logged by the handler function that we passed into the $watch method.

Vue Instance Lifecycle Hooks

Each Vue instance goes through a lifecycle. The lifecycle events can be handled with functions, which are the lifecycle hooks.

For example, when a Vue instance is created, the created hook is called.

We can handle the created event emitted by Vue.js as follows:

new Vue({  
  data: {  
    foo: "bar"  
  },  
  created() {  
    console.log(`foo is ${this.foo}`);  
  }  
});

Then we should see foo is bar from the console.log . Once the Vue instance is created and the initial data is set, the created hook is called.

This is why we see such output from the console.log .

Note that we can’t use arrow functions for lifecycle hooks since we reference the properties from this , which is the Vue instance.

There’re also other lifecycle hooks like mounted , updated , destroyed .

Lifecycle Diagram

The full lifecycle diagram is below. It outlines the whole workflow for creating a new Vue instance.

The red rounded rectangles have the hooks that are called.

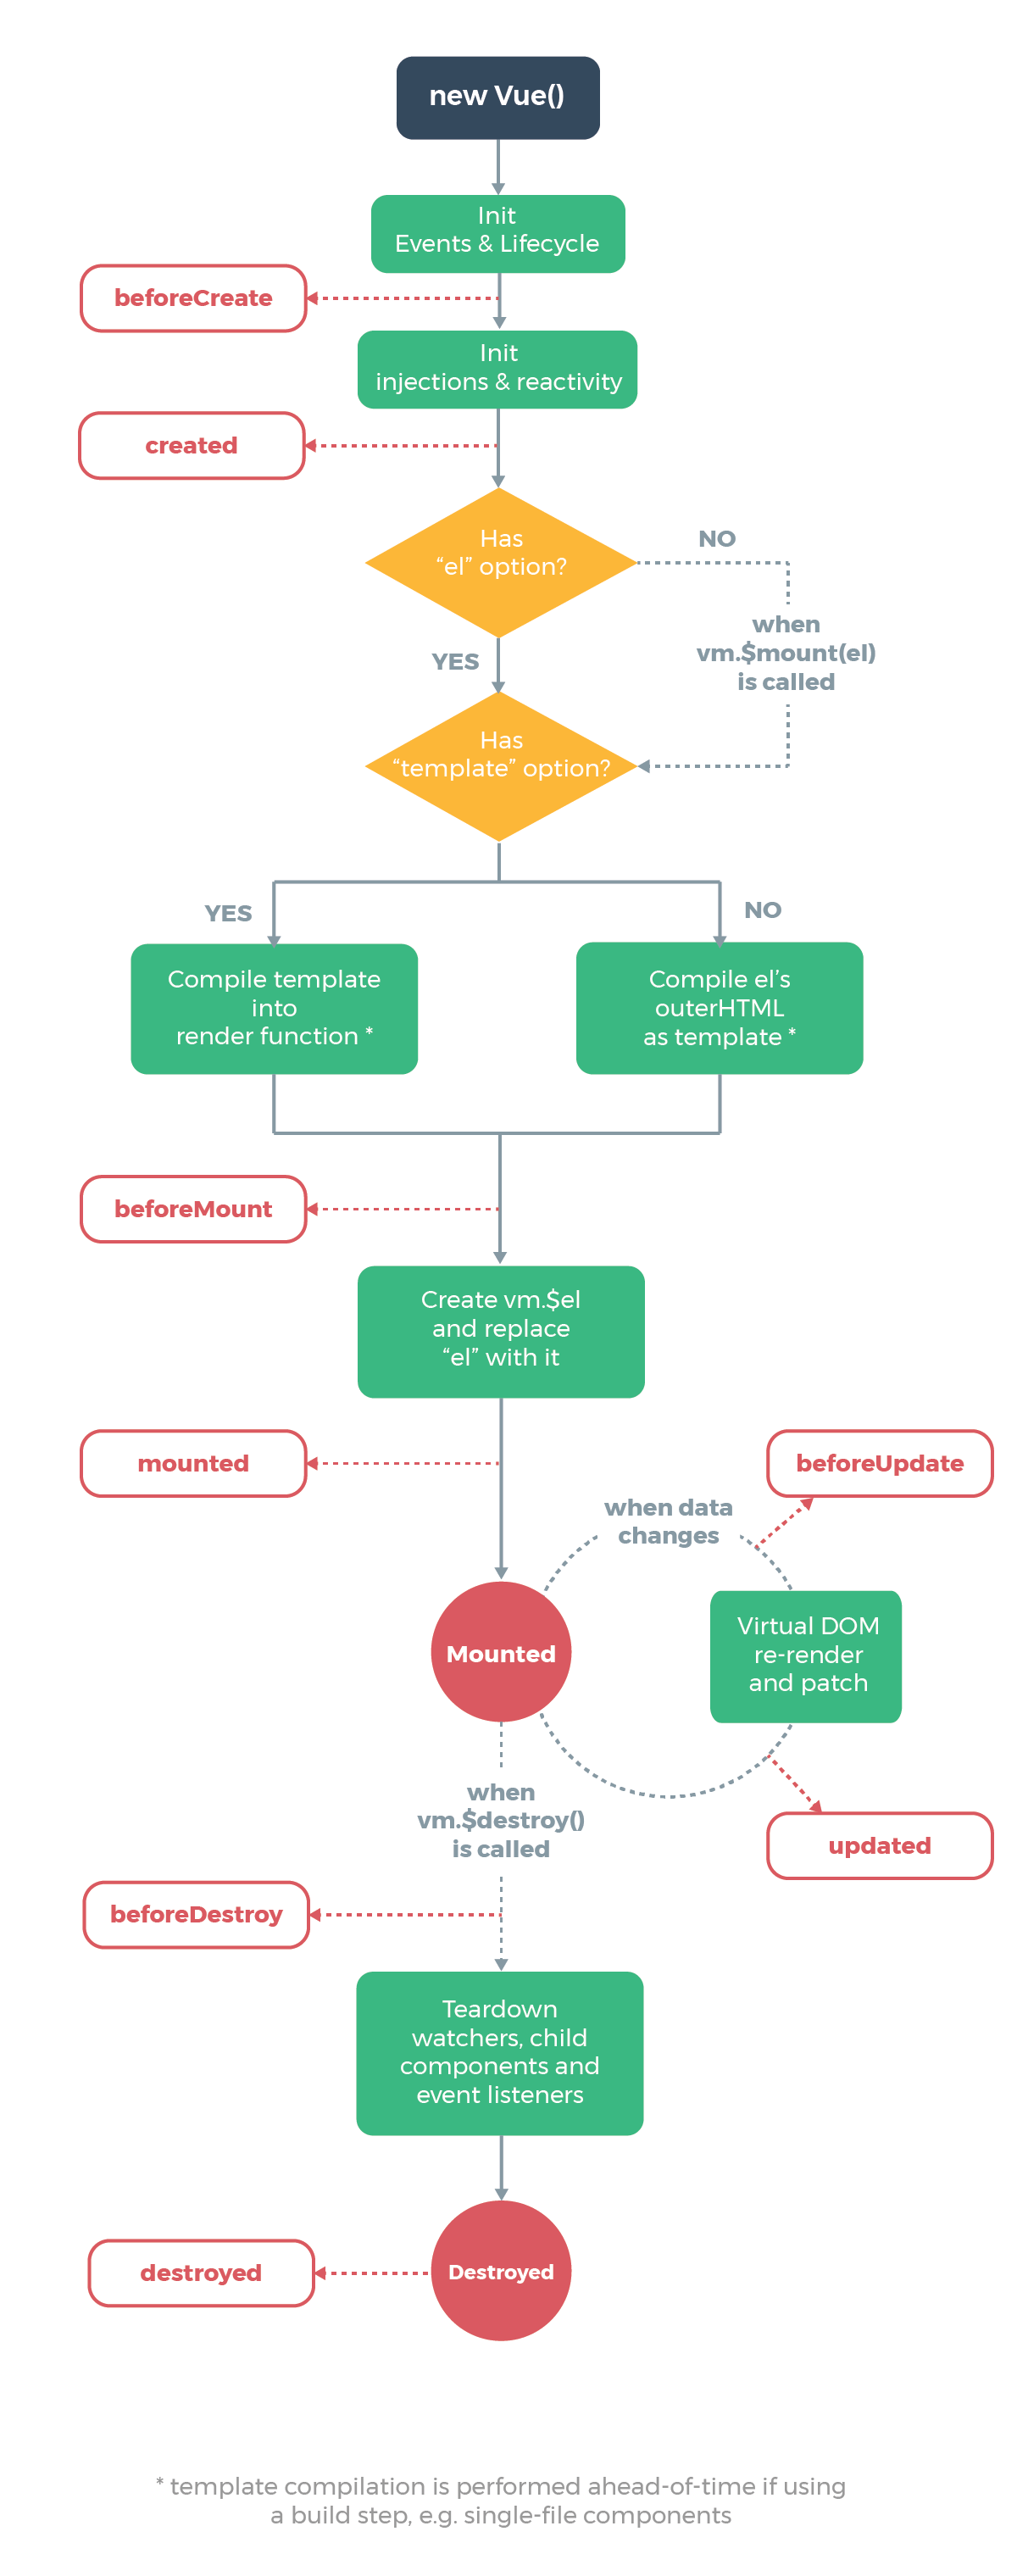
Courtesy of vuejs.org

Creation Hooks

Creation hooks are called when the Vue instance begins its initialization process. It lets us do things before the Vue instance is added to the DOM.

This hook is also run during server-side rendering

We don’t have access to this.$el (the target mounting element) or the DOM within this hook since no DOM manipulation is done at this point.

beforeCreate

The beforeCreate hook runs during initialization. data has been made reactive and events aren’t set up yet.

For example, if we have:

new Vue({  
  data: {  
    foo: "bar"  
  },  
  beforeCreate() {  
    console.log("beforeCreated called");  
  },  
  created() {  
    console.log(`foo is ${this.foo}`);  
  }  
});

Then we see:

beforeCreated called  
foo is bar

which confirms that beforeCreate is called before created .

created

data and events are available in the created hook since the Vue instance has been initialized.

For example, if we write:

new Vue({  
  data: {  
    foo: "bar"  
  },  
  created() {  
    this.foo = "baz";  
    console.log(`foo is ${this.foo}`);  
  }  
});

Then we get:

foo is baz

since we changed the value of this.foo in the created hook before logging its value.

Mounting Hooks

The mounting hooks are run when DOM manipulation is being done, including mounting the Vue instance to the specified element.

We can use it to access or modify the DOM of our component.

beforeMount

The beforeMount hook runs before the initial render happens and after the template or render functions are compiled.

It doesn’t get called during server-side rendering.

For instance, if we write:

new Vue({  
  el: "#app",  
  data: {  
    foo: "bar"  
  },  
  created() {  
    console.log(`created called`);  
  },  
  beforeMount() {  
    console.log(`beforeMount called`);  
  }  
});

Then we get:

created called  
beforeMount called

mounted

When the mounted hook is called, we have access to the component, template, and the DOM.

It’s used frequently for the initialization of our own data like fetching data over the network and integrate non-Vue libraries.

For example, if we have the following in src/index.js:

new Vue({  
  el: "#app",  
  data: {  
    foo: "bar"  
  },  
  beforeMount() {  
    console.log(this.$el.textContent);  
  }  
});

and the following in index.html :

<!DOCTYPE html>  
<html>  
  <head>  
    <title>Hello</title>  
    <meta charset="UTF-8" />  
    <script src="https://cdn.jsdelivr.net/npm/vue/dist/vue.js"></script>  
  </head> 
  <body>  
    <div id="app">foo</div>  
    <script src="./src/index.js"></script>  
  </body>  
</html>

Then we get foo logged since we have foo in the div with ID app .

Updating Hooks

Updating hooks are called when a reactive property used by our component changes or we some triggers re-rendering manually.

They’re useful for checking when a component is re-rendering.

However, we should use computed properties or watchers to track reactive property changes.

beforeUpdate

beforeUpdate runs after data changes in our component, right before the DOM is updated and re-rendered.

It lets us get the new state before the DOM is re-rendered.

For example, if we have the following in src/index.html :

new Vue({  
  el: "#app",  
  data: {  
    foo: "bar"  
  },  
  beforeUpdate() {  
    console.log(this.foo);  
  },  
  methods: {  
    toggle() {  
      this.foo = this.foo === "bar" ? "baz" : "bar";  
    }  
  }  
});

and the following in index.html :

<!DOCTYPE html>  
<html>  
  <head>  
    <title>Hello</title>  
    <meta charset="UTF-8" />  
    <script src="https://cdn.jsdelivr.net/npm/vue/dist/vue.js"></script>  
  </head> <body>  
    <div id="app">  
      <p>{{foo}}</p>  
      <button @click="toggle">Toggle</button>  
    </div>  
    <script src="./src/index.js"></script>  
  </body>  
</html>

Then when we click the Toggle button, we can see the value changes logged in the console.log call of the beforeUpdate method.

updated

The updated hook runs after data changes on our Vue instance and the DOM re-renders.

For example, if we have the following in src/index.js:

new Vue({  
  el: "#app",  
  data: {  
    foo: "bar"  
  },  
  updated() {  
    console.log(this.$refs.foo.textContent);  
  },  
  methods: {  
    toggle() {  
      this.foo = this.foo === "bar" ? "baz" : "bar";  
    }  
  }  
});

and the following in index.html :

<!DOCTYPE html>  
<html>  
  <head>  
    <title>Hello</title>  
    <meta charset="UTF-8" />  
    <script src="https://cdn.jsdelivr.net/npm/vue/dist/vue.js"></script>  
  </head> <body>  
    <div id="app">  
      <p ref="foo">{{foo}}</p>  
      <button @click="toggle">Toggle</button>  
    </div>  
    <script src="./src/index.js"></script>  
  </body>  
</html>

Then we can get the text content of the p element with ref set to foo by logging the value as follows:

console.log(this.$refs.foo.textContent);

in the updated hook and we can see the new value for it as we click the Toggle button.

Destruction Hooks

These hooks are run when the Vue instance is destroyed. Therefore, we can run clean up code in there.

These hooks aren’t run during server-side rendering.

beforeDestroy

beforeDestroy is run before teardown. Our Vue instance is still present and functional.

Therefore, we can run our clean up code in here.

For example, we can use it as follows:

new Vue({  
  el: "#app",  
  data: {  
    foo: "bar"  
  },  
  beforeDestroy() {  
    this.foo = null;  
  }  
});

destroyed

This is called after the Vue instance is destroyed. All the directives are unbound, event listeners are removed and child Vue instances are destroyed.

For example, we can use it as follows:

new Vue({  
  el: "#app",  
  data: {  
    foo: "bar"  
  },  
  destroyed() {  
    this.foo = null;  
  }  
});

Templates

Vue templates let us bind data to the DOM.

Vue compiles the template into Virtual DOM render functions. It can figure out the minimal number of components to re-render and minimize DOM manipulation when data changes.

Interpolations

The most basic form of data binding is text interpolation with double curly braces.

For example, we can write:

<p>{{foo}}</p>

To show the value of foo from a Vue instance or component.

The code above will be updated when foo updates.

We can keep it from updating after the first render by using the v-once directive as follows:

<p v-once>{{foo}}</p>

Raw HTML

We can also put raw HTML into an element with the v-html directive.

This lets us add HTML elements and formatting into an element.

For example, if we have the following in src/index.js :

new Vue({  
  el: "#app",  
  data: {  
    rawHtml: "<b>bar</b>"  
  }  
});

and the following in index.html :

<!DOCTYPE html>  
<html>  
  <head>  
    <title>Hello</title>  
    <meta charset="UTF-8" />  
    <script src="https://cdn.jsdelivr.net/npm/vue/dist/vue.js"></script>  
  </head> 
  <body>  
    <div id="app">  
      <p v-html="rawHtml"></p>  
    </div>  
    <script src="./src/index.js"></script>  
  </body>  
</html>

Then we get bar bolded displayed since the inner HTML of the p element is <b>bar</b> .

When we’re using this, we have to sanitize the HTML so that it won’t contain any code. This is to prevent cross-site scripting attacks since code will be run if there are any when we pass in a value to the v-html directive.

Attributes

We can set values of HTML element attributes dynamically with v-bind as follows.

In src/index.js , we write:

new Vue({  
  el: "#app",  
  data: {  
    isButtonDisabled: true  
  }  
});

Then when we write the following in index.html :

<!DOCTYPE html>  
<html>  
  <head>  
    <title>Hello</title>  
    <meta charset="UTF-8" />  
    <script src="https://cdn.jsdelivr.net/npm/vue/dist/vue.js"></script>  
  </head> 
  <body>  
    <div id="app">  
      <button v-bind:disabled="isButtonDisabled">Button</button>  
    </div>  
    <script src="./src/index.js"></script>  
  </body>  
</html>

Then since we set the isButtonDisabled property to true , the button will be disabled. This also apply to any other truthy value.

On the other hand, if we set it to false , we see that the button is disabled. This also applies to other falsy values like null , undefined , 0 and empty string.

JavaScript Expressions

We can add any other JavaScript expressions between the curly braces.

For example, we can write:

{{ number + 10 }}  
{{ yes ? 'YES' : 'NO' }}  
{{ str.split('').reverse('').join('') }}

Also, we can write expressions as the value of the v-bind directive as follows:

<div v-bind:id="`div-${id}`"></div>

Statements will not run inside the curly braces. For example:

{{ let a = 1 }}

will give us an error. We’ll get the error ‘avoid using JavaScript keyword as the property name: “let”’ in the console.

We also can’t run conditional statements within curly braces:

{{ if (id) { return id } }}

We’ll get the error ‘avoid using JavaScript keyword as the property name: “if”’.

Directives

Directives are special attributes with the v- prefix. We can pass in a single JavaScript expression as the value.

v-for can accept more than one expression separated by ; .

For example, we can conditionally display content with v-if :

<p v-if="show">Hello</p>

If show is truthy, then we’ll see Hello . Otherwise, it won’t be shown.

Arguments

Some directive takes an argument, which is denoted by a colon after the directive name.

For example, we can set the href value of an a element by writing:

<a v-bind:href="'https://medium.com'">Medium </a>

The v-on directive also takes an argument. For example, we can handle the click event of an element by writing:

<a v-on:click="onClick"> Click Me </a>

Then the onClick method in our Vue instance or component will be run when we click on the a element.

Dynamic Arguments

Since Vue.js 2.6.0, we can use a JavaScript expression as an argument for a directive.

For example, we can use it as follows. In src/index.js , we write:

new Vue({  
  el: "#app",  
  data: {  
    click: `${"cl"}${"ick"}`  
  },  
  methods: {  
    onClick() {  
      alert("clicked");  
    }  
  }  
});

Then in index.html , we can use a dynamic argument as follows:

<!DOCTYPE html>  
<html>  
  <head>  
    <title>Hello</title>  
    <meta charset="UTF-8" />  
    <script src="https://cdn.jsdelivr.net/npm/vue/dist/vue.js"></script>  
  </head> 
  <body>  
    <div id="app">  
      <a v-on:click="onClick"> Click Me </a>  
    </div>  
    <script src="./src/index.js"></script>  
  </body>  
</html>

This will reference the value of the click property of the data property in our Vue instance, and so we actually have v-on:click .

And therefore, when we click the a tag, we get an alert box with the clicked text displayed.

Dynamic argument expressions must evaluate to a string or null .

Spaces and quotes also aren’t valid inside the brackets.

When Should We Use Watchers?

We can use watchers when we want to watch for data changes in reactive properties and do some asynchronous or expensive options as the value changes.

For example, we can use it to watch for changes for an input and then get a joke from the Chuck Norris API when we type in something.

First, we put the following in src/index.js :

new Vue({  
  el: "#app",  
  data: {  
    message: "",  
    joke: ""  
  },  
  created() {  
    this.debounceGetAllCapsMessage = _.debounce(this.getAllCapsMessage, 500);  
  },  
  methods: {  
    async getAllCapsMessage() {  
      const res = await fetch("https://api.icndb.com/jokes/random");  
      const result = await res.json();  
      this.joke = result.value.joke;  
    }  
  },  
  watch: {  
    message(newMessage, oldMessage) {  
      this.debounceGetAllCapsMessage();  
    }  
  }  
});

The code above watches for the change in the message property and then call the debounceGetAllCapsMessage method, which gets a jokes after a half a second delay.

The watch method both takes the new value as the first parameter and the old value as the second parameter.

Then we put the following in index.html :

<!DOCTYPE html>  
<html>  
  <head>  
    <title>Hello</title>  
    <meta charset="UTF-8" />  
    <script src="https://cdn.jsdelivr.net/npm/vue/dist/vue.js"></script>  
    <script src="https://cdn.jsdelivr.net/npm/lodash@4.13.1/lodash.min.js"></script>  
  </head> <body>  
    <div id="app">  
      <input type="text" v-model="message" />  
      <p>{{joke}}</p>  
    </div>  
    <script src="./src/index.js"></script>  
  </body>  
</html>

As we can see, we can run an asynchronous operation, add a delay before we perform the operation, and then get the final result.

We can also use vm.$watch to watch for a value. It takes up to 3 arguments.

The first is a path to a property, which is a string. It can also be a function with one or multiple things combined to watch.

The second argument is a function that runs when the value changes.

The third argument for vm.$watch is an object with some properties. They include:

  • immediate — watches for the setting of the initial value

The method returns a function to stop watching for values. This is an optional argument.

We can use it as follows. In src/index.js , we have:

const vm = new Vue({  
  el: "#app",  
  data: {  
    message: "",  
    joke: ""  
  }  
});

vm.$watch(  
  "message",  
  _.debounce(async function() {  
    const res = await fetch("https://api.icndb.com/jokes/random");  
    const result = await res.json();  
    this.joke = result.value.joke;  
  }, 500)  
);

Then index.html , we have:

<!DOCTYPE html>  
<html>  
  <head>  
    <title>Hello</title>  
    <meta charset="UTF-8" />  
    <script src="https://cdn.jsdelivr.net/npm/vue/dist/vue.js"></script>  
    <script src="https://cdn.jsdelivr.net/npm/lodash@4.13.1/lodash.min.js"></script>  
  </head> <body>  
    <div id="app">  
      <input type="text" v-model="message" />  
      <p>{{joke}}</p>  
    </div>  
    <script src="./src/index.js"></script>  
  </body>  
</html>

which is the same as what we had before.

In both examples, we should get a new joke after half a second delay displayed.

Using v-for to Map Array to Elements

We can use the v-for directive to render a list of items from an array.

For example, we can use it as follows:

src/index.js :

new Vue({  
  el: "#app",  
  data: {  
    persons: [{ name: "Joe" }, { name: "Jane" }, { name: "Mary" }]  
  }  
});

index.html :

<!DOCTYPE html>  
<html>  
  <head>  
    <title>App</title>  
    <meta charset="UTF-8" />  
    <script src="https://cdn.jsdelivr.net/npm/vue/dist/vue.js"></script>  
  </head> <body>  
    <div id="app">  
      <div v-for="person in persons">  
        {{person.name}}  
      </div>  
    </div>  
    <script src="src/index.js"></script>  
  </body>  
</html>

In the code above, we have the v-for directive, and then we write person in persons to loop through the data.persons array.

Then we get the name property from each entry and display it.

person is an alias for the array element being iterated on.

Then we get:

JoeJaneMary

All the properties of the array entry is available during iteration.

We can also add an optional second argument to access the index of the array. For example, we can write the following:

src/index.js :

new Vue({  
  el: "#app",  
  data: {  
    persons: [{ name: "Joe" }, { name: "Jane" }, { name: "Mary" }]  
  }  
});

index.html ;

<!DOCTYPE html>  
<html>  
  <head>  
    <title>App</title>  
    <meta charset="UTF-8" />  
    <script src="https://cdn.jsdelivr.net/npm/vue/dist/vue.js"></script>  
  </head> <body>  
    <div id="app">  
      <div v-for="(person, index) in persons">  
        {{index}} - {{person.name}}  
      </div>  
    </div>  
    <script src="src/index.js"></script>  
  </body>  
</html>

Then we get:

0 - Joe1 - Jane2 - Mary

We can also use of instead of in to match the for...of loop syntax in JavaScript:

<!DOCTYPE html>  
<html>  
  <head>  
    <title>App</title>  
    <meta charset="UTF-8" />  
    <script src="https://cdn.jsdelivr.net/npm/vue/dist/vue.js"></script>  
  </head> <body>  
    <div id="app">  
      <div v-for="person of persons">  
        {{person.name}}  
      </div>  
    </div>  
    <script src="src/index.js"></script>  
  </body>  
</html>

v-for with an Object

We can also use v-for to loop through the values of an object.

So if we write the following:

src/index.js :

new Vue({  
  el: "#app",  
  data: {  
    book: {  
      title: "JavaScript Book",  
      author: "John Smith",  
      publishedYear: 2019  
    }  
  }  
});

index.html :

<!DOCTYPE html>  
<html>  
  <head>  
    <title>App</title>  
    <meta charset="UTF-8" />  
    <script src="https://cdn.jsdelivr.net/npm/vue/dist/vue.js"></script>  
  </head> <body>  
    <div id="app">  
      <div v-for="value in book">  
        {{value}}  
      </div>  
    </div>  
    <script src="src/index.js"></script>  
  </body>  
</html>

And we get:

JavaScript BookJohn Smith2019

We can loop through the keys of the object by providing a second argument to the expression as follows:

src/index.js :

new Vue({  
  el: "#app",  
  data: {  
    book: {  
      title: "JavaScript Book",  
      author: "John Smith",  
      publishedYear: 2019  
    }  
  }  
});

index.html :

<!DOCTYPE html>  
<html>  
  <head>  
    <title>App</title>  
    <meta charset="UTF-8" />  
    <script src="https://cdn.jsdelivr.net/npm/vue/dist/vue.js"></script>  
  </head> <body>  
    <div id="app">  
      <div v-for="(value, key) in book">  
        {{key}} - {{value}}  
      </div>  
    </div>  
    <script src="src/index.js"></script>  
  </body>  
</html>

Then we get:

title - JavaScript Bookauthor - John SmithpublishedYear - 2019

Also, we can provide a third argument for the index of the object entry.

To do this, we can write:

src/index.js:

new Vue({  
  el: "#app",  
  data: {  
    book: {  
      title: "JavaScript Book",  
      author: "John Smith",  
      publishedYear: 2019  
    }  
  }  
});

index.html :

`<!DOCTYPE html>  
<html>  
  <head>  
    <title>App</title>  
    <meta charset="UTF-8" />  
    <script src="https://cdn.jsdelivr.net/npm/vue/dist/vue.js"></script>  
  </head> <body>  
    <div id="app">  
      <div v-for="(value, key, index) in book">  
        {{index}}: {{key}} - {{value}}  
      </div>  
    </div>  
    <script src="src/index.js"></script>  
  </body>  
</html>

Then we get:

0: title - JavaScript Book1: author - John Smith2: publishedYear - 2019

The order of iteration over an object is based on the enumeration order of Object.keys() , which isn’t guaranteed to be consistent across JavaScript engine implementations.

Maintaining State

v-for by default updates the items in place instead of moving the DOM elements to match the order of the items to make sure it reflects what should be rendered at a particular index.

Therefore, it’s only suitable when the list doesn’t rely on child component state or temporary DOM state like input values.

To make sure Vue knows which elements are unique, we should provide a key attribute via the v-bind:key directive.

For example, we can write:

src/index.js :

new Vue({  
  el: "#app",  
  data: {  
    persons: [{ name: "Joe" }, { name: "Jane" }, { name: "Mary" }]  
  }  
});

index.html :

<!DOCTYPE html>  
<html>  
  <head>  
    <title>App</title>  
    <meta charset="UTF-8" />  
    <script src="https://cdn.jsdelivr.net/npm/vue/dist/vue.js"></script>  
  </head> <body>  
    <div id="app">  
      <div v-for="person in persons" v-bind:key="person.name">  
        {{person.name}}  
      </div>  
    </div>  
    <script src="src/index.js"></script>  
  </body>  
</html>

We have to use primitive values as keys.

The key attribute is a generic mechanism for Vue to identify nodes.

v-show

The v-show directive is used to show something when the expression we passed into it is truthy.

For example, we can use it as follows:

<h1 v-show="show">Hi</h1>

The difference between v-show and v-if are that v-show elements remain in the DOM even though is hidden.

On the other hand, v-if elements are hidden by removing them from the DOM.

Also, v-if removes event listeners and child components inside conditional blocks are destroyed if they’re hidden and recreated when v-if ‘s expression is truthy.

v-if elements are also different in that if the condition is falsy during conditional render, it won’t do anything. It won’t be rendered until the expression becomes truthy.

v-if has higher toggling than v-show since DOM manipulating and attaching event listeners have to be done when things are toggled.

Therefore, if things need to be toggled often, v-show is more efficient.

v-if with v-for

v-for has higher priority than v-if if they’re used together.

However, we shouldn’t use them together because of the higher precedence of v-for over v-if .

If we want to filter some elements out when we render items from an array, we should use a computed property.

If we only render a small fraction of array elements, it has to iterate over the entire list and then check if the expression we set it truthy.

For example, the following JavaScript and HTML code:

src/index.js :

new Vue({  
  el: "#app",  
  data: {  
    persons: ["Joe", "Jane", "Mary"]  
  }  
});

index.html :

<!DOCTYPE html>  
<html>  
  <head>  
    <title>App</title>  
    <meta charset="UTF-8" />  
    <script src="https://cdn.jsdelivr.net/npm/vue/dist/vue.js"></script>  
  </head>  <body>  
    <div id="app">  
      <div v-for="person in persons" v-if='person !== "Joe"'>  
        {{person}}  
      </div>  
    </div>  
    <script src="src/index.js"></script>  
  </body>  
</html>

is not very efficient since every time the loop is rendered, Vue has to iterate through every element and then check if person !== “Joe” is true .

Instead, we should use a computed property as follows:

src/index.js :

new Vue({  
  el: "#app",  
  data: {  
    persons: ["Joe", "Jane", "Mary"]  
  },  
  computed: {  
    personsWithoutJoe() {  
      return this.persons.filter(p => p !== "Joe");  
    }  
  }  
});

index.html :

<!DOCTYPE html>  
<html>  
  <head>  
    <title>App</title>  
    <meta charset="UTF-8" />  
    <script src="https://cdn.jsdelivr.net/npm/vue/dist/vue.js"></script>  
  </head>  <body>  
    <div id="app">  
      <div v-for="person in personsWithoutJoe">  
        {{person}}  
      </div>  
    </div>  
    <script src="src/index.js"></script>  
  </body>  
</html>

The code above is more efficient because personsWithoutJoe is only recomputed when persons change.

Also, only the items in personsWithoutJoe is iterated through during render, so v-for doesn’t have to loop through all the items.

There’s also less logic in the template, which keeps it clean. Maintenance is much easier.

We can also get performance benefits from moving v-if to the parent element that has the v-for , so whatever’s inside is only rendered when the condition is met.

For example, if we have:

src/index.js :

new Vue({  
  el: "#app",  
  data: {  
    persons: ["Joe", "Jane", "Mary"],  
    show: false  
  }  
});

index.html :

<!DOCTYPE html>  
<html>  
  <head>  
    <title>App</title>  
    <meta charset="UTF-8" />  
    <script src="https://cdn.jsdelivr.net/npm/vue/dist/vue.js"></script>  
  </head>  <body>  
    <div id="app">  
      <div v-if="show">  
        <div v-for="person in persons">  
          {{person}}  
        </div>  
      </div>  
    </div>  
    <script src="src/index.js"></script>  
  </body>  
</html>

Then nothing is rendered since show is false . Vue doesn’t have to do the work to look at whatever’s inside.

This is much better than:

<!DOCTYPE html>  
<html>  
  <head>  
    <title>App</title>  
    <meta charset="UTF-8" />  
    <script src="https://cdn.jsdelivr.net/npm/vue/dist/vue.js"></script>  
  </head>  <body>  
    <div id="app">  
      <div v-for="person in persons" v-if="show">  
        {{person}}  
      </div>  
    </div>  
    <script src="src/index.js"></script>  
  </body>  
</html>

In the code above, Vue has to loop through each entry and check if the condition in the v-if returns a truthy value.

As we can see, even though the code is only slightly different, but the performance implications are big.

Array Change Detection

Vue wraps the following array mutation methods so that when these methods are called, a view update will be triggered. They’re the following:

  • push()
  • pop()
  • shift()
  • unshift()
  • splice()
  • sort()
  • reverse()

For example, if we have a button that triggers a push of a new item to an array, it’ll update:

src/index.js :

new Vue({  
  el: "#app",  
  data: {  
    persons: [{ name: "Joe" }, { name: "Jane" }]  
  },  
  methods: {  
    addPerson() {  
      this.persons.push({ name: "Mary" });  
    }  
  }  
});

index.html :

<!DOCTYPE html>  
<html>  
  <head>  
    <title>App</title>  
    <meta charset="UTF-8" />  
    <script src="https://cdn.jsdelivr.net/npm/vue/dist/vue.js"></script>  
  </head> <body>  
    <div id="app">  
      <button @click="addPerson">Add Person</button>  
      <div v-for="person in persons">  
        {{person.name}}  
      </div>  
    </div>  
    <script src="src/index.js"></script>  
  </body>  
</html>

Then we get:

JoeJane

When the array is first rendered. Then when we click Add Button, we get:

JoeJaneMary

since we called the addPerson method with the button click, which called the push method to add a new entry.

Replacing an Array

Non-mutating array method are ones that always return a new array. We can replace the original array with the returned array to trigger a view update.

Vue doesn’t re-render the list from scratch when we update the array. Instead, it’ll try to maximum DOM element reuse.

For example, if we have the following:

src/index.js :

new Vue({  
  el: "#app",  
  data: {  
    persons: [{ name: "Joe" }, { name: "Jane" }, { name: "Mary" }]  
  },  
  methods: {  
    filterPerson() {  
      this.persons = this.persons.filter(p => p.name !== "Joe");  
    }  
  }  
});

index.html :

<!DOCTYPE html>  
<html>  
  <head>  
    <title>App</title>  
    <meta charset="UTF-8" />  
    <script src="https://cdn.jsdelivr.net/npm/vue/dist/vue.js)"></script>  
  </head> <body>  
    <div id="app">  
      <button @click="filterPerson">Filter Person</button>  
      <div v-for="person in persons">  
        {{person.name}}  
      </div>  
    </div>  
    <script src="src/index.js"></script>  
  </body>  
</html>

Then when our page first loads, we get the following names:

JoeJaneMary

Once we click Filter Person, we get:

JaneMary

since we called the filterPerson method with the button click, which called the filter method to return an array with the filtered items.

Then the new array is assigned to this.persons and then the view is refreshed.

Catches

Vue can’t detect directly assign an item to an array by setting the index or when the length of the array is modified.

So:

vm.item[indexOfItem] = 'item';

and:

vm.items.length = 2;

won’t be picked up by Vue and update the view with updated data.

We can either call Vue.set or splice to set an entry to a given index.

Vue.set

For example, we can write the following code:

src/index.js

new Vue({  
  el: "#app",  
  data: {  
    persons: ["Joe", "Mary"]  
  },  
  methods: {  
    addPerson() {  
      Vue.set(this.persons, 5, "Jane");  
    }  
  }  
});

index.html :

<!DOCTYPE html>  
<html>  
  <head>  
    <title>App</title>  
    <meta charset="UTF-8" />  
    <script src="https://cdn.jsdelivr.net/npm/vue/dist/vue.js)"></script>  
  </head> <body>  
    <div id="app">  
      <button @click="addPerson">Add Person</button>  
      <div v-for="(person, index) in persons">  
        {{index}} - {{person}}  
      </div>  
    </div>  
    <script src="src/index.js"></script>  
  </body>  
</html>

When the page first loads, we get the following entries rendered:

0 - Joe1 - Mary

Then when we click Add Person, we get:

0 - Joe1 - Mary2 -3 -4 -5 - Jane

Splice

We can do the same with splice , but the length has to be set first:

src/index.js :

new Vue({  
  el: "#app",  
  data: {  
    persons: ["Joe", "Mary"]  
  },  
  methods: {  
    addPerson() {  
      this.persons.length = 5;  
      this.persons.splice(5, 1, "Jane");  
    }  
  }  
});

index.html :

<!DOCTYPE html>  
<html>  
  <head>  
    <title>App</title>  
    <meta charset="UTF-8" />  
    <script src="https://cdn.jsdelivr.net/npm/vue/dist/vue.js"></script>  
  </head> <body>  
    <div id="app">  
      <button @click="addPerson">Add Person</button>  
      <div v-for="(person, index) in persons">  
        {{index}} - {{person}}  
      </div>  
    </div>  
    <script src="src/index.js"></script>  
  </body>  
</html>

Then we get the same results as before.

We can also use splice to set the length of the array and trigger view update. To do this, we can write:

this.persons.splice(5);

vm.$set

We can call vm.$set as follows, which is the same as Vue.set except that it’s available to the Vue instance instead of a global object.

For example, we can write:

src/index.js :

new Vue({  
  el: "#app",  
  data: {  
    persons: ["Joe", "Mary"]  
  },  
  methods: {  
    addPerson() {  
      this.$set(this.persons, 5, "Jane");  
    }  
  }  
});

index.html :

<!DOCTYPE html>  
<html>  
  <head>  
    <title>App</title>  
    <meta charset="UTF-8" />  
    <script src="https://cdn.jsdelivr.net/npm/vue/dist/vue.js"></script>  
  </head> <body>  
    <div id="app">  
      <button @click="addPerson">Add Person</button>  
      <div v-for="(person, index) in persons">  
        {{index}} - {{person}}  
      </div>  
    </div>  
    <script src="src/index.js"></script>  
  </body>  
</html>

Transitioning Between Elements

With Vue, we can transition elements between v-if and v-else .

When toggling between elements that have the same tag name, we must tell Vue that they’re distinct elements giving them unique key attributes. Otherwise, the Vue compiler will only replace the content of the element for efficiency.

It’s always a good idea to key multiple items within a transition element.

For example, we can transition between 2 p elements as follows:

src/index.js :

new Vue({  
  el: "#app",  
  data: { show: false }  
});

src/style.css :

.fade-enter-active,  
.fade-leave-active {  
  transition: opacity 0.5s;  
}  
.fade-enter,  
.fade-leave-to {  
  opacity: 0;  
}

index.html :

<!DOCTYPE html>  
<html>  
  <head>  
    <title>App</title>  
    <meta charset="UTF-8" />  
    <script src="https://cdn.jsdelivr.net/npm/vue/dist/vue.js"></script>  
    <link  
      rel="stylesheet"  
      type="text/css"  
      href="./src/styles.css"  
      media="screen"  
    />  
  </head>  
  <body>  
    <div id="app">  
      <button v-on:click="show = !show">  
        Toggle  
      </button>  
      <transition name="fade">  
        <p v-if="show" key="hi">hi</p>  
        <p v-else key="bye">bye</p>  
      </transition>  
    </div>  
    <script src="src/index.js"></script>  
  </body>  
</html>

Then we should see fade effects when we transition between ‘hi’ and ‘bye’.

We added key attributes to each so they’ll always be rendered from scratch.

Also, we can use the key attribute to transition between different states of the same element.

We can do that as follows:

src/index.js :

new Vue({  
  el: "#app",  
  data: { show: false }  
});

src/styles.css :

.fade-enter-active,  
.fade-leave-active {  
  transition: opacity 0.5s;  
}  
.fade-enter,  
.fade-leave-to {  
  opacity: 0;  
}

index.html :

<!DOCTYPE html>  
<html>  
  <head>  
    <title>App</title>  
    <meta charset="UTF-8" />  
    <script src="https://cdn.jsdelivr.net/npm/vue/dist/vue.js"></script>  
    <link  
      rel="stylesheet"  
      type="text/css"  
      href="./src/styles.css"  
      media="screen"  
    />  
  </head>  
  <body>  
    <div id="app">  
      <button v-on:click="show = !show">  
        Toggle  
      </button>  
      <transition name="fade">  
        <p v-bind:key="show">  
          {{ show ? 'hi' : 'bye' }}  
        </p>  
      </transition>  
    </div>  
    <script src="src/index.js"></script>  
  </body>  
</html>

In the code above, we replaced:

<transition name="fade">  
  <p v-if="show" key="hi">hi</p>  
  <p v-else key="bye">bye</p>  
</transition>

with:

<transition name="fade">  
  <p v-bind:key="show">  
    {{ show ? 'hi' : 'bye' }}  
  </p>  
</transition>

Everything else remained the same.

The transition can be done between any number of elements with v-if or binding a single element to a dynamic property.

For example, we can write:

src/index.js :

new Vue({  
  el: "#app",  
  data: { states: ["foo", "bar", "baz"], state: "", index: 0 },  
  methods: {  
    rotate() {  
      this.index = (this.index + 1) % this.states.length;  
      this.state = this.states[this.index];  
    }  
  }  
});

src/styles.css :

.fade-enter-active,  
.fade-leave-active {  
  transition: opacity 0.5s;  
}  
.fade-enter,  
.fade-leave-to {  
  opacity: 0;  
}

index.html :

<!DOCTYPE html>  
<html>  
  <head>  
    <title>App</title>  
    <meta charset="UTF-8" />  
    <script src="https://cdn.jsdelivr.net/npm/vue/dist/vue.js"></script>  
    <link  
      rel="stylesheet"  
      type="text/css"  
      href="./src/styles.css"  
      media="screen"  
    />  
  </head>  
  <body>  
    <div id="app">  
      <button v-on:click="rotate">  
        Rotate  
      </button>  
      <transition name="fade">  
        <p v-bind:key="state">  
          {{ state }}  
        </p>  
      </transition>  
    </div>  
    <script src="src/index.js"></script>  
  </body>  
</html>

We can rotate to different state value from the states array. Then we see transition each time the value of state changes.

Also, we can write out the v-if statements for each item as follows:

index.html :

<!DOCTYPE html>  
<html>  
  <head>  
    <title>App</title>  
    <meta charset="UTF-8" />  
    <script src="https://cdn.jsdelivr.net/npm/vue/dist/vue.js"></script>  
    <link  
      rel="stylesheet"  
      type="text/css"  
      href="./src/styles.css"  
      media="screen"  
    />  
  </head>  
  <body>  
    <div id="app">  
      <button v-on:click="rotate">  
        Rotate  
      </button>  
      <transition name="fade">  
        <p v-if="state === 'foo'" key="foo">  
          foo  
        </p>  
        <p v-if="state === 'bar'" key="bar">  
          bar  
        </p>  
        <p v-if="state === 'baz'" key="baz">  
          baz  
        </p>  
      </transition>  
    </div>  
    <script src="src/index.js"></script>  
  </body>  
</html>

The rest are unchanged.

Transition Modes

We can set the transition modes to control how old elements are transition to new elements.

There’re 2 transition modes:

  • in-out — new element transitions in first, then the current element transitions out
  • out-in — current element transitions our first and then the new element transitions in

For example, we can use it as follows:

src/index.js :

new Vue({  
  el: "#app",  
  data: { states: ["foo", "bar", "baz"], state: "", index: 0 },  
  methods: {  
    rotate() {  
      this.index = (this.index + 1) % this.states.length;  
      this.state = this.states[this.index];  
    }  
  } 
});

src/styles.css :

.fade-enter-active,  
.fade-leave-active {  
  transition: opacity 0.5s;  
}  
.fade-enter,  
.fade-leave-to {  
  opacity: 0;  
}

index.html :

<!DOCTYPE html>  
<html>  
  <head>  
    <title>App</title>  
    <meta charset="UTF-8" />  
    <script src="https://cdn.jsdelivr.net/npm/vue/dist/vue.js"></script>  
    <link  
      rel="stylesheet"  
      type="text/css"  
      href="./src/styles.css"  
      media="screen"  
    />  
  </head>  
  <body>  
    <div id="app">  
      <button v-on:click="rotate">  
        Rotate  
      </button>  
      <transition name="fade" mode="out-in">  
        <p v-bind:key="state">  
          {{ state }}  
        </p>  
      </transition>  
    </div>  
    <script src="src/index.js"></script>  
  </body>  
</html>

With the mode attribute added, we no longer have the jumpiness that the previous example has when transitioning between elements since old and new elements won’t exist on the same screen.

Computed Properties

To make more template expressions more concise and reusable, we can create computed properties to compute results from existing properties as their value changes.

We can define computed properties in a Vue instance by putting them in the computed property of the options object that we pass into the Vue constructor.

For example, we can write the following in src/index.js:

new Vue({  
  el: "#app",  
  data: {  
    message: "foo"  
  },  
  computed: {  
    spelledMessage() {  
      return this.message.split("").join("-");  
    }  
  }  
});

Then we can use it like any other field in our HTML template. So in index.html, we can write:

<!DOCTYPE html>  
<html>  
  <head>  
    <title>Hello</title>  
    <meta charset="UTF-8" />  
    <script src="https://cdn.jsdelivr.net/npm/vue/dist/vue.js"></script>  
  </head> <body>  
    <div id="app">  
      <p>{{message}}</p>  
      <p>{{spelledMessage}}</p>  
    </div>  
    <script src="./src/index.js"></script>  
  </body>  
</html>

We should then get:

foof-o-o

on our screen.

The spelledMessage method is a getter that’s used by Vue.js. It takes the returned value of it and then put it in place of {{spelledMessage}} .

Therefore, the name of the placeholder in the template must be the same as the name of the method that returns the value that we want in the computed object.

We can also get the value from the returned Vue instance as follows:

const vm = new Vue({  
  el: "#app",  
  data: {  
    message: "foo"  
  },  
  computed: {  
    spelledMessage() {  
      return this.message.split("").join("-");  
    }  
  }  
});console.log(vm.spelledMessage);

We should see f-o-o logged from the console.log.

We can bind to computed properties in templates like any other property. Vue knows that vm.spelledMessage depends on vm.message, so the bindings will be updated when vm.message is updated.

The computed getter method doesn’t commit side effects, which makes it easy to test and understand.

Computed Caching vs Methods

One good feature of computed properties is that the result of it is cached.

There’s no caching for results returned from methods.

So instead of using methods, we should use computed properties for cases where we’re computing something from existing properties.

A computed property is only re-evaluated once a reactive property is updated.

For example, if we have:

const vm = new Vue({  
  el: "#app",  
  data: {  
    message: "foo"  
  },  
  computed: {  
    now() {  
      return Date.now();  
    }  
  }  
});

It’ll never update after its first computed since it doesn’t depend on any reactive property from the data property.

Without caching computed properties keep getting computed as reactive properties that they depend on change, which means the app gets slow as reactive properties that the computed property depends on are changing.

Computed vs Watched Property

Watch properties are useful for watching for changes in a property as the name suggests.

However, because of the caching feature of computed properties, we should use them as much as we can.

For instance, we can simplify the following:

new Vue({  
  el: "#app",  
  data: {  
    name: "Joe",  
    age: 1,  
    person: undefined  
  },  
  watch: {  
    name: {  
      immediate: true,  
      handler(newVal) {  
        this.person = `${newVal} - ${this.age}`;  
      }  
    },  
    age: {  
      immediate: true,  
      handler(newVal) {  
        this.person = `${this.name} - ${newVal}`;  
      }  
    }  
  }  
});

to:

new Vue({  
  el: "#app",  
  data: {  
    name: "Joe",  
    age: 1  
  },  
  computed: {  
    person() {  
      return `${this.name} - ${this.age}`;  
    }  
  }  
});

As we can see, the first example was much more complex. We have to set immediate to true in each property so that it’ll watch the initial value change. Then we have to define the value change handler for each reactive property.

Then in each handler, we have to set the person property so that we can combine name and age.

On the other hand, with computed properties, we only have one method which returns the fields combined in the way we want.

It’s much more convenient for us and the app that we create is also faster because of caching.

Computed Setter

We can also create a setter function for computed properties.

For example, we can write:

new Vue({  
  el: "#app",  
  data: {  
    name: "Joe",  
    age: 1  
  },  
  computed: {  
    person: {  
      get() {  
        return `${this.name} - ${this.age}`;  
      },  
      set(newValue) {  
        const [name, age] = newValue.split("-");  
        this.name = name.trim();  
        this.age = age.trim();  
      }  
    }  
  }  
});

The getter function returns the same thing as before, but now we also have a setter function.

The setter function splits the newValue, which has the computed value from the getter function, we split the result and set the result back to the corresponding reactive properties.

We can use a setter as follows. We can put the following in src/index.js:

new Vue({  
  el: "#app",  
  data: {  
    firstName: "Joe",  
    lastName: "Smith"  
  },  
  computed: {  
    name: {  
      get() {  
        return `${this.firstName} ${this.lastName}`;  
      },  
      set(newValue) {  
        const [firstName, lastName] = newValue.split(" ");  
        this.firstName = (firstName || "").trim();  
        this.lastName = (lastName || "").trim();  
      }  
    }  
  }  
});

And in index.html, we put:

<!DOCTYPE html>  
<html>  
  <head>  
    <title>Hello</title>  
    <meta charset="UTF-8" />  
    <script src="https://cdn.jsdelivr.net/npm/vue/dist/vue.js"></script>  
  </head> <body>  
    <div id="app">  
      <p>{{name}}</p>  
      <input type="text" v-model="name" />  
    </div>  
    <script src="./src/index.js"></script>  
  </body>  
</html>

Then when we change the value in the input, we get the new values assigned back to the firstName and lastName fields with the setter.

Conclusion

Vue makes building front end apps easy.

We just have to start by creating a Vue instance.

Then we can add some markup to a template and use JavaScript to create some logic.

In the template, we can render things conditionally and we can render arrays of data.

Then to make them fancier, we can add transitions.

Categories
JavaScript Vue

Creating Async Vue Components

Vue.js is an easy to use web app framework that we can use to develop interactive front end apps.

In this article, we’ll look at how to create async components that have its own loading and error components to go with it.

Creating Async Components with Apps Created with Vue CLI

Vue apps created with Vue CLI has built-in support for dynamic imports, which is what we need to create an async component.

Dynamic imports are async. Therefore, we need components to display something when the component is loading. Also, we need another component to display something in case there’s an error loading the component.

When we register an async component, we also have to register components that are used when the async component is loading and when there’s an error.

To create the components and register them, we can write the following code:

components/AsyncComponent.vue :

<template>  
  <p>Async Component</p>  
</template>

components/AsyncError.vue :

<template>  
  <p>Error</p>  
</template>

components/AsyncLoading.vue :

<template>  
  <p>Loading</p>  
</template>

App.vue :

<template>  
  <div id="app">  
    <async-component></async-component>  
  </div>  
</template>

<script>  
import AsyncError from "./components/AsyncError.vue";  
import AsyncLoading from "./components/AsyncLoading.vue";  
const AsyncComponent = import("./components/AsyncComponent.vue");

export default {  
  name: "App",  
  components: {  
    AsyncComponent: () => ({  
      component: AsyncComponent,  
      loading: AsyncLoading,  
      error: AsyncError,  
      delay: 100,  
      timeout: 3000  
    })  
  }  
};  
</script>

As we can see from the code above, we register an async component differently than registering a regular Vue component.

To register an async component, the property name is the component name as usual, but the value is an arrow function that returns an object with several properties.

The import function loads the async component from a different bundle than the ones that are statically imported, so we don’t want to waste time when the app first loads waiting for the async components to load.

The component property has the component to load. loading is the component that’s displayed when loading the async component, error is the component that’s displayed when there’s an error. delay is the delay before the component is shown. timeout is when Vue stops trying to load the async component and displays the error component.

delay and timeout are measured in milliseconds.

We then load the async component like any other component. Then when we load the async component, we’ll see Loading and then the async component displayed.

Conclusion

Async components let us create a component with a loading stater and error state so that we can see something while the async component is loading. It’s useful for code splitting as the async component is loaded only when it needs from a different bundle with the import function.