
Categories
Tools

List of Useful Git Commands

Git is one of the most popular version control systems in the world. It saves us lots of frustration by letting us interact with the change history and revert code.

In this article, we’ll look at more ways that Git can help us with some commands that we may have missed.

Find Branches

We can find a branch with a given commit by running git branch --contains <commit>

Modify The Most Recent Commit

We can use git commit --amend to amend the last commit.

With this, we can change the commit message or the files that were committed in the last commit.

Or we can add the --no-edit option to amend the last commit without changing the last commit message.

Selected Files to Commit Interactively

We can use the git add -p command to select files interactively to add to out commit.

-p is short for --patch .

Choose Files to Stash Interactively

We can use the git statsh -p command to pick files that we want to stash.

Again -p is short for --patch .

Stash Untracked Files

The git stash -u command lets us stash untracked files. There’s also the -a or --all option which does the same thing.

Revert Selected Files

To let us selectively revert files, we can use the git checkout -p command, which again -p stands for --patch , to let us selective revert files that have been changed.

Switch to a Previous Branch

We can switch to a previous branch with the git checkout - command.

- is an alias for the previous branch.

Revert All Local Changes

The git checkout . command lets us revert all local changes.

Show Changes

We can use the git diff --staged command to let us compare the staged changes to what’s currently committed.

Rename Branches Locally

To rename branches locally, we can run:

git branch -m old-branch-name new-branch-name

to change the name of the current branch from old-branch-name to new-branch-name .

Rename Branches Remotely

We can rename the rename a remote branch by running:

git push origin :old-branch-name  
git push origin new-branch-name

The first command removes the old branch with old-branch-name and the 2nd command pushes the new branch with new-branch-name to our remote Git server.

Open All Files with Conflicts at Once

We can open all files that have conflicts by running:

git diff --name-only --diff-filter=U | uniq  | xargs $EDITOR

— diff-filter=U filters out all the files without conflicts.

Find Files That Have Changed From a Given Date and On

Git has a whatchanged command to let us find files from a given period. We can run it by typing:

git whatchanged —-since=‘3 weeks ago’

Then Git will show us all the files that are changed since 3 weeks ago.

Remove a File From the Last Commit

We can use the rm command to remove the old file and then run git commit --amend to amend the last commit to remove the file.

So we run:

git rm —-cached file-to-remove  
git commit —-amend

one after the other to remove the file file-to-remove then run git commit —-amend to amend the last commit to remove the file from the commit.

Overwrite Local With Remote

We can overwrite our local files with files in the remote repository with git reset --hard origin/<branch_name>.

This will reset the history to whatever is in the remote repository.

Remove All Untracked Files

We can run git clean -d -n to do a dry run to see the files that’ll be removed and git clean -d -f to do the removal if we’re fine with the changes.

Stashing Changes

We’ve stash changes if we pull from a remote repository and it conflicts with what we have in the local one.

Stashing is storing modified tracked files temporarily.

To stash changes, we run git stash save . Then once we’re done pulling from remote, we can run git stash pop to restore the changes that were stashed.

Conclusion

There’re lots of commands that we can use that we may not have used. So these are going to help with improving our Git workflow.

Categories
Reviews

Best Web Hosting Providers for Hosting Your WordPress Website

SiteGround

SiteGround is a popular shared hosting provider for hosting simple sites.

They offer multiple hosting options.

They offer WordPress hosting, cloud hosting, and dedicated server hosting.

Performance

The performance they offered is good.

SiteGround offers 99.99% uptime and they kept the promise for the last 24 months.

From February 2019 to December 2019, they kept their promise and maintained 99.99% to 100% uptime.

In January 2020, they dropped to having 99.92% uptime.

The loading time is also good. This is important because most people won’t wait for a slow site to load.

The sites that are tested load after less than a second. This is very good since this speed is above average.

Customer Support

SiteGround offers a live chat for support. It’s available 24/7 so you won’t have to worry about it being unavailable.

The support staff answers very quickly, so we can reach them without trouble any time of the day.

Site Migration.

Siteground offers free site migration for 1 site if you move to them.

This way, you won’t have to do the hard work of moving the site yourself.

With this option, we can avoid downtime and worry for any issues that comes up since we get help from SiteGround to do the migration.

Free SSL Certificate and CDN

SiteGround offers integration with CloudFlare so that we can use their CDN to cache our site’s content.

Setting up CloudFlare integration is very easy since e can do it with one click.

This way, it loads faster without us doing much work.

Also, Let’s Encrypt is built-in so we can use the certificate they issue for free.

We won’t have to worry about renewals since it’s done automatically.

Advanced Features

SiteGround has various advanced features like database management, anti-bot prevention tool, and more.

With them, we can use them to host our apps securely.

Multiple levels of caching are also available to improve the speed of our site.

They also offer multiple versions of PHP, which we can set individually for each domain or subdomain to keep our sites running.

FTP support is also offered so we can manage our site’s files easily.

Conclusion

Overall, they have lots of useful features for hosting small sites.

They offer security and performance that are above average.

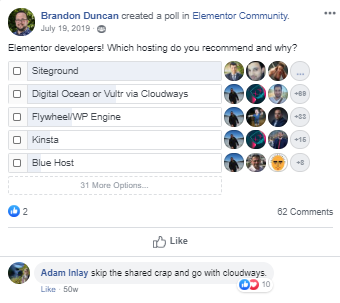
The polls shows that many people like Siteground:

SiteGround poll

Click Here to Sign Up for Siteground Hosting

A2 Hosting

A2 Hosting is another shared hosting provider that offers lots of values to their customers.

They offer higher server speeds that other shared hosting providers.

Fastest Shared Hosting Speed

A2 Hosting loads sites faster than any other hosting provider. They can load a site usually in less than half a second.

This shows how fast they can load a site.

Customer Support

A2 Hosting offers a live chat for customer support.

It’s also available 24/7 so we can get support from them at any time.

Their support staff also replies very quickly so you’ll be sure to be able to reach them.

HackScan

The HackScan feature keeps your site safe by checking for any malware in your site and traffic patterns that may indicate an attack is going 24/7.

This prevents any chance of a denial of service attack breaking out on your site.

Free Site Migrations

A2 Hosting also offers free site migration. They’re more generous than Siteground.

You can get 1 to 25 websites migrated for free by them depending on tour plan.

If you subscribe to the Lite, Swift, or Turbo plans, you’ll get a single site moved for free.

But if you subscribe to dedicated or managed VPS plans, you get 25 free site migrations.

Content Management Systems, Website Builders, and Developer Tools

They offer many tools for web a web hosts to help webmasters.

There’s one click installers for various CMSes like WordPress, Drupal, Joomla, and more.

And they offer their own website builder called SiteBuilder.

With that, you get a WYSIWYG interface for building your own site so that you don’t have to know how to code.

Like SiteGround, A2 Hosting also has free CloudFlare integration for caching to keep your site fast.

Money-Back Guarantee

A2 Hosting offers more than the 30-day money-back guarantee that most hosts offers.

They offer a refund even after 30 days with the ‘anytime’ money-back guarantee.

You can get a refund as far as 120 days.

Uptime of 99.93%

They have a high uptime percentage of 99.93%.

This means that your site is very unlikely to go down if you host it with A2 Hosting.

Conclusion

A2 Hosting offers many benefits that not all web hosts can offer.

Click Here to Sign Up for A2 Hosting

Categories
Vue

Using Firebase in a Vue App with Vuexfire — Unbinding, and Geopoints

The Vuefire library lets us add Firebase database manipulation capabilities right from our Vue app.

In this article, we’ll look at how to use Vuefire and Vuexfire to add support for Cloud Firestore database manipulation into our Vue app.

Unbinding

We can stop syncing the state of a collection or document to our Vuex store with the unbindFirestoreRef method.

For example, we can write:

db.js

import firebase from "firebase/app";
import "firebase/firestore";
export const db = firebase
  .initializeApp({ projectId: "project-id" })
  .firestore();
const { Timestamp, GeoPoint } = firebase.firestore;
export { Timestamp, GeoPoint };

main.js

import Vue from "vue";
import App from "./App.vue";
import { firestorePlugin } from "vuefire";
import { vuexfireMutations, firestoreAction } from "vuexfire";
import Vuex from "vuex";
import { db } from "./db";

Vue.use(Vuex);
Vue.use(firestorePlugin);
Vue.config.productionTip = false;

const store = new Vuex.Store({
  state: {
    books: []
  },
  mutations: {
    ...vuexfireMutations
  },
  actions: {
    bindBooksRef: firestoreAction((context) => {
      return context.bindFirestoreRef("books", db.collection("books"));
    }),

    unbindBooksRef: firestoreAction(({ unbindFirestoreRef }) => {
      unbindFirestoreRef("books");
    })
  },
  getters: {
    books: (state) => {
      return state.books;
    }
  }
});

new Vue({
  store,
  render: (h) => h(App)
}).$mount("#app");

App.vue

<template>
  <div>{{books}}</div>
</template>
<script>
import { mapGetters, mapActions } from "vuex";

export default {
  data() {
    return {};
  },
  methods: {
    ...mapActions(["bindBooksRef"])
  },
  computed: {
    ...mapGetters(["books"])
  },
  mounted() {
    this.bindBooksRef();
  }
};
</script>

We added the unbindBookRef action which calls the unbindFirestoreRef with the collection name string.

By default, when we unbind a collection, the Vuex store state will reset to its initial value.

unbindFirestoreRef(“books”); is the same as unbindFirestoreRef(“books”, true); .

If we don’t want to state to be reset when we unbind, we can pass in false as the 2nd argument:

unbindFirestoreRef("books", false);

We can also reset the state to the value we want if we pass in a function that returns the value we want to reset to:

unbindFirestoreRef('books', () => [{ title: 'foo' }])

If we reset a document, then it’ll be reset to null :

unbindFirestoreRef('book')

Geopoints

We can save geolocation data to our Firebase documents with the GeoPoint constructor.

This is only available with Cloud Firestore only.

For example, we can use it by writing:

main.js

import Vue from "vue";
import App from "./App.vue";
import { firestorePlugin } from "vuefire";
import { vuexfireMutations, firestoreAction } from "vuexfire";
import Vuex from "vuex";
import { db } from "./db";

Vue.use(Vuex);
Vue.use(firestorePlugin);
Vue.config.productionTip = false;

const store = new Vuex.Store({
  state: {
    cities: []
  },
  mutations: {
    ...vuexfireMutations
  },
  actions: {
    bindCitiesRef: firestoreAction((context) => {
      return context.bindFirestoreRef("cities", db.collection("cities"));
    })
  },
  getters: {
    cities: (state) => {
      return state.cities;
    }
  }
});

new Vue({
  store,
  render: (h) => h(App)
}).$mount("#app");

App.vue

<template>
  <div>{{cities}}</div>
</template>
<script>
import { mapGetters, mapActions } from "vuex";
import { db, GeoPoint } from "./db";

export default {
  data() {
    return {};
  },
  methods: {
    ...mapActions(["bindCitiesRef"])
  },
  computed: {
    ...mapGetters(["cities"])
  },
  async mounted() {
    this.bindCitiesRef();
    await db.collection("cities").add({
      name: "Paris",
      location: new GeoPoint(48.9, 2.3)
    });
  }
};
</script>

We just call add to add the entry to our Firestore collection.

The GeoPoint constructor returns an object that has the latitude and longitude properties.

These are also the arguments of the constructor.

Since we called the bindCitiesRef method, the collection’s documents are automatically synced with the Vuex Store.

And we called mapGetters to map the cities getter to our component, so we’ll see the documents in our template.

Conclusion

We can unbind from our store and add GeoPoint instances to our collection and see the updates immediately.

Categories
Vue

Using Firebase in a Vue App with Vuexfire — Querying and Replacing Documents

The Vuefire library lets us add Firebase database manipulation capabilities right from our Vue app.

In this article, we’ll look at how to use Vuefire and Vuexfire to add support for Cloud Firestore database manipulation into our Vue app.

Querying the Database

We can query the database and synchronize it with the Vuex store with Vuexfire.

Sorting

To sort the data that we get from the Firebase database, we can call orderBy to sort the data.

db.js

import firebase from "firebase/app";
import "firebase/firestore";
export const db = firebase
  .initializeApp({ projectId: "project-id" })
  .firestore();
const { Timestamp, GeoPoint } = firebase.firestore;
export { Timestamp, GeoPoint };

main.js

import Vue from "vue";
import App from "./App.vue";
import { firestorePlugin } from "vuefire";
import { vuexfireMutations, firestoreAction } from "vuexfire";
import Vuex from "vuex";
import { db } from "./db";

Vue.use(Vuex);
Vue.use(firestorePlugin);
Vue.config.productionTip = false;

const store = new Vuex.Store({
  state: {
    books: []
  },
  mutations: {
    ...vuexfireMutations
  },
  actions: {
    bindBooksRef: firestoreAction((context) => {
      return context.bindFirestoreRef(
        "books",
        db.collection("books").orderBy("title", "desc")
      );
    })
  },
  getters: {
    books: (state) => {
      return state.books;
    }
  }
});

new Vue({
  store,
  render: (h) => h(App)
}).$mount("#app");

App.vue

<template>
  <div>{{books}}</div>
</template>
<script>
import { mapGetters, mapActions } from "vuex";

export default {
  data() {
    return {};
  },
  methods: {
    ...mapActions(["bindBooksRef"])
  },
  computed: {
    ...mapGetters(["books"])
  },
  mounted() {
    this.bindBooksRef();
  }
};
</script>

In the bindBookRef action, we called the bindFirestoreRef method to bind the books state to our books database collection.

The orderBy method sorts the title field value in descending order.

Then state.books returns an array of books object with title sorted in descending order.

Since we called mapGetters to map the getters to computed properties, we’ll see this displayed in the template.

Filtering

We can also filter items with the where method.

For example, we can write:

main.js

import Vue from "vue";
import App from "./App.vue";
import { firestorePlugin } from "vuefire";
import { vuexfireMutations, firestoreAction } from "vuexfire";
import Vuex from "vuex";
import { db } from "./db";

Vue.use(Vuex);
Vue.use(firestorePlugin);
Vue.config.productionTip = false;

const store = new Vuex.Store({
  state: {
    books: []
  },
  mutations: {
    ...vuexfireMutations
  },
  actions: {
    bindBooksRef: firestoreAction((context) => {
      return context.bindFirestoreRef(
        "books",
        db.collection("books").where("wordCount", ">", 200)
      );
    })
  },
  getters: {
    books: (state) => {
      return state.books;
    }
  }
});

new Vue({
  store,
  render: (h) => h(App)
}).$mount("#app");

We called where to only return the documents with wordCount bigger than 200.

Then this is what we’ll see in the states and getters.

Writing to the Database

We have to use the Firebase SDK to write to our Firebase database.

For example, we can write:

main.js

import Vue from "vue";
import App from "./App.vue";
import { firestorePlugin } from "vuefire";
import { vuexfireMutations, firestoreAction } from "vuexfire";
import Vuex from "vuex";
import { db } from "./db";

Vue.use(Vuex);
Vue.use(firestorePlugin);
Vue.config.productionTip = false;

const store = new Vuex.Store({
  state: {
    books: [],
    book: {}
  },
  mutations: {
    ...vuexfireMutations
  },
  actions: {
    bindBooksRef: firestoreAction((context) => {
      return context.bindFirestoreRef("books", db.collection("books"));
    }),

    updateBook: firestoreAction(async ({ state }, { bookId, title }) => {
      const bookSnapshot = await db.collection("books").doc(bookId).get();
      const book = bookSnapshot.data();
      const newBook = { ...book, title };
      await db.collection("books").doc(bookId).set(newBook);
      console.log("book updated");
    })
  },
  getters: {
    books: (state) => {
      return state.books;
    }
  }
});

new Vue({
  store,
  render: (h) => h(App)
}).$mount("#app");

App.vue

<template>
  <div>
    <button @click="updateBook">update book</button>
    <div>{{books}}</div>
  </div>
</template>
<script>
import { mapGetters, mapActions } from "vuex";

export default {
  data() {
    return {};
  },
  methods: {
    ...mapActions(["bindBooksRef"]),
    updateBook() {
      this.$store.dispatch("updateBook", {
        bookId: "ei4jIGJjcmS7eSRKUxsw",
        title: "baz"
      });
    }
  },
  computed: {
    ...mapGetters(["books"])
  },
  mounted() {
    this.bindBooksRef();
  }
};
</script>

In the Vuex store, we have the updateBook action to let us get the book we want to update by its bookId .

And we want to update the title with it.

To do that, we get the books collection with the collection method.

doc gets the document by ID.

get gets the snapshot of the query result.

Then the data method returns the actual data.

Once we did that, we update the title by creating the newBook object.

And once we did that, we call set to update the document.

In the App component, we called dispatch in the updateBook method to dispatch the updateBook Vuex store action to do the update.

Since sync the store state with the collection with bindFirestoreRef , the updated items should show automatically.

Conclusion

We can update the data by using methods from the Firebase SDK.

Since it’s async, we’ve to put the code in actions.

Also, we can sort and filter items when we do the binding of the collection to the state.

Categories
Vue

Using Firebase in a Vue App with Vuexfire — Adding Data

The Vuefire library lets us add Firebase database manipulation capabilities right from our Vue app.

In this article, we’ll look at how to use Vuefire and Vuexfire to add support for Cloud Firestore database manipulation into our Vue app.

Timestamps

We can add a timestamp to our document with the Timestamp.fromDate method.

This is only available when we use Vuexfire with Cloud Firestore.

For example, we can write:

db.js

import firebase from "firebase/app";
import "firebase/firestore";
export const db = firebase
  .initializeApp({ projectId: "project-id" })
  .firestore();
const { Timestamp, GeoPoint } = firebase.firestore;
export { Timestamp, GeoPoint };

main.js

import Vue from "vue";
import App from "./App.vue";
import { firestorePlugin } from "vuefire";
import { vuexfireMutations, firestoreAction } from "vuexfire";
import Vuex from "vuex";
import { db } from "./db";

Vue.use(Vuex);
Vue.use(firestorePlugin);
Vue.config.productionTip = false;

const store = new Vuex.Store({
  state: {
    events: []
  },
  mutations: {
    ...vuexfireMutations
  },
  actions: {
    bindEventsRef: firestoreAction((context) => {
      return context.bindFirestoreRef("events", db.collection("events"));
    })
  },
  getters: {
    events: (state) => {
      return state.events;
    }
  }
});

new Vue({
  store,
  render: (h) => h(App)
}).$mount("#app");

App.vue

<template>
  <div>{{events}}</div>
</template>
<script>
import { mapGetters, mapActions } from "vuex";
import { db, Timestamp } from "./db";

export default {
  data() {
    return {};
  },
  methods: {
    ...mapActions(["bindEventsRef"])
  },
  computed: {
    ...mapGetters(["events"])
  },
  async mounted() {
    this.bindEventsRef();
    await db.collection("events").add({
      name: "event",
      date: Timestamp.fromDate(new Date("2029-09-14"))
    });
  }
};
</script>

We call the Timestamp.fromDate method to add the timestamp.

And we called bindEventsRef to sync the events collection with the events state in our store.

We then get the events state with a getter.

Then our events state has something like:

[ { "name": "event", "date": { "seconds": 1884038400, "nanoseconds": 0 } } ]

We can also call toDate to turn the Timestamp object back to a human-readable date:

<template>
  <div>
    <div v-for="e of events" :key="e.id">{{e.date.toDate()}}</div>
  </div>
</template>
<script>
import { mapGetters, mapActions } from "vuex";
import { db, Timestamp } from "./db";

export default {
  data() {
    return {};
  },
  methods: {
    ...mapActions(["bindEventsRef"])
  },
  computed: {
    ...mapGetters(["events"])
  },
  async mounted() {
    this.bindEventsRef();
    await db.collection("events").add({
      name: "event",
      date: Timestamp.fromDate(new Date("2029-09-14"))
    });
  }
};
</script>

References

We can store references of another document in a document.

For example, we can write:

main.js

import Vue from "vue";
import App from "./App.vue";
import { firestorePlugin } from "vuefire";
import { vuexfireMutations, firestoreAction } from "vuexfire";
import Vuex from "vuex";
import { db } from "./db";

Vue.use(Vuex);
Vue.use(firestorePlugin);
Vue.config.productionTip = false;

const store = new Vuex.Store({
  state: {
    books: []
  },
  mutations: {
    ...vuexfireMutations
  },
  actions: {
    bindBooksRef: firestoreAction((context) => {
      return context.bindFirestoreRef("books", db.collection("books"));
    })
  },
  getters: {
    books: (state) => {
      return state.books;
    }
  }
});

new Vue({
  store,
  render: (h) => h(App)
}).$mount("#app");

App.vue

<template>
  <div>{{books}}</div>
</template>
<script>
import { mapGetters, mapActions } from "vuex";
import { db } from "./db";

export default {
  data() {
    return {};
  },
  methods: {
    ...mapActions(["bindBooksRef"])
  },
  computed: {
    ...mapGetters(["books"])
  },
  async mounted() {
    this.bindBooksRef();
    await db.collection("books").add({
      title: "foo",
      author: db.collection("authors").doc("james-smith")
    });
  }
};
</script>

We just get the collection with db.collection .

Then with what it returns, we call doc with the ID of the authors document as the argument to reference it.

Conclusion

We can add documents to our Firebase database collections and they’ll be automatically reflected in our Vue app if we bind the Vuex state to our collection.