
Categories
Vue

Add Simple State Management with Vuex

Vue.js is an easy to use web app framework that we can use to develop interactive front end apps.

With Vuex, we can store our Vue app’s state in a central location.

In this article, we’ll look at how to add Vuex to our app and add a simple store.

What is Vuex?

Vuex is for storing states that are needed by multiple components in one central location.

It lets us get and set shared state and propagate any changes made to the shared state automatically to all components.
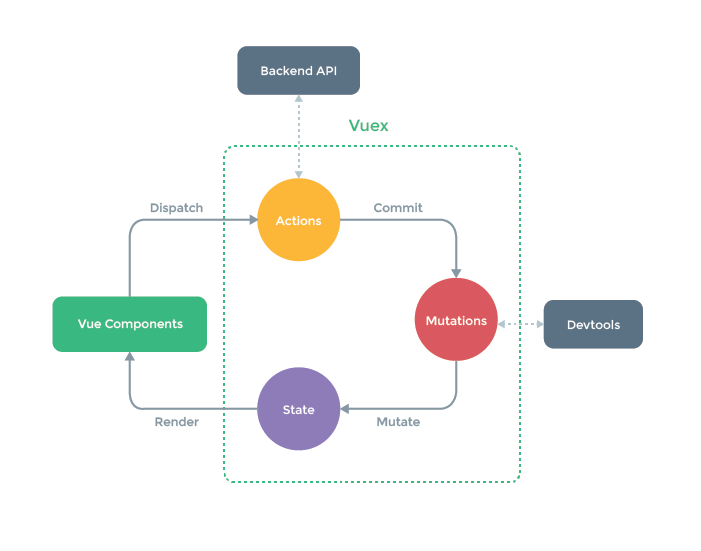
Courtesy of https://vuex.vuejs.org/

In the workflow diagram above, we can see that Vuex mutations are committed by our code when we get something from the back end API.

The mutation will update the state with the back end API data and the state will be updated in our Vue components.

We can also dispatch mutations from Vue components to change the Vuex store state the change will be propagated to all components that have access to the store.

Getting Started

We can include Vuex with a script tag in our HTML code:

<script src="https://unpkg.com/vuex"></script>

Then we can create a simple store by using the Vuex.Store as follows:

const store = new Vuex.Store({
  state: {
    count: 0
  },
  mutations: {
    increase(state) {
      state.count++;
    }
  }
});

The code above is a store which stores the state count .

Then we can commit the increase mutation by running:

store.commit("increase");

Then we can get the state after the mutation is done by running:

console.log(store.state.count);

store.state.count is the count state from the Vuex store. Then we should see 1 logged.

Getting Vuex State into Vue Components

We can get the state into our store by adding a computed property.

Therefore, to add the state into our store, we can write the following:

index.js :

const store = new Vuex.Store({
  state: {
    count: 0
  },
  mutations: {
    increase(state) {
      state.count++;
    }
  }
});

new Vue({
  el: "#app",
  computed: {
    count() {
      return store.state.count;
    }
  }
});

index.html :

<!DOCTYPE html>
<html>
  <head>
    <title>App</title>
    <meta charset="UTF-8" />
    <script src="https://unpkg.com/vue/dist/vue.js"></script>
    <script src="https://unpkg.com/vuex"></script>
  </head>
  <body>
    <div id="app">
      <p>{{count}}</p>
    </div>
    <script src="index.js"></script>
  </body>
</html>

Then we should see 0 displayed since count is 0 initially in the store .

Then whenever store.state.count updates, the computed property will be updated and the view will update with the new value.

A more convenient way to inject the store into all child components is to add the store in the root component as follows:

index.js :

const store = new Vuex.Store({
  state: {
    count: 0
  },
  mutations: {
    increase(state) {
      state.count++;
    }
  }
});

new Vue({
  el: "#app",
  store
});

index.html :

<!DOCTYPE html>
<html>
  <head>
    <title>App</title>
    <meta charset="UTF-8" />
    <script src="https://unpkg.com/vue/dist/vue.js"></script>
    <script src="https://unpkg.com/vuex"></script>
  </head>
  <body>
    <div id="app">
      <p>{{$store.state.count}}</p>
    </div>
    <script src="index.js"></script>
  </body>
</html>

Then it’ll be available to all child components and we don’t have to worry about add computed properties for every value.

It works with child component without much changes:

const store = new Vuex.Store({
  state: {
    count: 0
  },
  mutations: {
    increase(state) {
      state.count++;
    }
  }
});

Vue.component("counter", {
  template: `<div>{{ count }}</div>`,
  computed: {
    count() {
      return this.$store.state.count;
    }
  }
});

new Vue({
  el: "#app",
  store
});

this.$store is available to the counter component just by including it in the root Vue component.

Photo by Clark Street Mercantile on Unsplash

The mapState Helper

To avoid adding a new computed property for every state that’s in the store, we can use the mapState helper to add it. For example, we can write the following code to do that:

index.js :

const store = new Vuex.Store({
  state: {
    count: 0
  },
  mutations: {
    increase(state) {
      state.count++;
    }
  }
});

Vue.component("counter", {
  data() {
    return {
      localCount: 1
    };
  },
  template: `
    <div>
      <div>{{ count }}</div>
      <div>{{ countAlias }}</div>
      <div>{{ countPlusLocal }}</div>
    </div>
  `,
  computed: Vuex.mapState({
    count: state => state.count,
    countAlias: "count",
    countPlusLocal(state) {
      return state.count + this.localCount;
    }
  })
});

new Vue({
  el: "#app",
  store
});

index.html :

<!DOCTYPE html>
<html>
  <head>
    <title>App</title>
    <meta charset="UTF-8" />
    <script src="https://unpkg.com/vue/dist/vue.js"></script>
    <script src="https://unpkg.com/vuex"></script>
  </head>
  <body>
    <div id="app">
      <counter></counter>
    </div>
    <script src="index.js"></script>
  </body>
</html>

Then we see:

0

0

1

Because we called mapState as follows:

computed: Vuex.mapState({
  count: state => state.count,
  countAlias: "count",
  countPlusLocal(state) {
    return state.count + this.localCount;
  }
})

We have:

count: state => state.count,

which gets the count state from the store and returns it. The count is 0 so we get 0.

Then we have:

countAlias: "count"

which is a shorthand for:

count: state => state.count

And finally, we have:

countPlusLocal(state) {
  return state.count + this.localCount;
}

which adds state.count from the store to this.localCount , which we set to 1.

Object Spread Operator

We can combine local computed properties with mapState by applying the spread operator to mapState as follows:

index.js :

const store = new Vuex.Store({
  state: {
    count: 0
  },
  mutations: {
    increase(state) {
      state.count++;
    }
  }
});

Vue.component("counter", {
  data() {
    return {
      localCount: 1
    };
  },
  template: `
    <div>
      <div>{{ count }}</div>
      <div>{{ foo }}</div>
    </div>
  `,
  computed: {
    foo() {
      return 2;
    },
    ...Vuex.mapState({
      count: "count"
    })
  }
});

new Vue({
  el: "#app",
  store
});

Then we get:

0

2

displayed since foo always returns 2.

Components Can Still Have Local State

Components can still have their own local state, so we don’t have to put everything in the Vuex store.

Conclusion

We can add a Vuex store to our app to store the states of our app that are shared by multiple components.

To make getting state easy, we can include the store in the root Vue component.

Then we call the mapState helper to get the states we want in any component.

We can also combine it with the local states with the spread operator in the computed object.

Categories
Vue

Adding Modules to a Vuex Store

Vue.js is an easy to use web app framework that we can use to develop interactive front end apps.

With Vuex, we can store our Vue app’s state in a central location.

In this article, we’ll look at how to add modules to separate a Vuex store into smaller parts.

Dividing a Store into Modules

Vuex uses a single state tree. This means the states are located in one big object. This will be bloated is our app grows big.

To make a Vuex store easier to scale, it can be separated into modules. Each module can have its own state, mutations, getters, and actions.

The state parameter in mutations and getters are the module’s local state.

By default, all actions, mutations, and getters inside modules are registered under a global namespace. This allows multiple modules to react to the same mutation or action type.

We can divide our store into module as in the following example:

index.js :

const moduleA = {
  state: {
    count: 0
  },
  mutations: {
    increase(state, payload) {
      state.count += payload.amount;
    }
  },
  actions: {
    increase({ commit }, payload) {
      commit("increase", payload);
    }
  }
};

const moduleB = {
  state: {
    count: 1
  },
  mutations: {
    increase(state, payload) {
      state.count += payload.amount;
    }
  },
  actions: {
    increase({ commit }, payload) {
      commit("increase", payload);
    }
  }
};

const store = new Vuex.Store({
  modules: {
    a: moduleA,
    b: moduleB
  }
});

console.log(store.state.a.count);
console.log(store.state.b.count);

Then in the console.log output, we should see 0 and 1 since moduleA ‘s initial count state is 0 and moduleB ‘s initial count state is 1.

To make each module self-contained, we have to namespace it by setting the namespaced option to true .

We can namespace a module and then call dispatch on actions after namespacing the modules as follows:

index.js :

const moduleA = {
  namespaced: true,
  state: {
    count: 0
  },
  mutations: {
    increase(state, payload) {
      state.count += payload.amount;
    }
  },
  actions: {
    increase({ commit }, payload) {
      commit("increase", payload);
    }
  }
};

const moduleB = {
  namespaced: true,
  state: {
    count: 1
  },
  mutations: {
    increase(state, payload) {
      state.count += payload.amount;
    }
  },
  actions: {
    increase({ commit }, payload) {
      commit("increase", payload);
    }
  }
};

const store = new Vuex.Store({
  modules: {
    a: moduleA,
    b: moduleB
  }
});

new Vue({
  el: "#app",
  store,
  computed: {
    ...Vuex.mapState({
      a: state => state.a,
      b: state => state.b
    })
  },
  methods: {
    increaseA(payload) {
      this.$store.dispatch("a/increase", payload);
    },
    increaseB(payload) {
      this.$store.dispatch("b/increase", payload);
    }
  }
});

index.html :

<!DOCTYPE html>
<html>
  <head>
    <title>App</title>
    <meta charset="UTF-8" />
    <script src="https://unpkg.com/vue/dist/vue.js"></script>
    <script src="https://unpkg.com/vuex"></script>
  </head>
  <body>
    <div id="app">
      <button @click="increaseA({amount: 10})">Increase</button>
      <button @click="increaseB({amount: 10})">Increase</button>
      <p>A Count: {{a.count}}</p>
      <p>B Count: {{b.count}}</p>
    </div>
    <script src="index.js"></script>
  </body>
</html>

In the code above, we have namespaced: true set in each module, and then we added 2 methods to our Vue instance to dispatch the namespaced actions:

increaseA(payload) {
  this.$store.dispatch("a/increase", payload);
}

and:

increaseB(payload) {
  this.$store.dispatch("b/increase", payload);
}

Since we have namespaced set to true , we have to dispatch the actions by passing in “a/increase” and “b/increase” to dispatch .

Then once we clicked the buttons, our methods are called to dispatch the actions and the numbers will increase.

Register Global Action in Namespaced Modules

We can also register global actions in namespaced modules, by setting the root option to true and place the action definition in the function handler.

To do register a global action, we can write something like the following code:

index.js :

const moduleA = {
  namespaced: true,
  state: {
    count: 0
  },
  mutations: {
    increase(state, payload) {
      state.count += payload.amount;
    }
  },
  actions: {
    increase({ commit }, payload) {
      commit("increase", payload);
    }
  }
};

const moduleB = {
  namespaced: true,
  state: {
    count: 1
  },
  mutations: {
    increase(state, payload) {
      state.count += payload.amount;
    }
  },
  actions: {
    increase({ commit }, payload) {
      commit("increase", payload);
    }
  }
};

const rootModule = {
  actions: {
    increaseAll: {
      root: true,
      handler(namespacedContext, payload) {
        namespacedContext.commit("a/increase", payload);
        namespacedContext.commit("b/increase", payload);
      }
    }
  }
};

const store = new Vuex.Store({
  modules: {
    a: moduleA,
    b: moduleB,
    root: rootModule
  }
});

new Vue({
  el: "#app",
  store,
  computed: {
    ...Vuex.mapState({
      a: state => state.a,
      b: state => state.b
    })
  },
  methods: {
    ...Vuex.mapActions(["increaseAll"])
  }
});

index.html :

<!DOCTYPE html>
<html>
  <head>
    <title>App</title>
    <meta charset="UTF-8" />
    <script src="https://unpkg.com/vue/dist/vue.js"></script>
    <script src="https://unpkg.com/vuex"></script>
  </head>
  <body>
    <div id="app">
      <button @click="increaseAll({amount: 10})">Increase All</button>
      <p>A Count: {{a.count}}</p>
      <p>B Count: {{b.count}}</p>
    </div>
    <script src="index.js"></script>
  </body>
</html>

In the code above, we added the rootModule which has the global action as follows:

const rootModule = {
  actions: {
    increaseAll: {
      root: true,
      handler(namespacedContext, payload) {
        namespacedContext.commit("a/increase", payload);
        namespacedContext.commit("b/increase", payload);
      }
    }
  }
};

A global action has the root option set to true and a handler method which is used to dispatch actions from any module.

Then in the Vue instance, we have:

methods: {
  ...Vuex.mapActions(["increaseAll"])
}

to map the increaseAll action to a method in the Vue instance.

Then in the template, we have:

<button @click="increaseAll({amount: 10})">Increase All</button>

to call the increaseAll method returned from the mapActions method when the button is clicked.

Then we should both numbers increasing since we mapped both module’s state to the Vue instance’s data.

Dynamic Module Registration

We can also register a module dynamically by using the store.registerModule method as follows:

index.js :

const moduleA = {
  state: {
    count: 0
  },
  mutations: {
    increase(state, payload) {
      state.count += payload.amount;
    }
  },
  actions: {
    increase({ commit }, payload) {
      commit("increase", payload);
    }
  }
};

const store = new Vuex.Store({});

store.registerModule("a", moduleA);

new Vue({
  el: "#app",
  store,
  computed: {
    ...Vuex.mapState({
      a: state => state.a
    })
  },
  methods: {
    ...Vuex.mapActions(["increase"])
  }
});

index.html :

<!DOCTYPE html>
<html>
  <head>
    <title>App</title>
    <meta charset="UTF-8" />
    <script src="https://unpkg.com/vue/dist/vue.js"></script>
    <script src="https://unpkg.com/vuex"></script>
  </head>
  <body>
    <div id="app">
      <button @click="increase({amount: 10})">Increase</button>
      <p>A Count: {{a.count}}</p>
    </div>
    <script src="index.js"></script>
  </body>
</html>

The store.registerModule takes a string for the module name, and then an object for the module itself.

Then we can call the helpers to map getters to computed properties and actions/mutations to methods. In the code above, we have the increase action mapped to a method.

Then we can call it in our template as usual.

Conclusion

If our Vuex store is big, we can divide it into modules.

We can register modules when we create the store or dynamically with registerModule .

Then we can map actions/mutations by their name as usual, and we can map the state by accessing state.a.count , where a is the module name, and count is the state name. Replace it with our own module and state names if the code is different.

We can also namespace the modules. Then we dispatch the actions starting with the module name and a slash instead of just the name.

Categories
Svelte

Advanced Svelte Transition Features

Svelte is an up and coming front end framework for developing front end web apps.

It’s simple to use and lets us create results fast.

In this article, we’ll look at how to use advance Svelte transition features, including transition events, and local and deferred transitions.

Transition Events

We can add event handlers for various transition events to do things like logging.

For instance, we can write the following code to add an animation for our p element when it’s being toggled on and off and show the status of the animation:

App.svelte :

<script>
 import { fly } from "svelte/transition";
 let visible = true;
 let status = "";
</script>

<button on:click={() => visible = !visible}>Toggle</button>
<p>Animation status: {status}</p>
{#if visible}
<p
  transition:fly="{{ y: 200, duration: 2000 }}"
  on:introstart="{() => status = 'intro started'}"
  on:outrostart="{() => status = 'outro started'}"
  on:introend="{() => status = 'intro ended'}"
  on:outroend="{() => status = 'outro ended'}"
>
  foo
</p>
{/if}

In the code above, we add event handlers for introstart , outrostart , introend , and outroend events which set the status .

Then we display the status in a p tag. As we click the Toggle button, we’ll see the animation happen and the status being updated.

Local Transitions

We can apply transitions to individual list elements with local transitions. For instance, we can write the following to add a slide effect to each item on a list:

App.svelte :

<script>
  import { slide } from "svelte/transition";
  let items = [];
  const addItem = () => {
    items = [...items, Math.random()];
  };
</script>

<button on:click={addItem}>Add Item</button>
{#each items as item}
  <div transition:slide>
    {item}
  </div>
{/each}

In the code, we have the addItem function to add a new number to an array. Then we display the array in the markup.

In the div inside the each , we add the transition:slide directive to apply a slide effect when the item is added.

Therefore, we’ll see the slide effect as we click Add Item.

Deferred Transitions

With Svelte, we can defer transitions so that we can coordinate animation between multiple elements.

We can use the crossfade function to achieve this. It creates a pair of transitions called send and receive .

If the element is sent, then it looks for a corresponding element being received and generates a transition that transforms the element to its counterpart’s position and fades it out.

When an element is received, then the opposite happens. If there’s no counterpart, then the fallback transition is used.

For instance, we can animate the moving of items between 2 lists as follows:

App.svelte :

<script>
  import { cubicOut } from "svelte/easing";
  import { crossfade } from "svelte/transition";

  const [send, receive] = crossfade({
    duration: d => Math.sqrt(d * 200),

    fallback(node, params) {
      const style = getComputedStyle(node);
      const transform = style.transform === "none" ? "" : style.transform;

      return {
        duration: 600,
        easing: cubicOut,
        css: t => `
          transform: ${transform} scale(${t});
          opacity: ${t}
        `
      };
    }
  });

  let uid = 1;

  let todos = [
    { id: uid++, done: false, description: "write some docs" },
    { id: uid++, done: false, description: "eat" },
    { id: uid++, done: true, description: "buy milk" },
    { id: uid++, done: false, description: "drink" },
    { id: uid++, done: false, description: "sleep" },
    { id: uid++, done: false, description: "fix some bugs" }
  ];

  const mark = (id, done) => {
    const index = todos.findIndex(t => t.id === id);
    todos[index].done = done;
  };
</script>

<style>
  #box {
    display: flex;
    flex-direction: row;
  }
</style>

<div id='box'>
  <div>
    Done:
    {#each todos.filter(t => t.done) as todo}
      <div
        in:receive="{{key: todo.id}}"
        out:send="{{key: todo.id}}"
      >
        {todo.description}
        <button on:click={mark(todo.id, false)}>Not Done</button>
      </div>
    {/each}
  </div>
  <div>
    Not Done:
    {#each todos.filter(t => !t.done) as todo}
      <div
        in:receive="{{key: todo.id}}"
        out:send="{{key: todo.id}}"
      >
        {todo.description}
        <button on:click={mark(todo.id, true)}> Done</button>
      </div>
    {/each}
  </div>
</div>

In the code above, we created our send and receive transition functions with the crossfade function.

The fallback animation is used when there’s no receive counterpart for the send and vice versa, which can happen if we aren’t moving an element between 2 elements.

The fallback animation just does some scaling and opacity changes to the element being animated.

We render the 2 todo lists for done and not done items. When we click the Done or Not Done button beside the todo item, we’ll see a fade effect as the item is moved between the containing divs.

This is achieved with the in and out animations, we pass in an object with the key property with the value set to the id so that Svelte knows which element we’re moving.

Conclusion

We can use crossfade to coordinate transitions when it involves multiple elements.

Also, we use local transitions to animate list items that are being rendered.

Finally, we can track transition effects by listening to the events that are emitted during transitions by attaching event listeners to each.

Categories
Svelte

Add Transition Effects to a Svelte App

Svelte is an up and coming front end framework for developing front end web apps.

It’s simple to use and lets us create results fast.

In this article, we’ll look at how to add transition effects to a Svelte app.

Transitions

Svelte has built-in libraries for adding transitions. We can add the fade function to create a fade effect.

To use it, we write the following code:

App.svelte :

<script>
  import { fade } from "svelte/transition";
  let visible = true;
</script>

<button on:click={() => visible = !visible}>Toggle</button>
{#if visible}
<p transition:fade>foo</p>
{/if}

In the code above, we toggle visible between true and false as we click the Toggle button.

Then the p element fades as it’s being toggle on and off.

Transition functions can accept parameters. For instance, we can modify the default options of the fly effect as follows:

App.svelte :

<script>
  import { fly } from "svelte/transition";
  let visible = true;
</script>

<button on:click={() => visible = !visible}>Toggle</button>
{#if visible}
<p transition:fly="{{ y: 200, duration: 3000 }}">foo</p>
{/if}

The code above moved the word foo up and down as we click the Toggle button. y indicates the distance that we move the word foo up and down. duration is the length of the transition effect.

We should therefore then see the word foo move up and down as we click the Toggle button.

With Svelte, we can also only add transition effects when an item is added to the DOM with the in directive, and animate when the item is removed from the DOM with the out directive.

For instance, we can write the following:

App.svelte :

<script>
  import { fade } from "svelte/transition";
  let visible = true;
</script>

<button on:click={() => visible = !visible}>Toggle</button>
{#if visible}
<p in:fade="{{ y: 200, duration: 3000 }}">foo</p>
{/if}

The code above only applies the fade effect when the p element with word foo is being inserted into the DOM. We should see a fade effect at that time.

Likewise, we can use the out directive to only add transition effect when the p element is removed from the DOM as follows:

<script>
  import { fade } from "svelte/transition";
  let visible = true;
</script>

<button on:click={() => visible = !visible}>Toggle</button>
{#if visible}
<p out:fade="{{ y: 200, duration: 3000 }}">foo</p>
{/if}

Creating our own Transition

We can create our own transitions if we don’t want to use the built-in transitions.

For instance, we can write the following code to create an effect that spins the text and change the color as the p element is being removed from the DOM a follows:

<script>
  import { fade } from "svelte/transition";
  import { elasticOut } from "svelte/easing";
  let visible = true;

  const spin = (node, { duration }) => {
    return {
      duration,
      css: t => {
        const eased = elasticOut(t);

        return `
            transform: scale(${eased}) rotate(${eased * 1080}deg);
            color: hsl(
              ${~~(t * 360)},
              ${Math.min(100, 2000 - 1000 * t)}%,
              ${Math.min(50, 2000 - 500 * t)}%
            );`;
      }
    };
  };
</script>

<button on:click={() => visible = !visible}>Toggle</button>
{#if visible}
<p out:spin="{{ y: 200, duration: 3000 }}">foo</p>
{/if}

Add we did was return the CSS for styling the p element as the time t is increasing.

elasticOut defines our easing, which is our rate of change over time. We passed it into transform to change the size of the text. We also used it to change the rotation angle of the text as it fades out.

JavaScript Animation

We can also animate text with JavaScript. For instance, we can create a typewriter effect as follows:

<script>
  let visible = true;

  const typewriter = (node, { speed = 50 }) => {
    const valid =
      node.childNodes.length === 1 && node.childNodes[0].nodeType === 3;

    if (!valid) {
      return;
    }

    const text = node.textContent;
    const duration = text.length * speed;

    return {
      duration,
      tick: t => {
        const i = Math.ceil(text.length * t);
        node.textContent = text.slice(0, i);
      }
    };
  };
</script>

<button on:click={() => visible = !visible}>Toggle</button>
{#if visible}
<p in:typewriter>Hello Jane. How are you?</p>
{/if}

In the code above, we created the typewriter effect by defining a typewriter function.

We progressive append the text content into the p element as time goes on, which means t is increasing.

Therefore, we’ll get a typewriter when we toggle the text on by clicking the Toggle button since we have:

<p in:typewriter>Hello Jane. How are you?</p>

in the markup.

Conclusion

Svelte has built-in libraries for creating transitions and animations. It makes animation effects easy.

We just import the functions for animation and apply them with in , out , or transition directives.

Also, we can make our own custom animations by writing our own animation functions applying them with the same directives.

Categories
Svelte

Animating Value Changes with Svelte

Svelte is an up and coming front end framework for developing front end web apps.

It’s simple to use and lets us create results fast.

In this article, we’ll look at how to create tweens to animate values in a Svelte component.

Creating Animation for Value Changes with tween

We can use the tweened function to create a value that’s animated when we change it.

For instance, we can use it to create an animated progress bar which has an easing effect as follows:

<script>
  import { tweened } from "svelte/motion";
  import { cubicOut } from "svelte/easing";

  const progress = tweened(0, {
    duration: 400,
    easing: cubicOut
  });

  const moveProgress = () => {
    $progress = 0;
    const interval = setInterval(() => {
      $progress += 0.1;
      if ($progress === 1) {
        clearInterval(interval);
      }
    }, 1500);
  };
</script>

<style>
  progress {
    display: block;
    width: 100%;
  }
</style>

<progress value={$progress}></progress>
<br>
<button on:click="{moveProgress}">
  Start
</button>

In the code above, we have the moveProgress function, which sets the $progress store’s value.

Then we update it until it gets to 1. Once it’s 1, then we clear the timer object to stop it from running.

The $progress store is created from the tweened function, which enables us to animate as the value is being changed. It has the initial value of 0 as we passed 0 into the tweened function as the first argument.

The 2nd argument has the object to specify how the animation is done. We set the duration of the animation to 400ms. Then we set the easing function to cubic out.

Cubic out means that the animation moves fast and then slowly.

All options that are available in the object we pass into the 2nd argument are:

  • delay — milliseconds before the tween starts
  • duration — either the duration of the tween in milliseconds or a (from, to) => milliseconds function allowing us to specify the tween
  • easing — a p => t function
  • interpolate — a custom (from, to) => t => value function for interpolating between arbitrary values. Svelte interpolates between numbers, dates, and identically shaped arrays and objects by default

We can pass the options to the progress.set and progress.update as the second argument to override the defaults.

The set and update methods both return a promise that resolves when the tween completes.

spring Function

We can use the spring function to create a store that has values that’s animated as they’re changed.

For instance, we can write the following code to add a spring effect to our square as we move it by hover the mouse on different location:

App.svelte :

<script>
  import { spring } from "svelte/motion";

  let coords = spring({ x: 50, y: 50 });
  let square;

  const setCoords = e => {
    coords.set({ x: e.clientX, y: e.clientY });
    square.style.top = `${$coords.y}px`;
    square.style.left = `${$coords.x}px`;
  };
</script>

<style>
  .screen {
    width: 100vw;
    height: 100vh;
  }

  .square {
    width: 20px;
    height: 20px;
    background-color: red;
    position: absolute;
  }
</style>

<div class="screen" on:mousemove="{setCoords}">
  <div class="square" bind:this={square}>
  </div>
</div>

In the code above, we bind the div with class square to the square variable.

Then we added a setCoords function to set the coords store with the x and y values of the mouse hover position.

We then used that to set the top and left values of the div with class square, which when combined with the existing styles, will move the square.

The spring function gives the square a springy effect as we move the red square around with the mouse.

If we switch between spring and writable , we’ll notice a difference in how the square moves.

Conclusion

We can create animation from store states with the tween and spring functions.

Then tween function is good for values that change less frequently and spring is good for animations of values that change more frequently.