Categories
JavaScript Vue

Lifecycle Hooks of the Vue Instance

Vue.js is an easy to use web app framework that we can use to develop interactive front end apps.

In this article, we’ll look at the lifecycle hooks of a Vue instance.

Vue Instance Lifecycle Hooks

Each Vue instance goes through a lifecycle. The lifecycle events can be handled with functions, which are the lifecycle hooks.

For example, when a Vue instance is created, the created hook is called.

We can handle the created event emitted by Vue.js as follows:

new Vue({  
  data: {  
    foo: "bar"  
  },  
  created() {  
    console.log(`foo is ${this.foo}\`);  
  }  
});

Then we should see foo is bar from the console.log . Once the Vue instance is created and the initial data is set, the created hook is called.

This is why we see such output from the console.log .

Note that we can’t use arrow functions for lifecycle hooks since we reference the properties from this , which is the Vue instance.

There’re also other lifecycle hooks like mounted , updated , destroyed .

Lifecycle Diagram

The full lifecycle diagram is below. It outlines the whole workflow for creating a new Vue instance.

The red rounded rectangles have the hooks that are called.

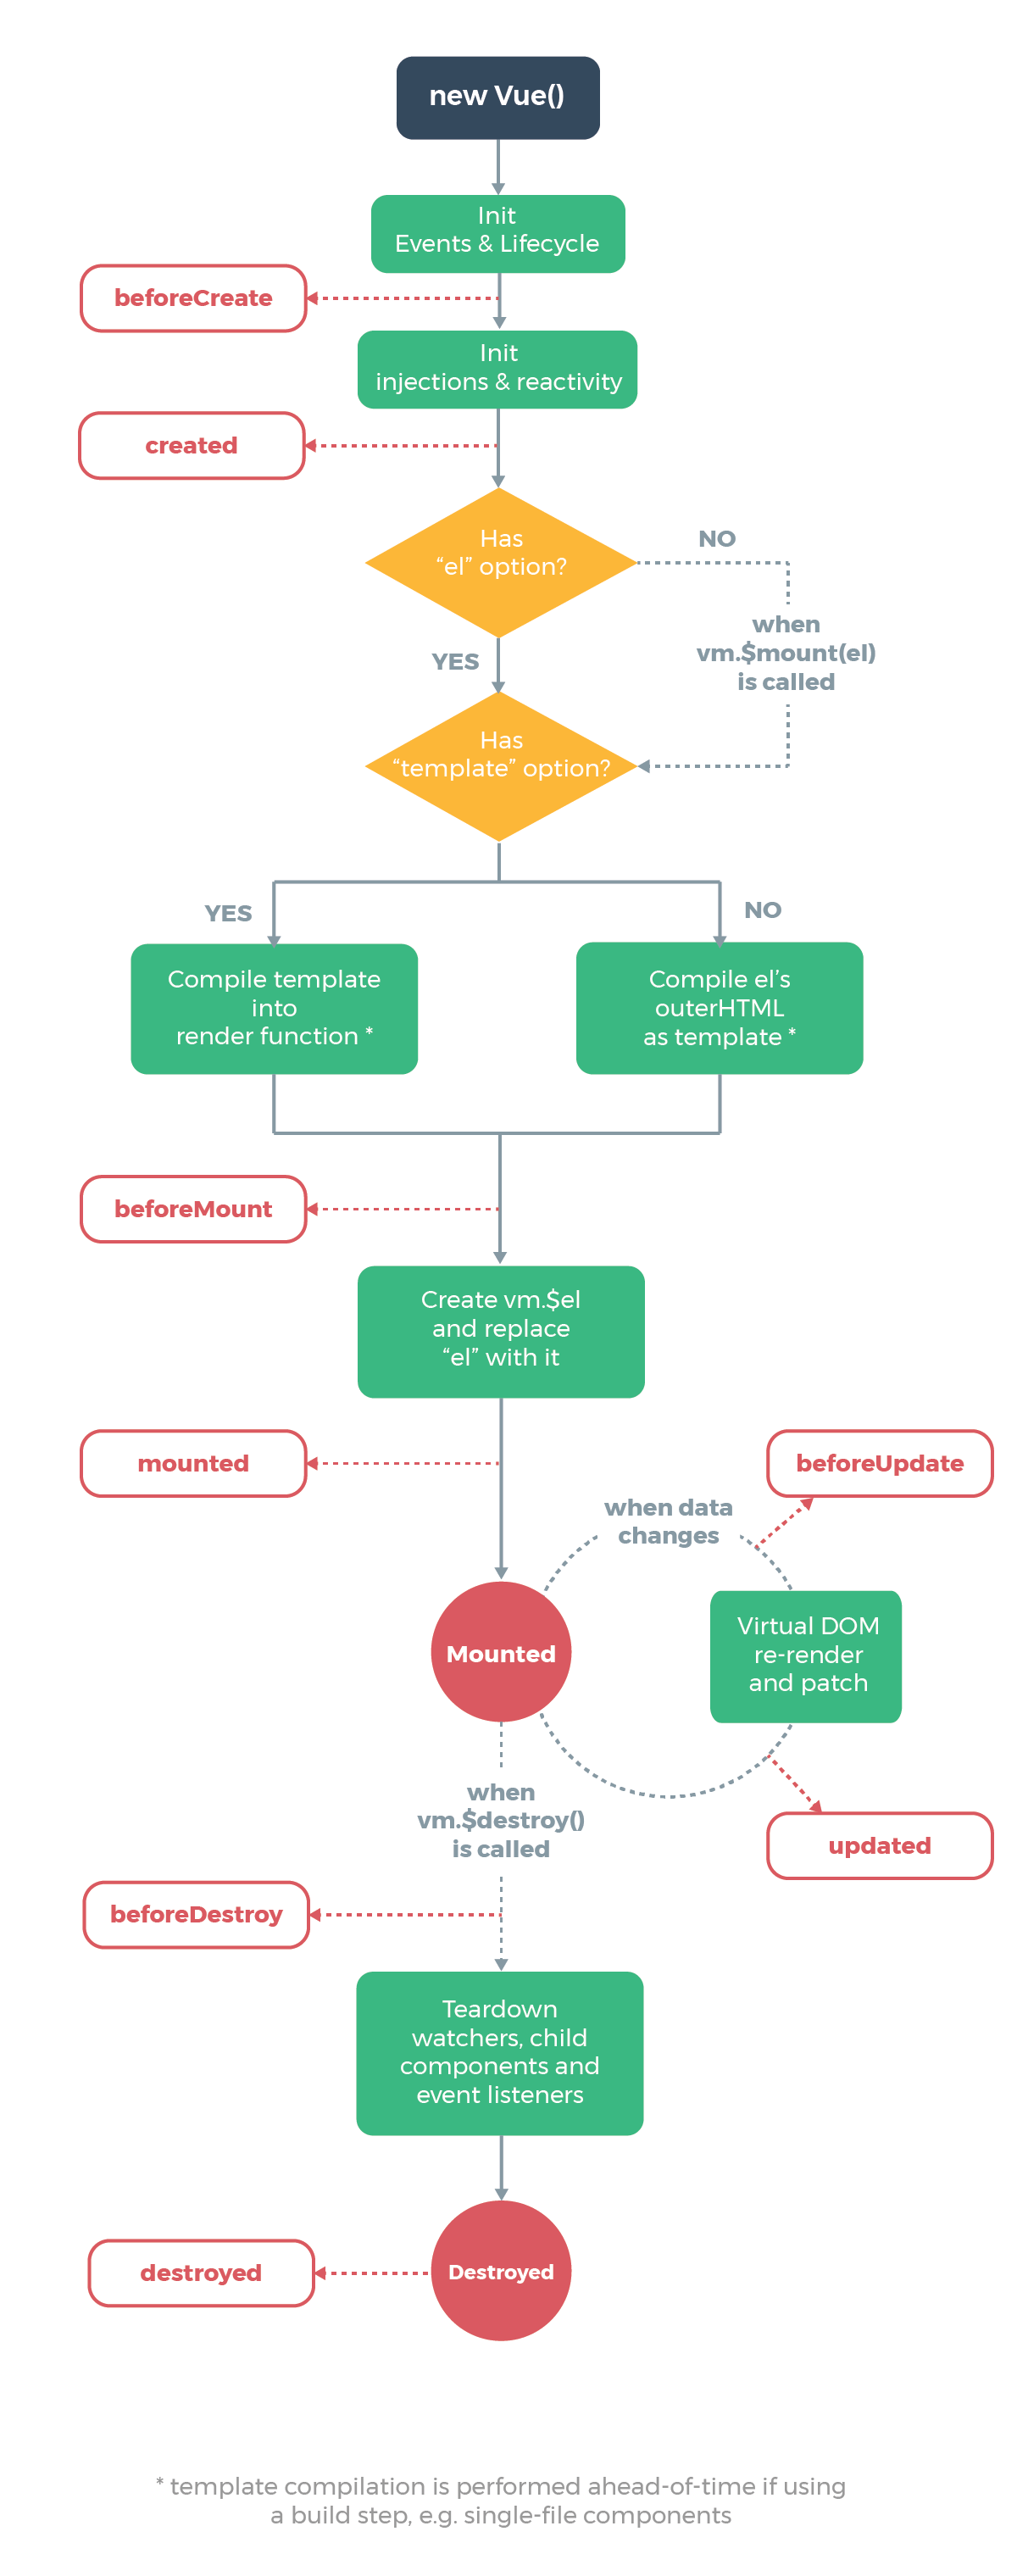
Courtesy of vuejs.org

Creation Hooks

Creation hooks are called when the Vue instance begins its initialization process. It lets us do things before the Vue instance is added to the DOM.

This hook is also run during server-side rendering

We don’t have access to this.$el (the target mounting element) or the DOM within this hook since no DOM manipulation is done at this point.

beforeCreate

The beforeCreate hook runs during initialization. data has been made reactive and events aren’t set up yet.

For example, if we have:

new Vue({  
  data: {  
    foo: "bar"  
  },  
  beforeCreate() {  
    console.log("beforeCreated called");  
  },  
  created() {  
    console.log(`foo is ${this.foo}`);  
  }  
});

Then we see:

beforeCreated called  
foo is bar

which confirms that beforeCreate is called before created .

created

data and events are available in the created hook since the Vue instance has been initialized.

For example, if we write:

new Vue({  
  data: {  
    foo: "bar"  
  },  
  created() {  
    this.foo = "baz";  
    console.log(`foo is ${this.foo}`);  
  }  
});

Then we get:

foo is baz

since we changed the value of this.foo in the created hook before logging its value.

Mounting Hooks

The mounting hooks are run when DOM manipulation is being done, including mounting the Vue instance to the specified element.

We can use it to access or modify the DOM of our component.

beforeMount

The beforeMount hook runs before the initial render happens and after the template or render functions are compiled.

It doesn’t get called during server-side rendering.

For instance, if we write:

new Vue({  
  el: "#app",  
  data: {  
    foo: "bar"  
  },  
  created() {  
    console.log(`created called`);  
  },  
  beforeMount() {  
    console.log(`beforeMount called`);  
  }  
});

Then we get:

created called  
beforeMount called

mounted

When the mounted hook is called, we have access to the component, template, and the DOM.

It’s used frequently for the initialization of our own data like fetching data over the network and integrate non-Vue libraries.

For example, if we have the following in src/index.js:

new Vue({  
  el: "#app",  
  data: {  
    foo: "bar"  
  },  
  beforeMount() {  
    console.log(this.$el.textContent);  
  }  
});

and the following in index.html :

<!DOCTYPE html>  
<html>  
  <head>  
    <title>Hello</title>  
    <meta charset="UTF-8" />  
    <script src="https://cdn.jsdelivr.net/npm/vue/dist/vue.js"></script>  
  </head> 
  <body>  
    <div id="app">foo</div>  
    <script src="./src/index.js"></script>  
  </body>  
</html>

Then we get foo logged since we have foo in the div with ID app .

Updating Hooks

Updating hooks are called when a reactive property used by our component changes or we some triggers re-rendering manually.

They’re useful for checking when a component is re-rendering.

However, we should use computed properties or watchers to track reactive property changes.

beforeUpdate

beforeUpdate runs after data changes in our component, right before the DOM is updated and re-rendered.

It lets us get the new state before the DOM is re-rendered.

For example, if we have the following in src/index.html :

new Vue({  
  el: "#app",  
  data: {  
    foo: "bar"  
  },  
  beforeUpdate() {  
    console.log(this.foo);  
  },  
  methods: {  
    toggle() {  
      this.foo = this.foo === "bar" ? "baz" : "bar";  
    }  
  }  
});

and the following in index.html :

<!DOCTYPE html>  
<html>  
  <head>  
    <title>Hello</title>  
    <meta charset="UTF-8" />  
    <script src="https://cdn.jsdelivr.net/npm/vue/dist/vue.js"></script>  
  </head> <body>  
    <div id="app">  
      <p>{{foo}}</p>  
      <button @click="toggle">Toggle</button>  
    </div>  
    <script src="./src/index.js"></script>  
  </body>  
</html>

Then when we click the Toggle button, we can see the value changes logged in the console.log call of the beforeUpdate method.

updated

The updated hook runs after data changes on our Vue instance and the DOM re-renders.

For example, if we have the following in src/index.js:

new Vue({  
  el: "#app",  
  data: {  
    foo: "bar"  
  },  
  updated() {  
    console.log(this.$refs.foo.textContent);  
  },  
  methods: {  
    toggle() {  
      this.foo = this.foo === "bar" ? "baz" : "bar";  
    }  
  }  
});

and the following in index.html :

<!DOCTYPE html>  
<html>  
  <head>  
    <title>Hello</title>  
    <meta charset="UTF-8" />  
    <script src="https://cdn.jsdelivr.net/npm/vue/dist/vue.js"></script>  
  </head> <body>  
    <div id="app">  
      <p ref="foo">{{foo}}</p>  
      <button @click="toggle">Toggle</button>  
    </div>  
    <script src="./src/index.js"></script>  
  </body>  
</html>

Then we can get the text content of the p element with ref set to foo by logging the value as follows:

console.log(this.$refs.foo.textContent);

in the updated hook and we can see the new value for it as we click the Toggle button.

Destruction Hooks

These hooks are run when the Vue instance is destroyed. Therefore, we can run clean up code in there.

These hooks aren’t run during server-side rendering.

beforeDestroy

beforeDestroy is run before teardown. Our Vue instance is still present and functional.

Therefore, we can run our clean up code in here.

For example, we can use it as follows:

new Vue({  
  el: "#app",  
  data: {  
    foo: "bar"  
  },  
  beforeDestroy() {  
    this.foo = null;  
  }  
});

destroyed

This is called after the Vue instance is destroyed. All the directives are unbound, event listeners are removed and child Vue instances are destroyed.

For example, we can use it as follows:

new Vue({  
  el: "#app",  
  data: {  
    foo: "bar"  
  },  
  destroyed() {  
    this.foo = null;  
  }  
});

Conclusion

The lifecycle hooks are useful for doing things during the lifecycle of the Vue instance.

The creation hooks can be used to run any initialization code.

The mounting hooks are run when the Vue instance is being mounted into the DOM.

The update hooks whenever data of the Vue instance updates, and the destroy hooks are run when the Vue instance is being destroyed.

Categories
JavaScript Vue

Vue.js Basics — The Vue Instance

Vue.js is an easy to use web app framework that we can use to develop interactive front end apps.

In this article, we’ll look more closely at the Vue instance, including how to define it and some properties of it.

Characteristics of the Vue Instance

Each Vue.js app begins by defining a new Vue instance. The Vue constructor takes an options object that takes various properties.

We often use vm to refer to a Vue instance, where vm stands for ViewModel.

A Vue app roughly follows the Model-View-ViewModel pattern, where the ViewModel has the business logic of the app, View has the markup that users see, and Model has the data.

For example, we can define a Vue instance as follows:

const vm = new Vue({ });

Each Vue app consists of a root Vue instance and it’s created with new Vue . We can organize it in a tree for easier maintenance.

Data and Methods

The options object that pass into the Vue constructor can have data and methods.

For example, if we define a Vue instance as follows:

const vm = new Vue({  
  el: "#app",  
  data: { foo: "bar" }  
});

Then when we add:

console.log(vm.foo);

below our vm definition, we get 'bar' since data.foo has the value 'bar' .

In other words, if we have:

const data = { foo: "bar" };  
const vm = new Vue({  
  el: "#app",  
  data  
});  
console.log(vm.foo === data.foo);

Then the console.log will log true .

When the data changes, the app will re-render with the new data.

If we create a new property in vm and set it as follows:

let data = { foo: "bar" };  
const vm = new Vue({  
  el: "#app",  
  data  
});  
vm.a = 1;

The app won’t re-render. On the other hand, if we write:

let data = { foo: "bar", a: 1 };  
const vm = new Vue({  
  el: "#app",  
  data  
});

Then the app will re-render. This means that we have to put our data that we want to render in the data field.

If we freeze the object that we pass to data with Object.freeze() , then the Vue app won’t re-render since properties can’t be changed, so new changes can’t propagate since they aren’t set in the object.

So if we have:

let data = { foo: "bar", a: 1 };  
Object.freeze(data);  
const vm = new Vue({  
  el: "#app",  
  data  
});

No changes can be made after the initial render since we froze data with Object.freeze .

The Vue instance also exposes a number of instance properties and methods.

They’re prefixed with the $ so that we know they’re part of the Vue instance.

$el

We have the $el property to get the DOM element that the Vue instance resides in.

For example, if we have:

let data = { foo: "bar" };  
const vm = new Vue({  
  el: "#app",  
  data  
});

console.log(vm.$el === document.getElementById("app"));

Then the console.log will log true since our Vue instance resides in an element with ID app .

$data

The $data property will get us the value of the data property that we set in the options object that we passed into the Vue constructor.

So if we have:

let data = { foo: "bar" };  
const vm = new Vue({  
  el: "#app",  
  data  
});

console.log(vm.$data === data);

Then we get true from the console.log since data references the same object as vm.$data since we set it as the value of the data property of the options object that we passed into the Vue constructor.

$watch

$watch is an instance method that lets us watch for changes in the data object that we set as the value of the options object.

For example, if we have:

let data = { foo: "bar" };  
const vm = new Vue({  
  el: "#app",  
  data  
});

vm.$watch("foo", (newValue, oldValue) => {  
  console.log(newValue, oldValue);  
});

in src/index.js and:

<!DOCTYPE html>  
<html>  
  <head>  
    <title>Hello</title>  
    <meta charset="UTF-8" />  
    <script src="https://cdn.jsdelivr.net/npm/vue/dist/vue.js"></script>  
  </head> <body>  
    <div id="app">  
      <input type="text" v-model="foo" />  
    </div>  
    <script src="./src/index.js"></script>  
  </body>  
</html>

in index.html . Then when we type in something to the input box, we should get some console.log output from:

vm.$watch("foo", (newValue, oldValue) => {  
  console.log(newValue, oldValue);  
});

This is because changes are constantly being watched in the data.foo property. v-model automatically updates the value for foo as we type into the box.

So as we’re typing, the changes to foo are being watched and it’s logged by the handler function that we passed into the $watch method.

Conclusion

The Vue instance is created by passing in an options object with the data , el , and methods properties to the Vue constructor. It returns an instance of our Vue app.

The instance has the $el property to get the DOM element that our app resides in.

Also, there’s the $data property to get the value of the data property to get the data that we set when we pass it in as the value of the data property of the options object.

Finally, we have the $watch method to watch for changes in our data.

Categories
JavaScript Vue

Basic Vue Form Validation with VeeValidate

Form validation is a common requirement of in most web apps. This is no different with Vue apps.

Vue doesn’t provide a solution for form validation out of the box. Therefore, we have to find our own solution for form validation.

In this article, we’ll look at how to do basic Vue form validation with VeeValidate.

Getting Started

We can get started by including the VeeValidate library by writing:

<script src="https://unpkg.com/vee-validate@latest"></script>

in our HTML file.

Then we can write:

Vue.component("validation-provider", VeeValidate.ValidationProvider);

to include the validation-provider component in our app. We need to wrap this around our form fields to let VeeValidate do validation on it.

Then we need to define some form validation rules to actually do the form validation.

To do this, we use the VeeValidate.extend function, which takes the rule name string as the first argument, and the callback function that returns the condition for a validate input as the second argument.

For instance, we can use Veelidate.extend as follows to create a rule for for validating that the inputted value is an odd number:

VeeValidate.extend("odd", value => {
  return value % 2 !== 0;
});

In the code above, we check if value % 2 returns 0 or not. If it doesn’t then it’s an odd number.

Likewise, we can do something similar to check if an inputted value is a positive number as follows:

VeeValidate.extend("positive", value => {
  return value >= 0;
});

We can use the rules as follows in a small app with a form field that we can enter something into:

index.js:

Vue.component("validation-provider", VeeValidate.ValidationProvider);

VeeValidate.extend("odd", value => {
  return value % 2 !== 0;
});

VeeValidate.extend("positive", value => {
  return value >= 0;
});
new Vue({
  el: "#app",
  data: {
    value: ""
  }
});

index.html:

<!DOCTYPE html>
<html lang="en">
  <head>
    <title>App</title>
    <script src="https://cdn.jsdelivr.net/npm/vue/dist/vue.js"></script>
    <script src="https://unpkg.com/vee-validate@latest"></script>
  </head>
  <body>
    <div id="app">
      <validation-provider rules="positive|odd" v-slot="{ errors }">
        <input v-model="value" type="text" name="value" />
        <span>{{ errors[0] }}</span>
      </validation-provider>
    </div>
    <script src="index.js"></script>
  </body>
</html>

In the template above, we have a slot that gets the errors object from the validation-provider component which contains the form validation errors messages.

We display the first one by accessing the string on the 0 index of errors.

The rules prop has the rules separated by the | symbol. We applied the positive and odd rules that we defined earlier in index.js

Note that the validation-provider is wrapped around our input. This is required to validate the input. We wrap one validation-provider per input.

Then when type in something that’s not a positive, odd number, we’ll see ‘value is not valid’ displayed.

value is from the value of the name attribute of the input.

Rule Arguments

We can pass in arguments to rule callbacks so that we can do more complex validations. For instance, we can write the following rule to validate that the inputted value is a number bigger than or equal to a certain number:

VeeValidate.extend("min", {
  validate(value, args) {
    return value >= args.num;
  },
  params: ["num"]
});

Then we can apply it as follows:

index.js:

Vue.component("validation-provider", VeeValidate.ValidationProvider);

VeeValidate.extend("min", {
  validate(value, args) {
    return value >= args.num;
  },
  params: ["num"]
});

new Vue({
  el: "#app",
  data: {
    value: ""
  }
});

index.html:

<!DOCTYPE html>
<html lang="en">
  <head>
    <title>App</title>
    <script src="https://cdn.jsdelivr.net/npm/vue/dist/vue.js"></script>
    <script src="https://unpkg.com/vee-validate@latest"></script>
  </head>
  <body>
    <div id="app">
      <validation-provider rules="min:5" v-slot="{ errors }">
        <input v-model="value" type="text" name="value" />
        <span>{{ errors[0] }}</span>
      </validation-provider>
    </div>
    <script src="index.js"></script>
  </body>
</html>

In the code above, we have min:5 to indicate that we want to make sure that our inputted value is 5 or greater.

Conclusion

Validation of Vue forms with VeeValidate is simple. We can do a lot with a few lines of code.

Validation rules are defined with extend. And we use the validation-provider component to validate inputs by wrapping it around the input element.

Also, we can pass in arguments to validation rules to make them more flexible.

Categories
JavaScript Vue

Emitting Custom Events with Vue.js

We can emit events with Vue. Events are emitted by child components and are listened to by their parent components.

Emitted can have data that’s sent along with the event emission.

In this article, we’ll look at how to emit custom Vue events with $emit and listen to them in the parent component.

We can emit events in our child component and use the listen to the event and use the emitted data as follows:

index.html:

<!DOCTYPE html>
<html lang="en">
  <head>
    <title>App</title>
    <script src="https://cdn.jsdelivr.net/npm/vue/dist/vue.js"></script>
  </head>
  <body>
    <div id="app">
      <Foo @foo="bar = $event"></Foo>
      <p>{{bar}}</p>
    </div>
    <script src="index.js"></script>
  </body>
</html>

index.js

Vue.component("Foo", {
  methods: {
    emit() {
      this.$emit("foo", "bar");
    }
  },
  template: `<button @click='emit'>Emit</button>`
});

new Vue({
  el: "#app",
  data: {
    bar: ""
  }
});

In the code above, we defined a Foo component with an emit method that emits an event called foo with the payload 'bar'.

Then in our template, we attached a listener to the template where we referenced our Foo component.

This is where we have:

<Foo @foo="bar = $event"></Foo>

We display assigned item in:

<p>{{bar}}</p>

Then when we click Emit, the foo event is emitted with the value 'bar'.

'bar' is assigned to $event. Then it’s set to bar in the parent component and displayed.

Whatever name we set it to, it’ll be the event name that’s used to attach event listeners. There’s no transformation of the names.

Customizing Component v-model

v-model is shorthand for @input and :value together. We can change that since Vue 2.2.0 to make v-model listen to other event names and bind to different props.

We can add the model property to our component so that v-model can listen to the event name and pass in props with names that we specify.

For example, we can write:

Vue.component("Foo", {
  model: {
    prop: "checked",
    event: "change"
  },
  data() {
    return {
      checked: false
    };
  },
  template: `
  <div>
    <label>foo</label>
    <input
      type="checkbox"
      :checked="checked"
      @change="$emit('change', $event.target.checked)"
    >
  </div>
  `
});

new Vue({
  el: "#app",
  data: {
    bar: false
  }
});

index.html:

<!DOCTYPE html>
<html lang="en">
  <head>
    <title>App</title>
    <script src="https://cdn.jsdelivr.net/npm/vue/dist/vue.js"></script>
  </head>
  <body>
    <div id="app">
      <Foo v-model="bar"></Foo>
      <p>{{bar}}</p>
    </div>
    <script src="index.js"></script>
  </body>
</html>

In the code above, we have:

model: {
    prop: "checked",
    event: "change"
}

to specify that the parent’s v-model directive in the parent listens to the change event and pass data for the checkbox into the checked prop.

Now we should see the value of the checkbox displayed in the p tag below the Foo component as we click the checkbox.

Conclusion

We can emit custom events with Vue with the $emit method. It takes the name of the event as the first argument, and the value we want to emit in the second argument.

Then we can listen to the event and get the payload in the parent component.

We can customize v-model by setting the prop that v-model passes the value to and then event it listens to from the child component to set the value of the specified model.

Categories
JavaScript Vue

Create Custom Filters with Vue.js

In a Vue app, we can use filters to transform data in a template to a format that we want to display the items in.

In this article, we’ll look at how to create filters and use them in our template.

Global Filter

We can define a global filter by using the Vue.filter method to define a filter.

Global filters are available in any part of the app.

It takes the name of the filter as the first argument and a function that takes a value and returns the value transformed to something we want as the second argument.

For example, we can define a global filter and use it as follows:

index.html:

<!DOCTYPE html>
<html lang="en">
  <head>
    <title>App</title>
    <script src="https://cdn.jsdelivr.net/npm/vue/dist/vue.js"></script>
  </head>
  <body>
    <div id="app">
      {{date | localeString}}
    </div>
    <script src="index.js"></script>
  </body>
</html>

index.js:

Vue.filter("localeString", function(value) {
  if (!value instanceof Date) return "";
  return value.toLocaleString();
});

new Vue({
  el: "#app",
  data: {
    date: new Date()
  }
});

In the code above, we defined a global filter with:

Vue.filter("localeString", function(value) {
  if (!value instanceof Date) return "";
  return value.toLocaleString();
});

It takes a value parameter, checks if it’s a Date instance, and returns value.toLocaleString() if it is to format the date into a date string.

We then used it by writing:

{{date | localeString}}

in our template.

Local Filter

We can define a local filter by adding the filter method to our filters object in our Vue component.

We can write it as follows:

index.js

new Vue({
  el: "#app",
  data: {
    date: new Date()
  },
  filters: {
    localeString(value) {
      if (!value instanceof Date) return "";
      return value.toLocaleString();
    }
  }
});

In the code above, we moved our filter function into the root component. We reference the same way as we did we the global filter.

Filters can be chained. We just have to separate them with pipes. For example, we can write:

index.html:

<!DOCTYPE html>
<html lang="en">
  <head>
    <title>App</title>
    <script src="https://cdn.jsdelivr.net/npm/vue/dist/vue.js"></script>
  </head>
  <body>
    <div id="app">
      {{date | localeString | lowercase}}
    </div>
    <script src="index.js"></script>
  </body>
</html>

index.js:

Vue.filter("localeString", function(value) {
  if (!value instanceof Date) return "";
  return value.toLocaleString();
});

Vue.filter("lowercase", function(value) {
  return value.toLowerCase();
});

new Vue({
  el: "#app",
  data: {
    date: new Date()
  }
});

We should then see our date string in lower case.

Also, we can pass in arguments into filters as follows:

{{ message | filterA('arg1', arg2) }}

Then 'arg1' will be passed in as the second argument and arg2 as the 3rd argument of our filter function.

Conclusion

We can define filters to transform data into a format that we want to displayed in.

They can be defined globally or locally.

They can be chained and they can also pass in arguments.