Categories
Vue 3

Vue 3 — Vue Instance Properties and Templates

Vue 3 is in beta and it’s subject to change.

Vue 3 is the up and coming version of Vue front end framework.

It builds on the popularity and ease of use of Vue 2.

In this article, we’ll look at Vue instance hooks and create simple templates with Vue 3.

Vue Instance Properties

The Vue instance has some properties that are built into th app.

The $data property has the data that our Vue instance has.

For instance, we can write:

<!DOCTYPE html>
<html lang="en">
  <head>
    <title>App</title>
    <script src="https://unpkg.com/vue@next"></script>
  </head>
  <body>
    <div id="app">
      {{a}}
    </div>
    <script>
      const data = { a: 1 };

      const vm = Vue.createApp({
        data() {
          return data;
        }
      }).mount("#app");

      console.log(vm.$data.a);
    </script>
  </body>
</html>

We have the vm.$data.a property which is the same as what we return in the data method.

a would be 1.

Instance Lifecycle Hooks

A Vue instance has various lifecycle hooks that it goes through from the initial load to being destroyed.

The following is the lifecycle diagram:
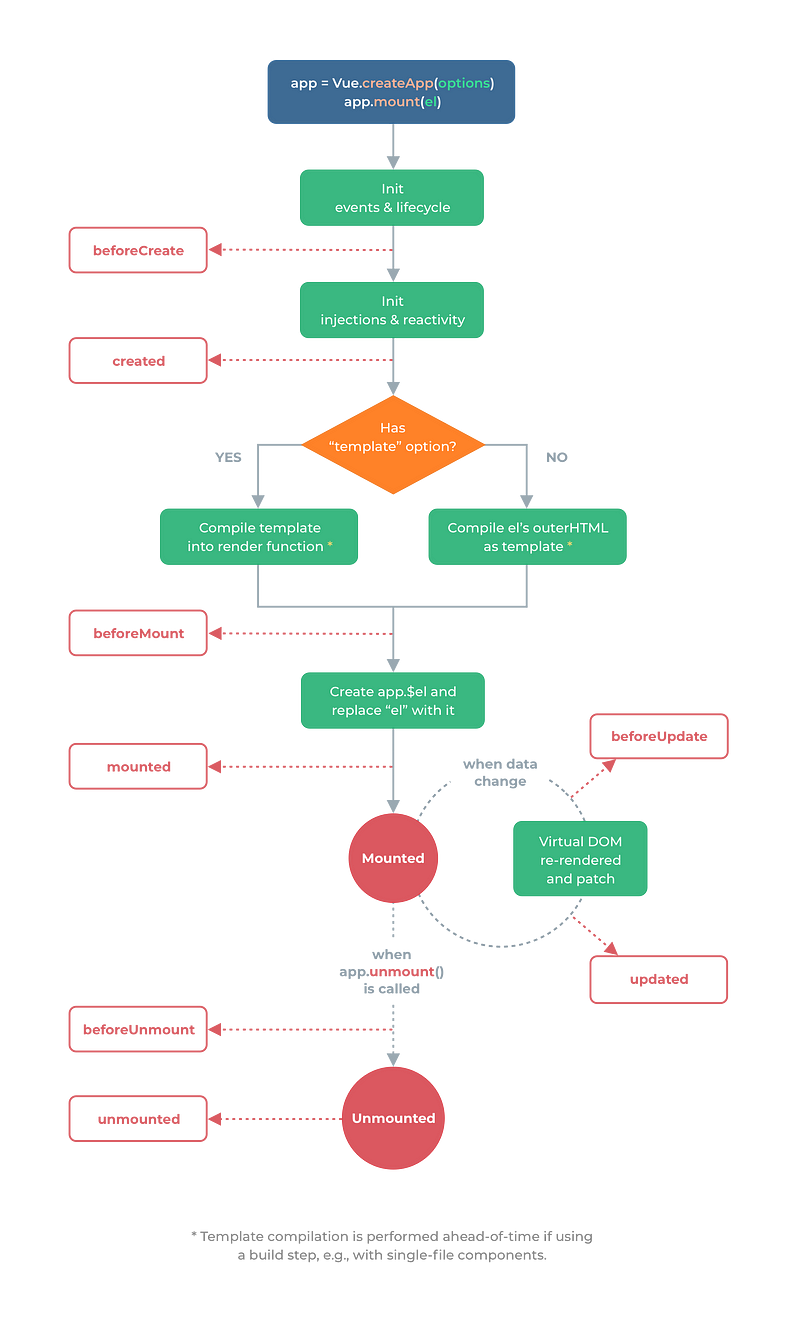
Courtesy of https://v3.vuejs.org/guide/instance.html#lifecycle-diagram

When the Vue instance is created, it starts with the init events and lifecycle stage, which calls the beforeCreate method in the Vue instance.

Event listeners are attached and the lifecycle begins at this stage.

Then it initializes the injections and reactivity stage and calls the created method.

This stage is where Vue starts listening for changes for data changes in the Vue instance.

Then one of 2 things can happen depending on if there’s a template in our Vue instance.

If there is, then template is compiled.

Otherwise, it compiles the content of the element we mounted pour Vue instance to HTML.

Once either of those is done, then beforeMount method is run.

Then the $el property is added to the Vue instance. Then element’s content is replaced with the compiled content.

The mounted method is then run.

When the state changes, then beforeUpdate is run.

Once the Virtual DOM is updated, the updated method is run.

Once app.unmount is called, which means the component will be unmounted.

Then beforeUnmount is run.

And when it’s unmounted, the unmounted method is run.

The methods are optional in our component.

We only need to add them if we want to run something in those lifecycle stages.

For example, we can write:

<!DOCTYPE html>
<html lang="en">
  <head>
    <title>App</title>
    <script src="https://unpkg.com/vue@next"></script>
  </head>
  <body>
    <div id="app">
      {{a}}
    </div>
    <script>
      const vm = Vue.createApp({
        data() {
          return {
            a: 1
          };
        },
        created() {
          console.log(this.a);
        }
      }).mount("#app");
    </script>
  </body>
</html>

to add our own code to the created hook, which runs when the component first listen to state changes.

Therefore, this.a ‘s value will be logged.

Template Syntax

Vue uses a HTML-base template syntax that lets us bind the value between the template and the Vue instance’s data.

Vue compiles the templates into Virtual DOM render functions.

This lets Vue figure out the least amount of changes to change the real DOM to render the latest data.

Interpolations

The most basic kind of data binding is text interpolation.

For example, we can write:

<!DOCTYPE html>
<html lang="en">
  <head>
    <title>App</title>
    <script src="https://unpkg.com/vue@next"></script>
  </head>
  <body>
    <div id="app">
      {{a}}
    </div>
    <script>
      const vm = Vue.createApp({
        data() {
          return {
            a: 1
          };
        }
      }).mount("#app");
    </script>
  </body>
</html>

Then we see that a is 1, which is displayed on the screen.

This interpolate is updated every time a changes.

We can make the interpolation only update once with the v-once directive.

For instance, we can write:

<!DOCTYPE html>
<html lang="en">
  <head>
    <title>App</title>
    <script src="https://unpkg.com/vue@next"></script>
  </head>
  <body>
    <div id="app">
      <div v-once>{{a}}</div>
    </div>
    <script>
      const vm = Vue.createApp({
        data() {
          return {
            a: 1
          };
        }
      }).mount("#app");
    </script>
  </body>
</html>

{{a}} will still be displayed as 1 even if the value changes.

Conclusion

The Vue instance has its own lifecycle hook.

We can add the code needed to run code during various stages of a Vue instance lifecycle.

Vue has an easy to use template syntax for rendering data.

Categories
Vue 3

Vue 3 — HTML and Directives

Vue 3 is in beta and it’s subject to change.

Vue 3 is the up and coming version of Vue front end framework.

It builds on the popularity and ease of use of Vue 2.

In this article, we’ll look at how to create templates with Vue 3.

Raw HTML

We can render raw HTML with the v-html directive.

For example, we can write:

<!DOCTYPE html>
<html lang="en">
  <head>
    <title>App</title>
    <script src="https://unpkg.com/vue@next"></script>
  </head>
  <body>
    <div id="app">
      <p>{{ rawHtml }}</p>
      <p><span v-html="rawHtml"></span></p>
    </div>
    <script>
      const vm = Vue.createApp({
        data() {
          return {
            rawHtml: `<b>foo</b>`
          };
        }
      }).mount("#app");
    </script>
  </body>
</html>

We have the rawHtml property returned with the object we return in the data method.

If we pass raw HTML into the mustache, it’ll be sanitized. This means the raw code will be displayed.

If we pass it into the v-html directive, it’ll be displayed as HTML, so it’ll be bold.

Therefore, if we use v-html , we should be careful of cross-site scripting vulnerabilities.

We should only display trusted content with v-html .

Attributes

If we want to set attribute values dynamically, we’ve to use the v-bind directive.

For instance, we can write:

<!DOCTYPE html>
<html lang="en">
  <head>
    <title>App</title>
    <script src="https://unpkg.com/vue@next"></script>
  </head>
  <body>
    <div id="app">
      <div v-bind:id="dynamicId"></div>
    </div>
    <script>
      const vm = Vue.createApp({
        data() {
          return {
            dynamicId: `foo`
          };
        }
      }).mount("#app");
    </script>
  </body>
</html>

to set the id attribute of the div to foo by using v-bind .

If we have boolean attributes, its existence means we set the value totrue .

For example, we can write:

<!DOCTYPE html>
<html lang="en">
  <head>
    <title>App</title>
    <script src="https://unpkg.com/vue@next"></script>
  </head>
  <body>
    <div id="app">
      <button v-bind:disabled="disabled">Button</button>
    </div>
    <script>
      const vm = Vue.createApp({
        data() {
          return {
            disabled: true
          };
        }
      }).mount("#app");
    </script>
  </body>
</html>

We disabled the button by passing in the disabled value to v-bind:disabled , which is true .

JavaScript Expressions

We can put JavaScript expressions between the double curly braces.

For instance, we can write:

<!DOCTYPE html>
<html lang="en">
  <head>
    <title>App</title>
    <script src="https://unpkg.com/vue@next"></script>
  </head>
  <body>
    <div id="app">
      {{message.split('').reverse().join('')}}
    </div>
    <script>
      const vm = Vue.createApp({
        data() {
          return {
            message: "hello world"
          };
        }
      }).mount("#app");
    </script>
  </body>
</html>

to reverse 'hello world' in the template.

We can only put in single expressions and not statements, so we can’t write:

<!DOCTYPE html>
<html lang="en">
  <head>
    <title>App</title>
    <script src="https://unpkg.com/vue@next"></script>
  </head>
  <body>
    <div id="app">
      {{ var a = 1 }}}
    </div>
    <script>
      const vm = Vue.createApp({
        data() {
          return {
            message: "hello world"
          };
        }
      }).mount("#app");
    </script>
  </body>
</html>

The Vue template compiler will give us an error.

Directives

Directives are special attributes that starts with v- .

The values they expect are single JavaScript expressions.

v-for and v-on are exceptions to this.

We reactively apply the side effects to the DOM when the value of its expression changes.

For instance, we can write:

<!DOCTYPE html>
<html lang="en">
  <head>
    <title>App</title>
    <script src="https://unpkg.com/vue@next)"></script>
  </head>
  <body>
    <div id="app">
      <p v-if="show">hello world</p>
    </div>
    <script>
      const vm = Vue.createApp({
        data() {
          return {
            show: true
          };
        }
      }).mount("#app");
    </script>
  </body>
</html>

to show the ‘hello world’ message with v-if since show is true .

v-if is a directive that shows something when its value is truthy.

Conclusion

Templates can have raw HTML, attributes, and directives.

Directives are special attributes that take values.

Categories
Vue 3

Vue 3 — Inputs, Loops. and Components

Vue 3 is in beta and it’s subject to change.

Vue 3 is the up and coming version of Vue front end framework.

It builds on the popularity and ease of use of Vue 2.

In this article, we’ll look at how to handle user interactions with Vue 3.

Handling User Input

The v-model directive lets us bind our input value to a model property.

For instance, we can write:

<!DOCTYPE html>
<html lang="en">
  <head>
    <title>App</title>
    <script src="https://unpkg.com/vue@next"></script>
  </head>
  <body>
    <div id="app">
      <input v-model="name" />
      <p>{{ name }}</p>
    </div>
    <script>
      const app = {
        data() {
          return {
            name: ""
          };
        }
      };

      Vue.createApp(app).mount("#app");
    </script>
  </body>
</html>

We added the name property to the object we return in the data method in app .

Now we can use the name variable as the value in v-model .

Also, we added interpolation of the name value to our template.

Now when we type in something into the input box, we get the same value displayed below it.

This is because v-model does the hard work getting the input value, setting it as the value name and vice versa.

Conditionals and Loops

We can render something conditionally with the v-if directive.

For instance, we can write:

<!DOCTYPE html>
<html lang="en">
  <head>
    <title>App</title>
    <script src="https://unpkg.com/vue@next"></script>
  </head>
  <body>
    <div id="app">
      <button v-on:click="toggle">toggle</button>
      <p v-if="seen">Now you see me</p>
    </div>
    <script>
      const app = {
        data() {
          return {
            seen: true
          };
        },
        methods: {
          toggle() {
            this.seen = !this.seen;
          }
        }
      };

      Vue.createApp(app).mount("#app");
    </script>
  </body>
</html>

We have the button which calls toggle .

The toggle method toggles the rthis.seen state to its opposite value.

Since we used that with v-if , it’ll render the p element if seen is true and not rendering it if it’s false .

We can also use it with transition effects.

Loops

We can display items in an array with the v-for directive.

For example, we can use it by writing:

<!DOCTYPE html>
<html lang="en">
  <head>
    <title>App</title>
    <script src="https://unpkg.com/vue@next"></script>
  </head>
  <body>
    <div id="app">
      <ol>
        <li v-for="p in people">
          {{ p.name }}
        </li>
      </ol>
    </div>
    <script>
      const app = {
        data() {
          return {
            people: [{ name: "mary" }, { name: "jane" }, { name: "bob" }]
          };
        },
        methods: {
          toggle() {
            this.seen = !this.seen;
          }
        }
      };

      Vue.createApp(app).mount("#app");
    </script>
  </body>
</html>

We have the people array in the data method.

This is used with the v-for directive to loop through the array and display the items.

p is the loop variable, we use to display the array items.

Components

Components let us component multiple parts of a Vue 3 app.

Each component is a small part of the app.

We can create components by writing:

<!DOCTYPE html>
<html lang="en">
  <head>
    <title>App</title>
    <script src="https://unpkg.com/vue@next"></script>
  </head>
  <body>
    <div id="app">
      <hello />
    </div>
    <script>
      const root = {};

      const app = Vue.createApp(root);

      app.component("hello", {
        template: `<p>hello</p>`
      });

      app.mount("#app");
    </script>
  </body>
</html>

We have the root object.

Then we pass in root to Vue.createApp to create our Vue 3 app.

And then we create our hello component by calling the app.component method with the component and the component object.

template has the template content we want to display.

Then we call mount with the selector string to mount our app to that component.

Conclusion

We can add Vue components with the app.component method.

The v-model directive binds input values to variables.

v-for lets us loop through arrays and render its entries’ data.

Categories
Vue 3

Vue 3 — Component and Vue Instance

Vue 3 is in beta and it’s subject to change.*

Vue 3 is the up and coming version of Vue front end framework.

It builds on the popularity and ease of use of Vue 2.

In this article, we’ll look at how to create components with Vue 3.

Components and Props

Props are attributes that we can add to components to pass data to them.

To create a component that takes a prop, we can write:

<!DOCTYPE html>
<html lang="en">
  <head>
    <title>App</title>
    <script src="https://unpkg.com/vue@next"></script>
  </head>
  <body>
    <div id="app">
      <hello name="mary" />
    </div>
    <script>
      const root = {};

      const app = Vue.createApp(root);

      app.component("hello", {
        props: ["name"],
        template: `<p>hello {{name}}</p>`
      });

      app.mount("#app");
    </script>
  </body>
</html>

We have the name prop that takes a string and we display it.

We can use v-for to render multiple items and render a component for each.

For instance, we can write:

<!DOCTYPE html>
<html lang="en">
  <head>
    <title>App</title>
    <script src="[https://unpkg.com/vue@next](https://unpkg.com/vue@next)"></script>
  </head>
  <body>
    <div id="app">
      <hello v-for="p in people" v-bind:person="p" v-bind:key="p.id" />
    </div>
    <script>
      const root = {
        data() {
          return {
            people: [
              { id: 0, name: "mary" },
              { id: 1, name: "jane" },
              { id: 2, name: "bob" }
            ]
          };
        }
      };

      const app = Vue.createApp(root);

      app.component("hello", {
        props: ["person"],
        template: `<p>hello {{person.name}}</p>`
      });

      app.mount("#app");
    </script>
  </body>
</html>

Since we aren’t passing a string prop, we need the v-bind directive to let us pass non-string values to our component.

The key prop is needed so that Vue 3 can track the items properly.

In the app.component call, we have the props property with a prop name that’s accepted by our component.

And we can get the name property from the object.

Vue 3 components resemble web component spec’s custom elements.

It also implements the slot API so that we can use slots to add different content to our components.

The Vue Instance

The Vue instance is the root of our app.

We create it with the createApp method.

For instance, we can write:

<!DOCTYPE html>
<html lang="en">
  <head>
    <title>App</title>
    <script src="https://unpkg.com/vue@next"></script>
  </head>
  <body>
    <div id="app">
      {{a}}
    </div>
    <script>
      const data = { a: 1 };

      const vm = Vue.createApp({
        data() {
          return data;
        }
      }).mount("#app");
    </script>
  </body>
</html>

We have our data object we which we return in the data method.

Then we can use the a property in our template.

The Vue.createApp method returns the Vue instance.

It should contain the properties of the data object as properties.

If we have:

<!DOCTYPE html>
<html lang="en">
  <head>
    <title>App</title>
    <script src="https://unpkg.com/vue@next"></script>
  </head>
  <body>
    <div id="app">
      {{a}}
    </div>
    <script>
      const data = { a: 1 };

      const vm = Vue.createApp({
        data() {
          return data;
        }
      }).mount("#app");

      console.log(vm.a === data.a);
    </script>
  </body>
</html>

The console log should log true .

And if we change the value of vm.a :

<!DOCTYPE html>
<html lang="en">
  <head>
    <title>App</title>
    <script src="https://unpkg.com/vue@next"></script>
  </head>
  <body>
    <div id="app">
      {{a}}
    </div>
    <script>
      const data = { a: 1 };

      const vm = Vue.createApp({
        data() {
          return data;
        }
      }).mount("#app");

      vm.a = 2;

      console.log(data.a);
    </script>
  </body>
</html>

Then the value of a in the template and the data object should both change to 2.

Conclusion

Components can take props so we can populate it with data dynamically from the outside.

The Vue instance is the root of a Vue app.

It contains the data which can be changed and the change will be reflected everywhere.

Categories
Vue 3

Getting Started with Vue 3

Vue 3 is in beta and it’s subject to change.

Vue 3 is the up and coming version of Vue front end framework.

It builds on the popularity and ease of use of Vue 2.

In this article, we’ll look at how to create our first project with Vue 3.

Installation

We can install the Vue Devtools with by installing the browser extension according to the instructions at https://github.com/vuejs/vue-devtools#vue-devtools.

A standard Electron app is also available.

It can be used to debug our Vue apps.

To install the Vue package, we can run:

npm install vue@next

to install the NPM package.

Vue CLI is also available for create our Vue project.

We can run:

yarn global add @vue/cli@next

or

npm install -g @vue/cli@next

to install the Vue CLI globally.

Vite is a web dev build tool that lets us serve our code faster with the ES module import approach.

We can run:

$ npm init vite-app <project-name>
$ cd <project-name>
$ npm install
$ npm run dev

or

$ yarn create vite-app <project-name>
$ cd <project-name>
$ yarn
$ yarn dev

to create a Vue app with Vite, install the packages, and run the app.

We can also include Vue 3 as script tag.

For instance, we can write:

<script src="https://unpkg.com/vue@next"></script>

to add the script tag.

Get Started

We can get started by creating our first Vue app.

To do that, we can write:

<!DOCTYPE html>
<html lang="en">
  <head>
    <title>App</title>
    <script src="https://unpkg.com/vue@next"></script>
  </head>
  <body>
    <div id="app">
      {{ message }}
    </div>
    <script>
      const app = {
        data() {
          return {
            message: "hello world"
          };
        }
      };

      Vue.createApp(app).mount("#app");
    </script>
  </body>
</html>

to create a simple Vue app.

In the head tag, we add our Vue package.

We add our template in the div with ID app .

Then we create our app object with the data method to return our data.

We pass the object to the Vue.createApp method and call mount with a CSS selector to let us mount the app.

How we should see ‘hello world’ displayed on the screen.

This is because the text is interpolated from the data as indicated by the double curly braces.

In addition to interpolating text on the template, we can also use the v-bind attribute on the template to display the text.

For example, we can write:

<!DOCTYPE html>
<html lang="en">
  <head>
    <title>App</title>
    <script src="https://unpkg.com/vue@next"></script>
  </head>
  <body>
    <div id="app">
      <div v-bind:title="message">{{message}}</div>
    </div>
    <script>
      const app = {
        data() {
          return {
            message: "hello world"
          };
        }
      };

      Vue.createApp(app).mount("#app");
    </script>
  </body>
</html>

The v-bind directive lets us set a dynamic value for an element’s attribute.

Now when we hover over the ‘hello world’ text, we should see the same thing displayed.

Handling User Input

We can use the v-on directive to handle user input.

For example, we can write:

<!DOCTYPE html>
<html lang="en">
  <head>
    <title>App</title>
    <script src="https://unpkg.com/vue@next"></script>
  </head>
  <body>
    <div id="app">
      <p>{{ state }}</p>
      <button v-on:click="toggle">toggle</button>
    </div>
    <script>
      const app = {
        data() {
          return {
            state: true
          };
        },
        methods: {
          toggle() {
            this.state = !this.state;
          }
        }
      };

      Vue.createApp(app).mount("#app");
    </script>
  </body>
</html>

We have the v-on:click directive to let us listen to clicks on an element.

The value we passed in as the value of the directive is the method we’ll call when we click on th button.

It refers to the toggle method to toggle this.state to the opposite value.

Now when we click the toggle button, we’ll see the state on the template toggle between true and false .

Conclusion

We can get started with Vue 3 with a script tag or a package.

Vue Devtools let us debug our Vue app easier.

Once we have the Vue framework package added, we can create simple apps with it.

v-on lets us listen to events and v-bind lets us set attributes.