Twitter uses the standard OAuth for authentication, which means you incorporate a standardized way of logging in if you use Twitter sign in.
In Node.js, it is very easy to add Twitter sign in to an Express web app.
Getting Started
First, you have to make an Express app. Express is a routing library with a lot of add-ons built for easy web development.
There are many Express app boilerplates available on the web. There is also an Express code generator from the makers of the Express framework.
Using the latest Node.js versions, you can run npx express-generator.
If npx is not available, you can install express-generator globally and run that:
$ npm install -g express-generator
$ express
Make a folder for your project and follow the instructions.
To make the example simple, this app will provide the redirect URL that you get after providing the consumer key and request token for the Angular app.
Then, after the user goes through the Twitter sign in, it will redirect back to the Angular app, which will then call the Express API to save the OAuth access token and the OAuth access token secret to a database.
We need to make an entry point file for Express.
We need to install express-session, express-logger, cookie-parser, and cors for saving sessions, logging, parsing cookies, and allowing external requests for our Angular app, respectively.
babel-register and bale-polyfill are required to use the latest JavaScript features in our Node.js web app.
To save the secrets, use the [dotenv](https://www.npmjs.com/package/dotenv) library. With this, the secrets will be read from the .env file, rather than hard coding them into the code, which is very bad secret practice.
To get the Twitter keys, you have to apply for a developer account at https://developer.twitter.com/. You will then get the keys and secrets required, which you will put into the .env file.
The .env file should be a key-value list, like this:
TWITTER_CONSUMER_KEY=''
TWITTER_CONSUMER_SECRET=''
TWITTER_CALLBACK_URL='http://localhost:4200/settings'
SESSION_SECRET=''
I will call the entry point file app.js .
To run this, go to your project folder and run node app.js:
Then, we need the oauth library to make an oauth.OAuth object which will allow the Express app to get the request token and request token secret.
Add a controllers folder in the same level as app.js.
Then, add sessionsController.js into the controllers folder.
Add the following to sessionsController.js:
The connect route will send the Twitter sign-in URL as the redirect URL.
Then, the Angular app will call the saveAccessTokens route to store the OAuth access token and its secret in the session.
Angular CLI
To build the Angular app, you need the Angular CLI.
To install it, run npm i -g @angular/cli in your Node.js command prompt. Then, run ng new frontend to generate the skeleton code for your front end app.
Also, install @angular/material according to the Angular documentation.
After that, replace the default app.module.ts with the following:
import { BrowserModule } from '@angular/platform-browser';
import { NgModule } from '@angular/core';
import { BrowserAnimationsModule } from '@angular/platform-browser/animations';
import {
  MatButtonModule,
  MatTableModule,
  MAT_DIALOG_DEFAULT_OPTIONS,
} from '@angular/material';
import { AppRoutingModule } from './app-routing.module';
import { AppComponent } from './app.component';
import { SettingsPageComponent } from './settings-page/settings-page.component';
import { HttpClientModule, HTTP_INTERCEPTORS } from '@angular/common/http';
import { SessionService } from './session.service';
import { HttpReqInterceptor } from './http-req-interceptor';
@NgModule({
  declarations: [
    AppComponent,
    SettingsPageComponent,
  ],
  imports: [
    BrowserModule,
    AppRoutingModule,
    BrowserAnimationsModule,
    MatButtonModule,
    FormsModule,
    HttpClientModule,
  ],
  providers: [
    SessionService,
    {
      provide: HTTP_INTERCEPTORS,
      useClass: HttpReqInterceptor,
      multi: true
    },
    UserService,
    TweetsService,
  ],
  bootstrap: [AppComponent],
})
export class AppModule { }
We need to use Angular’s HTTP client to connect to our Express routes to get the redirect URL and get the access token from the redirect after logging in with Twitter, then send it back to our route.
To do this, run ng g service session.
This will create session.service.ts:
import { Injectable } from '@angular/core';
import { HttpClient } from '@angular/common/http';
import { environment } from 'src/environments/environment';
@Injectable({
  providedIn: 'root'
})
export class SessionService {
  constructor(private http: HttpClient) { }
  getRedirectUrl() {
  return this.http.get(`${environment.apiUrl}/sessions/connect`)
}
  saveAccessToken(oauthToken: string, oauthVerifier: string) {
    return this.http.get(`${environment.apiUrl}/sessions/saveAccessTokens?oauth_token=${oauthToken}&oauth_verifier=${oauthVerifier}`)
  }
}
In here, environment.apiUrl is the URL to our API, which is specified in environment.ts.
Now, we need a page with a button that calls our Express route to get the redirect URL.
Run ng g component settingsPage to create settings-page.component.ts and settings-page.component.html, which is where the button will be placed.
Add the following to settings-page.component.html:
<div>
  <button mat-raised-button (click)='redirectToTwitter()'>Connect to Twitter Account</button>
</div>
Then, add the following settings-page.component.ts:
import { Component, OnInit } from '@angular/core';
import { ActivatedRoute } from '@angular/router';
import { SessionService } from '../session.service';
@Component({
  selector: 'app-settings-page',
  templateUrl: './settings-page.component.html',
  styleUrls: ['./settings-page.component.scss']
})
export class SettingsPageComponent implements OnInit {
  constructor(
    private activatedRoute: ActivatedRoute,
    private sessionService: SessionService,
  ) {
    this.activatedRoute.queryParams.subscribe(params => {
      const oauthVerifier = params['oauth_verifier'];
      const oauthToken = params['oauth_token'];
      if (oauthToken && oauthVerifier) {
        this.saveAccessToken(oauthToken, oauthVerifier);
      }
    });
  }
  ngOnInit() {}
  saveAccessToken(oauthToken: string, oauthVerifier: string) {
    this.sessionService.saveAccessToken(oauthToken, oauthVerifier).subscribe(res => {
    alert('Token saved');
    })
  }
  redirectToTwitter() {
    this.sessionService.getRedirectUrl().subscribe((res: any) => {
      location.href = res.redirectUrl;
    })
  }
}
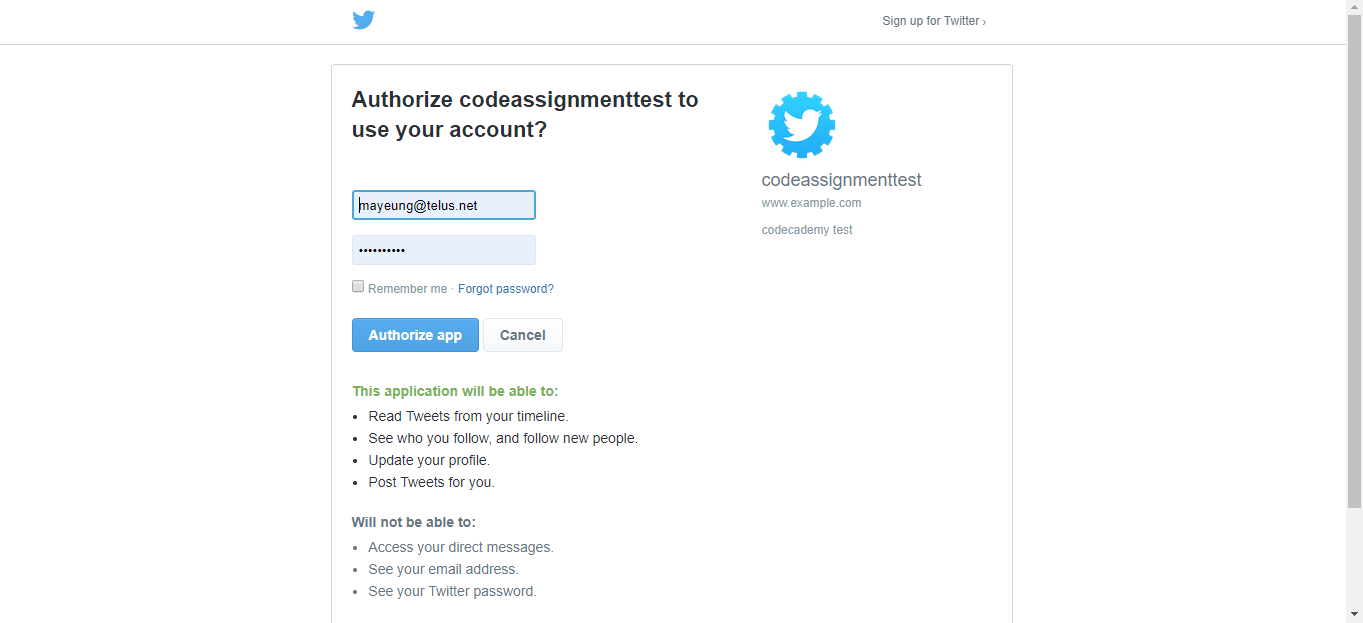
After adding the code above, you get a button that, after you click it, will go to the Twitter sign-in page.
Then, once Twitter sign in succeeds, you will be redirected to the same page with the OAuth access token and verifier, which will be sent to our Express API and stored in the session.
Token Saved
You will get Token saved message once it succeeds.
In the end, this is the workflow you should get:
- First, you get the connect button:

- Then, you are redirected to the Twitter login:

- Finally, you are redirected back with the OAuth access token and verifier, and with those, you get the access token and secret which will be stored to the session.
If that succeeds, the saveAccessTokens route will return a successful response, which will then trigger the Angular app to alert Token saved.
