Categories
Angular TypeScript

How to Build a Barcode Scanner App That Gets Prices From eBay

eBay has a free API for accessing their listing data, and HTML has a camera API for getting images from a camera via a web page. This means that we can create apps that scan barcodes from your web app, get the code, and send it to the eBay API for querying.

In this story, we will build a PHP app for querying the eBay API, and then we will build a web app for getting the barcode and sending it to our API. The back end is simple. It is just a script for getting data from the eBay API via the ISBN code. Create a folder for the back-end app and put in the following:

<?php
use SymfonyComponentHttpFoundationRequest;
use SymfonyComponentHttpFoundationResponse;
use GuzzleHttpClient;

$ebay = $app['controllers_factory'];
$ebayAppId = $_ENV['EBAY_APP_ID'];
$client = new Client([
    'base_uri' => '[http://svcs.ebay.com'](http://svcs.ebay.com%27)
]);

$ebay->get('/find-by-code/{code}/{page}', function ($code, $page) use ($app, $client, $ebayAppId) {
    if (strlen($code) == 10 || strlen($code) == 13){
        $type = 'ISBN';
    }
    else if (strlen($code) == 12){
        $type = 'UPC';
    }
    else{
        return $app->json(['error' => 'invalid code'], 400);
    }

    if (!is_int(intval($page)) || $page <= 0){
        return $app->json(['error' => 'invalid page'], 400);
    }

$response = $client->request('GET', "/services/search/FindingService/v1?OPERATION-NAME=findItemsByProduct&SERVICE-VERSION=1.0.0&SECURITY-APPNAME=$ebayAppId&RESPONSE-DATA-FORMAT=JSON&REST-PAYLOAD&paginationInput.entriesPerPage=10&productId.[@type](http://twitter.com/type "Twitter profile for @type")=$type&productId=$code&paginationInput.pageNumber=$page");
    return $app->json(json_decode($response->getBody(), true));
});

return $ebay;

We call that ebay.php. The function ($code, $page) use ($app, $client, $ebayAppId) part allows the route to access outside variables since the callback is in a different scope that the outside variables.

Then in index.php, we put

<?php
require_once 'vendor/autoload.php';

$app = new SilexApplication();
$dotenv = new DotenvDotenv('.');
$dotenv->load();
$app->register(new JDesrosiersSilexProviderCorsServiceProvider(), [
    "cors.allowOrigin" => "*",
]);

$app['debug']= true;

$app->get('/hello/{name}', function($name) use($app) {
    return 'Hello '.$app->escape($name);
});

$app->mount('/ebay', include 'ebay.php');
$app["cors-enabled"]($app);
$app->run();

so that we can access our routes.

In composer.json, we put

{
    "require": {
        "silex/silex": "^2.0",
        "vlucas/phpdotenv": "^2.4",
        "jdesrosiers/silex-cors-provider": "~1.0",
        "guzzlehttp/guzzle": "~6.0"
    }
}

so we can run composer install to install our dependencies if Composer is installed.

Now that we have the back end done. We can do the front end. The app is going to be built with Angular. We scaffold the app with the Angular CLI. We run ng new frontend to scaffold the app.

The only things different from our typical apps is that HTTPS is required to access the camera, so we have to generate our own HTTPS certificate for our development server. We should have theserver.crt and server.key file in the same folder as the front-end app files.

The serve section of our angular.json should have:

"serve": {
  "builder": "[@angular](http://twitter.com/angular "Twitter profile for @angular")-devkit/build-angular:dev-server",
  "options": {
    "browserTarget": "frontend:build",
    "sslKey": "server.key",
    "sslCert": "server.cert"
  },
  "configurations": {
    "production": {
      "browserTarget": "frontend:build:production"
    },
    "mobile": {
      "browserTarget": "frontend:build:mobile"
    }
  }
},

where

"sslKey": "server.key",
"sslCert": "server.cert"

should be referencing the path of your certificates.

Then to run the Angular CLI development server, we run:

ng serve --ssl

When you go to https://localhost:4200, you will see an insecure connection error in most browsers. Click proceed to continue.

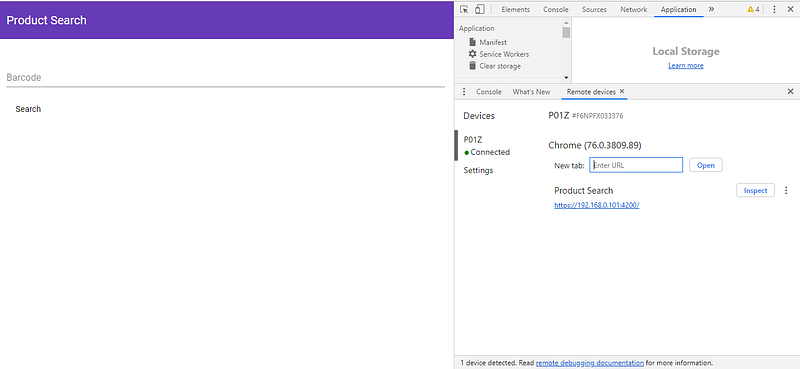
If your camera is on your Android device, we can debug remotely. In Chrome, press F12 to open the console, click on the top-right menu with the three vertical dots. Then click Remote Devices, connect your Android device to your computer, and enable remote debugging according to the instructions.

Instead of running ng serve --ssl, you run ng serve --ssl --host 0.0.0.0

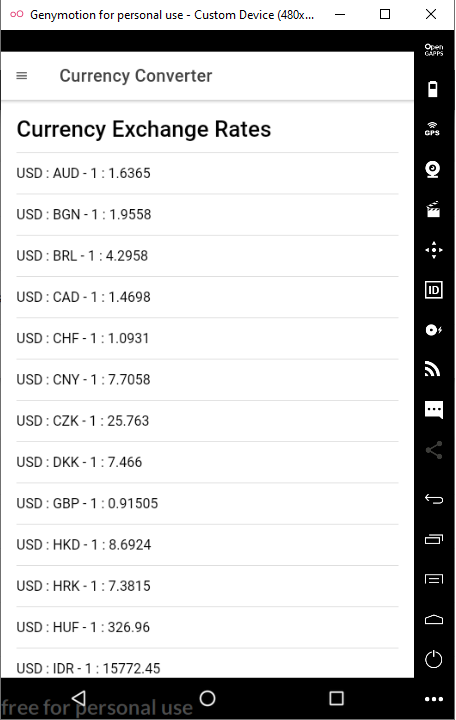
Once all that is done, you should see the following:

once the app is built.

We install a library for accessing the device’s camera and our flux store by running:

npm i @zxing/ngx-scanner @ngrx/store @angular/material @angular/cdk

In app.module.ts, we put:

import { BrowserModule } from '@angular/platform-browser';
import { NgModule } from '@angular/core';
import { ZXingScannerModule } from '@zxing/ngx-scanner';
import { BrowserAnimationsModule } from '@angular/platform-browser/animations';
import { MatToolbarModule } from '@angular/material/toolbar';
import { MatInputModule } from '@angular/material/input';
import { MatButtonModule } from '@angular/material/button';
import { MatTabsModule } from '@angular/material/tabs';
import { MatCardModule } from '@angular/material/card';
import { HttpClientModule } from '@angular/common/http';
import { MatPaginatorModule } from '@angular/material/paginator';
import { MatTableModule } from '@angular/material/table';
import { MatSelectModule } from '@angular/material/select';

import { AppRoutingModule } from './app-routing.module';
import { AppComponent } from './app.component';
import { HomePageComponent } from './home-page/home-page.component';
import { StoreModule } from '[@ngrx/store](http://twitter.com/ngrx/store "Twitter profile for @ngrx/store")';
import { barCodeReducer } from './bar-code-reducer';
import { FormsModule } from '@angular/forms';
import { EbayTabComponent } from './ebay-tab/ebay-tab.component';

@NgModule({
  declarations: [
    AppComponent,
    HomePageComponent,
    EbayTabComponent
  ],
  imports: [
    BrowserModule,
    AppRoutingModule,
    ZXingScannerModule,
    BrowserAnimationsModule,
    MatButtonModule,
    MatToolbarModule,
    MatInputModule,
    MatTabsModule,
    StoreModule.forRoot({ barCode: barCodeReducer }),
    FormsModule,
    MatCardModule,
    HttpClientModule,
    MatPaginatorModule,
    MatTableModule,
    MatSelectModule
  ],
  providers: [],
  bootstrap: [AppComponent]
})
export class AppModule { }

This incorporates the Angular Material components and our flux store.

Now we have to make a centralized store for our data. We create a file called bar-code-reducer.ts and add the following:

export const SET_BARCODE = 'SET_BARCODE';

export function barCodeReducer(state: string = '', action) {
    switch (action.type) {
        case SET_BARCODE:
            return action.payload;
        default:
            return state;
    }
}

Now we can add our front-end components. We run:

ng g component ebayTab
ng g component homePage

This adds the page to display our barcode scanner and a section to display our eBay data.

Next, we create a service to create our HTTP request by running:

ng g service productSearch

After that, we should have produce-search.service.ts. We put the following in there:

import { Injectable } from '@angular/core';
import { HttpClient } from '@angular/common/http';
import { environment } from 'src/environments/environment';

@Injectable({
  providedIn: 'root'
})
export class ProductSearchService {

  constructor(
    private http: HttpClient
  ) { }

  searchProduct(barcode: string, currentPage: number) {
    return this.http.get(`${environment.apiUrl}/ebay/find-by-code/${barcode}/${currentPage}`)
  }
}

In ebay-tab.component.ts, we put:

import { Component, OnInit } from '@angular/core';
import { Store, select } from '@ngrx/store';
import { Observable } from 'rxjs';
import { ProductSearchService } from '../product-search.service';
import { ConstantPool } from '@angular/compiler';

@Component({
  selector: 'app-ebay-tab',
  templateUrl: './ebay-tab.component.html',
  styleUrls: ['./ebay-tab.component.css']
})
export class EbayTabComponent implements OnInit {

barcode$: Observable<string>;
  barcodeValue: string;
  products: any[] = [];
  totalPages: number = 0;
  totalEntries: number = 0;
  entriesPerPage: number = 0;
  currentPage: number = 1;
  displayedColumns: string[] = [
    'itemId',
    'title',
    'location',
    'country',
    'shippingServiceCost',
    'currentPrice',
    'convertedCurrentPrice',
    'bestOfferEnabled',
    'buyItNowAvailable',
    'listingType'
  ];

constructor(
    private store: Store<any>,
    private productSearchService: ProductSearchService
  ) {
    this.barcode$ = store.pipe(select('barCode'))
    this.barcode$.subscribe(barcode => {
      this.barcodeValue = barcode;
      this.products = [];
      this.searchProduct(this.barcodeValue, this.currentPage);
    }, err => {

})
  }

  ngOnInit() {
  }

  searchProduct(barcodeValue, currentPage) {
    this.productSearchService.searchProduct(barcodeValue, currentPage)
      .subscribe((res: any) => {
        try {
          this.products = res.findItemsByProductResponse[0].searchResult[0].item as any[];
          this.products = this.products.map(p => {
            let shippingServiceCost = p.shippingInfo[0].shippingServiceCost;
            let sellingStatus = p.sellingStatus;
            return {
              itemId: p.itemId,
              title: p.title,
              country: p.country,
              location: p.location,
              shippingServiceCost: Array.isArray(shippingServiceCost) ? `${shippingServiceCost[0]['__value__']} ${shippingServiceCost[0]['@currencyId`]} : '',
              currentPrice: Array.isArray(sellingStatus) ? `${sellingStatus[0].currentPrice[0]['__value__']} ${sellingStatus[0].currentPrice[0]['@currencyId']}` : '',
              convertedCurrentPrice: Array.isArray(sellingStatus) ? `${sellingStatus[0].convertedCurrentPrice[0]['__value__']} ${sellingStatus[0].convertedCurrentPrice[0]['@currencyId']}` : '',
              bestOfferEnabled: p.listingInfo[0].bestOfferEnabled[0],
              buyItNowAvailable: p.listingInfo[0].buyItNowAvailable[0],
              listingType: p.listingInfo[0].listingType[0]
            }
          })
          this.totalPages = res.findItemsByProductResponse[0].paginationOutput[0].totalPages[0];
          this.totalEntries = res.findItemsByProductResponse[0].paginationOutput[0].totalEntries[0];
          this.entriesPerPage = res.findItemsByProductResponse[0].paginationOutput[0].entriesPerPage[0];
        }
        catch (ex) {
          this.products = [];
        }
      }, err => {
        this.products = [];
      })
  }

getProducts(event) {
    this.currentPage = event.pageIndex + 1;
    this.searchProduct(this.barcodeValue, this.currentPage);
  }
}

And in ebay-tab.component.html, we have:

<div *ngIf='products.length > 0'>
  <table mat-table [dataSource]="products" class="mat-elevation-z8">
    <ng-container matColumnDef="itemId">
      <th mat-header-cell *matHeaderCellDef> Item ID </th>
      <td mat-cell *matCellDef="let element"> {{element.itemId}} </td>
    </ng-container>

    <ng-container matColumnDef="title">
      <th mat-header-cell *matHeaderCellDef> Title </th>
      <td mat-cell *matCellDef="let element"> {{element.title}} </td>
    </ng-container>

    <ng-container matColumnDef="location">
      <th mat-header-cell *matHeaderCellDef> Location </th>
      <td mat-cell *matCellDef="let element"> {{element.location}} </td>
    </ng-container>

    <ng-container matColumnDef="country">
      <th mat-header-cell *matHeaderCellDef> Country </th>
      <td mat-cell *matCellDef="let element"> {{element.country}} </td>
    </ng-container>

    <ng-container matColumnDef="shippingServiceCost">
      <th mat-header-cell *matHeaderCellDef> Shipping Cost </th>
      <td mat-cell *matCellDef="let element"> {{element.shippingServiceCost}} </td>
    </ng-container>

    <ng-container matColumnDef="currentPrice">
      <th mat-header-cell *matHeaderCellDef> Current Price </th>
      <td mat-cell *matCellDef="let element"> {{element.currentPrice}} </td>
    </ng-container>

    <ng-container matColumnDef="convertedCurrentPrice">
      <th mat-header-cell *matHeaderCellDef> Converted Current Price </th>
      <td mat-cell *matCellDef="let element"> {{element.convertedCurrentPrice}} </td>
    </ng-container>

    <ng-container matColumnDef="bestOfferEnabled">
      <th mat-header-cell *matHeaderCellDef> Best Offer Enabled </th>
      <td mat-cell *matCellDef="let element"> {{element.bestOfferEnabled}} </td>
    </ng-container>

    <ng-container matColumnDef="buyItNowAvailable">
      <th mat-header-cell *matHeaderCellDef> Buy It Now </th>
      <td mat-cell *matCellDef="let element"> {{element.buyItNowAvailable}} </td>
    </ng-container>

    <ng-container matColumnDef="listingType">
      <th mat-header-cell *matHeaderCellDef> Listing Type </th>
      <td mat-cell *matCellDef="let element"> {{element.listingType}} </td>
    </ng-container>

    <tr mat-header-row *matHeaderRowDef="displayedColumns"></tr>
    <tr mat-row *matRowDef="let row; columns: displayedColumns;"></tr>
  </table>

<mat-paginator [length]="totalEntries" [pageSize]="entriesPerPage" (page)='getProducts($event)'>
  </mat-paginator>
</div>
<div *ngIf='products.length == 0' class="center">
  <h1>No Results</h1>
</div>

In home-page.component.ts, we put:

import { Component, OnInit, ViewChild } from '@angular/cor';
import { Store } from '@ngrx/store';
import { Observable } from 'rxjs';
import { SET_BARCODE } from '../bar-code-reducer';
import { NgForm } from '@angular/forms")';
import { BarcodeFormat } from '@zxing/library';
import { ZXingScannerComponent } from '@zxing/ngx-scanner';

@Component({
  selector: 'app-home-page',
  templateUrl: './home-page.component.html',
  styleUrls: ['./home-page.component.css']
})
export class HomePageComponent implements OnInit {

  barcodeValue: number;
  webCamAvailable: boolean = true;
  barcode$: Observable<string>;
  searching: boolean = false;
  allowedFormats = [
    BarcodeFormat.QR_CODE,
    BarcodeFormat.EAN_13,
    BarcodeFormat.CODE_128,
    BarcodeFormat.DATA_MATRIX,
    BarcodeFormat.UPC_A,
    BarcodeFormat.UPC_E,
    BarcodeFormat.UPC_EAN_EXTENSION,
    BarcodeFormat.CODABAR,
    BarcodeFormat.CODE_39,
    BarcodeFormat.CODE_93
  ];
  hasCameras = false;
  hasPermission: boolean;
  qrResultString: string;

  availableDevices: MediaDeviceInfo[];
  selectedDevice: MediaDeviceInfo;
  [@ViewChild](http://twitter.com/ViewChild "Twitter profile for @ViewChild")('scanner')
  scanner: ZXingScannerComponent;

  constructor(
    private store: Store<any>
  ) {

  }

  ngOnInit() {
    this.scanner.camerasFound.subscribe((devices: MediaDeviceInfo[]) => {
      this.hasCameras = true;
      this.availableDevices = devices;

});

    this.scanner.permissionResponse.subscribe((answer: boolean) => {
      this.hasPermission = answer;
    });
  }

  onValueChanges(result) {
    this.barcodeValue = result.codeResult.code;
    this.searching = true;
    this.store.dispatch({ type: SET_BARCODE, payload: this.barcodeValue });
  }

  searchProduct(barCodeForm: NgForm) {
    this.searching = false;
    if (barCodeForm.invalid) {
      return;
    }
    this.searching = true;
    this.store.dispatch({ type: SET_BARCODE, payload: this.barcodeValue });
  }

  scanSuccessHandler(event) {
    console.log(event);
    this.barcodeValue = event;
    this.store.dispatch({ type: SET_BARCODE, payload: this.barcodeValue });
  }

  onDeviceSelectChange(selectedValue: string) {
    this.selectedDevice = this.scanner.getDeviceById(selectedValue);
  }

  scanErrorHandler(event) {
    console.log(event);
  }

  scanFailureHandler(event) {
    console.log(event);
  }

  scanCompleteHandler(event) {
    console.log(event);
    this.barcodeValue = event.text;
    this.store.dispatch({ type: SET_BARCODE, payload: this.barcodeValue });
  }
}

In addition to scanning, you can also enter the barcode manually. If a camera is present, you should see a preview box. After scanning, we get the barcode value and propagate that to the ebay-tab component that we created via the flux store.

Categories
Angular

How to Make Android Text Based Games with Ionic

Ionic is a hybrid application framework that converts a web app into an Android or iOS app. It is handy for making mobile applications quickly with decent performance. It can easily be extended to create simple text games for entertainment.

If you don’t know how to create apps with Angular and Ionic, see:

In this story, we will build a game where you guess the number until you guessed it right, akin to the Bulls and Cows game or Mastermind game. The game provides you with a number guessing game, and you can change the settings for the number of digits of the number that you’re guessing. It will also be able to save the fastest time.

Building the Game

As usual, we start with the boilerplate code.

To start building, we can use Ionic’s CLI. If you used Angular CLI, then it should be familiar to you. To install the Ionic CLI, run npm install -g ionic.

Then to make generate skeleton code for our app, run ionic start guess-the-number-game sidemenu . guess-the-number-game is our app’s name and sidemenu specifies that we want a side menu in our app.

We need to install some libraries. We can do that by running npm i moment random-js .

Now we can build the game. We make 2 pages by running ionic g component HomePage , andionic g SettingsPage . After that we get 2 empty pages.

In home-page.component.ts , we replace the default code with the following:

import { Component, OnInit } from '@angular/core';
import { Random, browserCrypto } from "random-js";
import * as moment from 'moment';
import { NgForm } from '@angular/forms';
declare const require: any;
const words = require('an-array-of-english-words');

@Component({
  selector: 'app-home-page',
  templateUrl: './home-page.component.html',
  styleUrls: ['./home-page.component.scss'],
})
export class HomePageComponent implements OnInit {
  question: any = <any>{};
  answer: string;
  timer;
  started: boolean;
  rightNumber: number;
  inputtedAnswers: string[] = [];
  elapsedTime;
  message: string;
  numDigits: number;

constructor() { }

  ngOnInit() {
    if (!localStorage.getItem('numDigits')) {
      localStorage.setItem('numDigits', '4');
    }
  }

  ngOnDestroy() {
    this.stop();
  }

  start() {
    this.message = '';
    this.started = true;
    const random = new Random(browserCrypto);
    this.numDigits = +localStorage.getItem('numDigits');
    this.rightNumber = random.integer(Math.pow(10, (this.numDigits - 1)), Math.pow(10, this.numDigits) - 1);
    console.log(this.rightNumber);
    let numSeconds = 0;
    this.timer = setInterval(() => {
      numSeconds++;
      this.elapsedTime = moment.utc(numSeconds * 1000).format('H:mm:ss');
    }, 1000)
  }

  recordFastestTime() {
    const currentFastTime = moment(this.getFastestTime(), 'H:mm:ss');
    const newFastestTime = moment(this.elapsedTime, 'H:mm:ss')
    if (currentFastTime > newFastestTime) {
      localStorage.setItem(
        'fastestTime',
        this.elapsedTime
      );
    }
  }

  stop() {
    this.started = false;
    this.inputtedAnswers = [];
    clearInterval(this.timer);
  }

  checkAnswer(answerForm: NgForm) {
    if (answerForm.invalid) {
      return;
    }
    this.inputtedAnswers.push(this.answer);
    if (+this.answer == this.rightNumber) {
      this.stop();
      this.recordFastestTime();
      this.message = `You win! The correct number is ${this.rightNumber}`;
    }
    this.answer = '';
  }

  getFastestTime() {
    return localStorage.getItem('fastestTime') || '1000000:00:00';
  }

  getNumBullsandCows(answer: number) {
    const rightAnsStr = this.rightNumber.toString().split('');
    const answerStr = answer.toString().split('');
    const numBulls = rightAnsStr.filter((r, i) => rightAnsStr[i] == answer[i]).length;
    const numCows = answerStr.length - numBulls;
    return `${numBulls} bulls, ${numCows} cows`;
  }
}

The code above will generate the number you guess according to the numDigits setting stored in local storage. By default, the number will have 4 digits. After the number is generated, it will start a timer to start calculating the time. Both are in the start function.

inputtedAnswers store the answers you entered. The checkAnswer function checks if you entered anything, then calls the stop function which calls clearInterval on the timer object returned by the setInterval function if your answer is right. The getNumBullsandCows function checks which digits are right and which one are wrong. numBulls is the number of correct digits and numCows the number of wrong digits in your guess. When the guess is right, the fastest time will be computer by comparing with the last fastest time, which is store in local storage by calling the recordFastestTime function and if the current elapsed time is shorter than the saved one, will save the shorter one into the local storage.

Then in home-page.component.html , replace what’s there with the following:

<form #answerForm='ngForm' (ngSubmit)='checkAnswer(answerForm)'>
  <ion-list>
    <ion-item no-padding *ngIf='started' id='instruction'>
      How to Play: Guess the correct number. The closeness to the correct number will be indicated by the number of
      bulls and cows. The number of bulls means the number of digits with the right value and position in your guess.
      The number of cows is the
      number of digits with the wrong value and position in your guess.
    </ion-item>
    <ion-item no-padding *ngIf='started && getFastestTime()'>
      <ion-label class="ion-float-left">
        <h2>Your Fastest Time {{getFastestTime()}}</h2>
      </ion-label>
    </ion-item>
    <ion-item no-padding *ngIf='started'>
      <ion-label class="ion-float-left">
        <h2>Time {{elapsedTime}}</h2>
      </ion-label>
    </ion-item>
    <ion-item no-padding *ngIf='started'>
      <ion-label>Answer</ion-label>
      <ion-input [(ngModel)]='answer' #ans='ngModel' name='ans' required type="text" pattern="d*"
        [minlength]='numDigits' [maxlength]='numDigits'></ion-input>
    </ion-item>
  </ion-list>
  <ion-button type='submit' *ngIf='started'>Answer</ion-button>
  <ion-button (click)='start();' *ngIf='!started'>Start Game</ion-button>
  <ion-button (click)='stop(); started = false' *ngIf='started'>Stop Game</ion-button>
</form>
<ion-content [scrollEvents]="false">
  <ion-list *ngIf='started'>
    <ion-item no-padding *ngFor='let a of inputtedAnswers; let i = index'>
      <ion-label>
        {{i+1}}
      </ion-label>
      <ion-label>
        {{a}}
      </ion-label>
      <ion-label>
        {{getNumBullsandCows(a)}}
      </ion-label>
    </ion-item>
  </ion-list>
  <ion-list *ngIf='message'>
    <ion-item no-padding>
      {{message}}
    </ion-item>
  </ion-list>
</ion-content>

This creates a form for you to enter your number guess and list your guesses, along with the number of right and wrong digits for each guess.

Next we build the settings page. To do this, add the following to settings-page.component.ts :

import { Component, OnInit } from '@angular/core';
import { NgForm } from '@angular/forms';
import { ToastController } from '@ionic/angular';

@Component({
  selector: 'app-settings-page',
  templateUrl: './settings-page.component.html',
  styleUrls: ['./settings-page.component.scss'],
})
export class SettingsPageComponent implements OnInit {
  settings: any = <any>{};
  fastestTime: string;

  constructor(
    public toastController: ToastController
  ) { }

  ngOnInit() {
    if (!localStorage.getItem('numDigits')) {
      localStorage.setItem('numDigits', '4');
    }
    this.settings.numDigits = +localStorage.getItem('numDigits');
    this.fastestTime = localStorage.getItem('fastestTime');
  }

  save(settingsForm: NgForm) {
    if (settingsForm.invalid) {
      return;
    }
    localStorage.setItem('numDigits', this.settings.numDigits || 4);
    this.presentToast();
  }

  clear() {
    localStorage.removeItem('fastestTime');
    this.fastestTime = localStorage.getItem('fastestTime');
  }

  async presentToast() {
    const toast = await this.toastController.create({
      message: 'Your settings have been saved.',
      duration: 2000
    });
    toast.present();
  }
}

In settings-page.component.html , we replace what’s there with:

<ion-content [scrollEvents]="true">
  <form #settingsForm='ngForm' (ngSubmit)='save(settingsForm)'>
    <ion-list>
      <ion-item no-padding>
        <ion-label>Number of Digits</ion-label>
        <ion-range min="4" max="8" [(ngModel)]='settings.numDigits' #numDigits='ngModel' name='numDigits'>
          <ion-label slot="start">4</ion-label>
          <ion-label slot="end">8</ion-label>
        </ion-range>
      </ion-item>
      <ion-item no-padding>
        <ion-label>Fastest Time</ion-label>
        <ion-label>{{fastestTime}}</ion-label>
        <ion-button (click)='clear()'>Clear Score</ion-button>
      </ion-item>
    </ion-list>
    <ion-button type='submit'>Save</ion-button>
  </form>
</ion-content>

You can clear local storage from the settings form and set the number of digits of the number you guess in this page. The numDigits control is a slider.

In app-routing.module.ts , add:

import { NgModule } from '@angular/core';
import { PreloadAllModules, RouterModule, Routes } from '@angular/router';
import { HomePageComponent } from './home-page/home-page.component';
import { SettingsPageComponent } from './settings-page/settings-page.component';

const routes: Routes = [
  {
    path: '',
    redirectTo: 'home',
    pathMatch: 'full'
  },
  {
    path: 'home',
    component: HomePageComponent
  },
  {
    path: 'settings',
    component: SettingsPageComponent
  }
];

@NgModule({
  imports: [
    RouterModule.forRoot(routes, { preloadingStrategy: PreloadAllModules })
  ],
  exports: [RouterModule]
})
export class AppRoutingModule {}

In app.component.ts , add:

import { Component } from '@angular/core';

import { Platform } from '@ionic/angular';
import { SplashScreen } from '@ionic-native/splash-screen/ngx';
import { StatusBar } from '@ionic-native/status-bar/ngx';

@Component({
  selector: 'app-root',
  templateUrl: 'app.component.html'
})
export class AppComponent {
  public appPages = [
    {
      title: 'Home',
      url: '/home',
      icon: 'home'
    },
    {
      title: 'Settings',
      url: '/settings',
      icon: 'settings'
    }
  ];

constructor(
    private platform: Platform,
    private splashScreen: SplashScreen,
    private statusBar: StatusBar
  ) {
    this.initializeApp();
  }

initializeApp() {
    this.platform.ready().then(() => {
      this.statusBar.styleDefault();
      this.splashScreen.hide();
    });
  }
}

The last 2 files will add the menu entries for the side menu and allow us to visit the pages that we created.

In app.module.ts , write:

import { NgModule } from '@angular/core';
import { BrowserModule } from '@angular/platform-browser';
import { RouteReuseStrategy } from '@angular/router';
import { IonicModule, IonicRouteStrategy } from '@ionic/angular")';
import { SplashScreen } from '@ionic-native/splash-screen/ngx';
import { StatusBar } from '@ionic-native/status-bar/ngx';

import { AppComponent } from './app.component';
import { AppRoutingModule } from './app-routing.module';
import { HomePageComponent } from './home-page/home-page.component';
import { AdMobFree } from '@ionic-native/admob-free/ngx';
import { SettingsPageComponent } from './settings-page/settings-page.component';
import { FormsModule } from '@angular/forms")';

@NgModule({
  declarations: [
    AppComponent,
    HomePageComponent,
    SettingsPageComponent
  ],
  entryComponents: [],
  imports: [
    BrowserModule,
    IonicModule.forRoot(),
    AppRoutingModule,
    FormsModule
  ],
  providers: [
    StatusBar,
    SplashScreen,
    { provide: RouteReuseStrategy, useClass: IonicRouteStrategy }
  ],
  bootstrap: [AppComponent]
})
export class AppModule { }

This is the final wiring that allows all the pages to be seen.

Categories
Angular

How To Build Android Apps With the Ionic Framework

Building Android apps can be a pain. You have to learn the Android SDK inside-out to be productive.

However, if you already have experience developing modern front-end web applications, then building Android apps can be fun and easy.

The Ionic framework provides an easy way for front-end developers to build their web applications using Angular components that Ionic developers provide.

Version 4 of Ionic also has components for React and Vue.js, so you can use your favorite front-end framework to build Android apps.

Ionic is used to build applications. It has components for inputs, grids, scrolling, date and time pickers, cards, and other common components that Android applications have.

In this piece, we will build a currency converter.


Building the App

To start building, we can use Ionic’s CLI. If you’ve used Angular’s CLI, it should be familiar to you.

To install the Ionic CLI, run npm install -g ionic.

Then, to generate the skeleton code for our app, run ionic start currency-converter-mobile sidemenu.

currency-converter-mobile is our app’s name and sidemenu specifies that we want a side menu in our app.

We also need to install ngx-custom-validators for form validation. We need this package because number-range validation is not built-in in Angular.

After that, we can run ionic serve to see our app in the browser. The browser tab should refresh automatically when we make changes.

Now, we can start writing code for the currency converter.

Run ng g service currency.

This will create currency.service.ts.

In this file, we add:

import { Injectable } from '@angular/core';
import { HttpClient } from '@angular/common/http';

const APIURL = 'https://api.exchangeratesapi.io'

@Injectable({
  providedIn: 'root'
})
export class CurrencyService {

  constructor(
    private httpClient: HttpClient
  ) { }

  getLatest() {
    return this.httpClient.get(`${APIURL}/latest`);
  }

  getExchangeRate(from: string, to: string) {
    return this.httpClient.get(`${APIURL}/latest?base=${from}&symbols=${to}`);
  }
}

This allows us to get currency exchange data from https://exchangeratesapi.io/.

Then, run ionic g component convertPage and ionic g component homePage to add our currency converter form and home page, respectively.

The home page is the entry point of our Android app, just like a regular web app.

Then, in app-routing.module.ts, we change the code to:

import { NgModule } from '@angular/core';
import { PreloadAllModules, RouterModule, Routes } from '@angular/router';
import { HomePageComponent } from './home-page/home-page.component';
import { ConvertPageComponent } from './convert-page/convert-page.component';

const routes: Routes = [
  {
    path: '',
    redirectTo: 'home',
    pathMatch: 'full'
  },
  {
    path: 'home',
    component: HomePageComponent
  },
  {
    path: 'convert',
    component: ConvertPageComponent
  }
];

@NgModule({
  imports: [
    RouterModule.forRoot(routes, { preloadingStrategy: PreloadAllModules })
  ],
  exports: [RouterModule]
})
export class AppRoutingModule { }

In app.component.ts, we replace what’s there with:

import { Component } from '@angular/core';

import { Platform } from '@ionic/angular';
import { SplashScreen } from '@ionic-native/splash-screen/ngx';
import { StatusBar } from '@ionic-native/status-bar/ngx';
import { environment } from 'src/environments/environment';

@Component({
  selector: 'app-root',
  templateUrl: 'app.component.html'
})
export class AppComponent {
  public appPages = [
    {
      title: 'Home',
      url: '/home',
      icon: 'home'
    },
    {
      title: 'Convert Currency',
      url: '/convert',
      icon: 'cash'
    }
  ];

  constructor(
    private platform: Platform,
    private splashScreen: SplashScreen,
    private statusBar: StatusBar,
  ) {
    this.initializeApp();
  }

  initializeApp() {
    this.platform.ready().then(() => {
      this.statusBar.styleDefault();
      this.splashScreen.hide();
    });
  }
}

And, in app.component.html, we replace the default code with:

<ion-app>
  <ion-split-pane>
    <ion-menu type="overlay">
      <ion-header>
        <ion-toolbar>
          <ion-title>Menu</ion-title>
        </ion-toolbar>
      </ion-header>
      <ion-content>
        <ion-list>
          <ion-menu-toggle auto-hide="false" *ngFor="let p of appPages">
            <ion-item [routerDirection]="'root'" [routerLink]="[p.url]">
              <ion-icon slot="start" [name]="p.icon"></ion-icon>
              <ion-label>
                {{p.title}}
              </ion-label>
            </ion-item>
          </ion-menu-toggle>
        </ion-list>
      </ion-content>
    </ion-menu>
    <div class="ion-page" main>
      <ion-header>
        <ion-toolbar>
          <ion-buttons slot="start">
            <ion-menu-button>
              <ion-icon name="menu"></ion-icon>
            </ion-menu-button>
          </ion-buttons>
          <ion-title>Currency Converter</ion-title>
        </ion-toolbar>
      </ion-header>
      <ion-content>
        <ion-router-outlet main></ion-router-outlet>
      </ion-content>
    </div>
  </ion-split-pane>
</ion-app>

In convert-page.component.ts, we replace what we have with:

import { Component, OnInit, ChangeDetectorRef } from '@angular/core")';
import { currencies as c } from '../currencies';
import { CurrencyService } from '../currency.service';
import { NgForm } from '@angular/form")';
import { ToastController } from '@ionic/angular';
import { Store, select } from '@ngrx/store")';

const currencies = c;

@Component({
  selector: 'app-convert-page',
  templateUrl: './convert-page.component.html',
  styleUrls: ['./convert-page.component.scss'],
})
export class ConvertPageComponent implements OnInit {
  currencyOptions: any = <any>{};
  fromCurrencies: any[] = Object.assign([], currencies);
  toCurrencies: any[] = Object.assign([], currencies);
  result: any = <any>{};
  showResult: boolean;

  constructor(
    private currencyService: CurrencyService,
    public toastController: ToastController,
    private store: Store<any>
  ) {
    store.pipe(select('recentCoversion'))
      .subscribe(recentCoversion => {
        if (!recentCoversion) {
          return;
        }
        this.currencyOptions = recentCoversion;
      });
  }

  ngOnInit() { }

  setToCurrencies(event) {
    if (!event.detail || !event.detail.value) {
      return;
    }
    this.toCurrencies = Object.assign([], currencies.filter(c => c.abbreviation != event.detail.value));
  }

  setFromCurrencies(event) {
    if (!event.detail || !event.detail.value) {
      return;
    }
    this.fromCurrencies = Object.assign([], currencies.filter(c => c.abbreviation != event.detail.value));
  }

  convert(convertForm: NgForm) {
    this.showResult = false;
    if (convertForm.invalid) {
      return;
    }
    this.currencyService.getExchangeRate(this.currencyOptions.from, this.currencyOptions.to)
      .subscribe((res: any) => {
        let recentConversions = [];
        if (localStorage.getItem('recentConversions')) {
          recentConversions = JSON.parse(localStorage.getItem('recentConversions'));
        }
        recentConversions.push(this.currencyOptions);
        recentConversions = Array.from(new Set(recentConversions));
        localStorage.setItem('recentConversions', JSON.stringify(recentConversions));
        const rate = res.rates[this.currencyOptions.to];
        this.result = +this.currencyOptions.amount * rate;
        this.showResult = true;
      }, err => {
        this.showError();
      })
  }

  async showError() {
    const toast = await this.toastController.create({
      message: 'Exchange rate not found.',
      duration: 2000
    });
    toast.present();
  }
}

And, in convert-page.component.html, we replace what we have with:

<ion-content [scrollEvents]="true">
  <form #convertForm='ngForm' (ngSubmit)='convert(convertForm)'>
    <ion-list>
      <ion-item no-padding>
        <h1>Convert Currency</h1>
      </ion-item>
      <ion-item no-padding>
        <ion-label>Amount</ion-label>
        <ion-input [(ngModel)]='currencyOptions.amount' name='amount' #amount='ngModel' required [min]='0'></ion-input>
      </ion-item>
      <ion-item no-padding>
        <ion-label>Currencies to Convert From</ion-label>
        <ion-select [(ngModel)]='currencyOptions.from' name='from' #from='ngModel' required
          (ionChange)='setToCurrencies($event)' (ionBlur)='setToCurrencies($event)'>
          <ion-select-option [value]='c.abbreviation' *ngFor='let c of fromCurrencies; let i = index'>
            {{c.currency}}
          </ion-select-option>
        </ion-select>
      </ion-item>
      <ion-item no-padding>
        <ion-label>Currencies to Convert To</ion-label>
        <ion-select [(ngModel)]='currencyOptions.to' name='to' #to='ngModel' required
          (ionChange)='setFromCurrencies($event)' (ionBlur)='setFromCurrencies($event)'>
          <ion-select-option [value]='c.abbreviation' *ngFor='let c of toCurrencies; let i = index'>
            {{c.currency}}
          </ion-select-option>
        </ion-select>
      </ion-item>
    </ion-list>
    <ion-button type='submit'>Convert</ion-button>
    <ion-list *ngIf='showResult'>
      <ion-item no-padding>
        {{currencyOptions.amount}} {{currencyOptions.from}} is {{result}} {{currencyOptions.to}}.
      </ion-item>
    </ion-list>
  </form>
</ion-content>

The code above will provide a form for people to enter their currency amount in the ion-input element. Then, with the two ion-select elements, you can select the currency to convert from and to.

It will also remove the currency you already selected from the choices in the drop-down that doesn’t have selection applied. This is achieved by handling the ionChanged event and then removing the value that is selected from the ion-select.

Then, in home-page.component.ts:

import { Component, OnInit } from '@angular/core';
import { CurrencyService } from '../currency.service';
import { Store } from '@ngrx/store';
import { SET_RECENT_CONVERSION } from '../reducers/recent-coverions-reducer';
import { Router } from '@angular/router';

@Component({
  selector: 'app-home-page',
  templateUrl: './home-page.component.html',
  styleUrls: ['./home-page.component.scss'],
})
export class HomePageComponent implements OnInit {
  rates: any = <any>{};
  recentConversions: any[] = []

constructor(
    private currencyService: CurrencyService,
    private store: Store<any>,
    private router: Router,
  ) {
    router.events.subscribe((val) => this.recentConversions = this.getRecentConversions())
  }

  ngOnInit() {
    this.getLatest();
    this.recentConversions = this.getRecentConversions();
  }

  getLatest() {
    this.currencyService.getLatest()
      .subscribe(res => {
        this.rates = res;
      })
  }
}

In home-page.compone.html, change to:

<ion-content [scrollEvents]="true">
  <ion-list>
    <ion-item no-padding>
      <h1>Currency Exchange Rates</h1>
    </ion-item>
    <ion-item no-padding *ngFor='let r of rates.rates | keyvalue'>
      USD : {{r.key}} - 1 : {{r.value}}
    </ion-item>
  </ion-list>
</ion-content>

Finally, in app.module.ts, replace what we have with:

import { NgModule } from '@angular/core';
import { BrowserModule } from '@angular/platform-browser';
import { RouteReuseStrategy } from '@angular/router';

import { IonicModule, IonicRouteStrategy } from '@ionic/angular';
import { SplashScreen } from '@ionic-native/splash-screen/ngx';
import { StatusBar } from '@ionic-native/status-bar/ngx';

import { AppComponent } from './app.component';
import { AppRoutingModule } from './app-routing.module';
import { HomePageComponent } from './home-page/home-page.component';
import { ConvertPageComponent } from './convert-page/convert-page.component';
import { HttpClientModule } from '@angular/common/http';
import { FormsModule } from '@angular/forms';
import { CustomFormsModule } from 'ngx-custom-validators';
import { CurrencyService } from './currency.service';
import { StoreModule } from '@ngrx/store';
import { reducers } from './reducers';
import { AdMobFree } from '@ionic-native/admob-free/ngx';

@NgModule({
  declarations: [
    AppComponent,
    HomePageComponent,
    ConvertPageComponent
  ],
  entryComponents: [],
  imports: [
    BrowserModule,
    IonicModule.forRoot(),
    AppRoutingModule,
    HttpClientModule,
    FormsModule,
    CustomFormsModule
  ],
  providers: [
    StatusBar,
    SplashScreen,
    { provide: RouteReuseStrategy, useClass: IonicRouteStrategy },
    CurrencyService
  ],
  bootstrap: [AppComponent]
})
export class AppModule { }

You should see a list of current exchanges when you go to [http://localhost:8100/home](http://localhost:8100/home).


Testing in the Genymotion Emulator

It is easy to test it in Genymotion. First, sign up for a Genymotion account, download Genymotion, and install it following the instructions. Then, run the program.

Once you open Genymotion, add an emulator by selecting what is available in the available templates section.

Once you add an emulator, you should see something like this:

Doubling-click on your emulator. Once you do that, you should see the emulator window. Run ionic cordova run android in the Node command prompt to see the app running in Genymotion.

Once the command is finished, you should see:


Building for Production

First, you have to sign your app. To do this, you have to run a command to generate keystore:

keytool -genkey -v -keystore my-release-key.jks -keyalg RSA -keysize 2048 -validity 10000 -alias my-alias

Run ionic cordova build — prod — release android to build the app in production mode.

After that, you can sign it with your keystore by running:

jarsigner -verbose -sigalg SHA1withRSA -digestalg SHA1 -keystore path/to/my-release-key.jks path/to/app-release-unsigned.apk alias_name

Optimize the APK by running [zipalign](https://developer.android.com/studio/command-line/zipalign):

zipalign -v 4 app-release-unsigned.apk currency-converter-mobile.apk

You’ll get a signed APK that you can submit to Android app stores, such as Google Play and Amazon.

Ionic makes it easy to build Android applications that don’t require too much native functionality, such as interacting with hardware.

With recent advances in HTML APIs for interacting with hardware, such as microphones, Ionic is going to be more useful for building these kinds of apps.

Performance is decent compared to native for simple apps and it is a lot easier to develop.

Categories
Angular

Build a Whiteboard App With Konva and Angular

The HTML canvas is part of the HTML specification that allows developers to easily add graphics and interactivity to their apps.

In the HTML canvas, you can add images, text, and shapes with different colors, fills, and gradients. It is supported by almost all recent browsers.

To add something to a canvas, you first add a canvas element to your page. Then, you can add lines to your canvas in the shape that you want.

For example, to add a line and a circle to your canvas element, in your HTML file you do the following:

<canvas id="canvas" width="200" height="100" style="border:2px solid #000000;">  
</canvas>

Then, in your JavaScript file, you do this:

If you want to add anything more complex, it will be difficult to do.

Therefore, the Konva library abstracts the hard work of adding items to the canvas. It allows you to add many more shapes by simply writing a few lines of code.

You can also allow users to move and transform your shapes easily, which you would have to write yourself if you wanted to do it in the HTML Canvas API.

In this piece, Konva will be combined with Angular to create a whiteboard where the user can add circles, rectangles, lines, and text, and move them and transform them within the whiteboard.

How it works: Konva creates a stage and a layer in the stage which will allow you to add the lines, shapes, and text that you want.


Getting Started

To start, we create an Angular app by running ng new whiteboard-app. Be sure to include the routing module when asked.

I’m assuming that you have the Angular CLI installed. If not, run npm i -g @angular/cli.

After that, we need to install the Konva library and Angular Material, which will allow us to manipulate the canvas and make our UI look pretty without a lot of effort.

To do this, run npm i konva @angular/material.

Then, we need to create Angular services to abstract some of the repetitive logic by running ng g service shape and ng g service textNode.

The logic for generating shapes and text will be placed in these files.

We also need to create a page for the whiteboard. Run ng g component whiteboardPage to make the component.

In app-routing.module.ts, add:

To make sure that we can see the page when we go to http://localhost:4200/, follow the instructions below.

In app.module.js, replace what was generated with:

In shape.service.ts, add the following:

Konva is available as an ES6 module, so we can import it.

Also, TypeScript definitions are built into the library, so autocomplete is available and they are correct (for the most part).

The three functions above will return line, circle, and rectangle shapes respectively, with pre-filled colors, strokes, and dimensions.

However, they can easily be changed to dynamic ones by adding parameters to the functions and setting the values in the object.

As we want to be able to move them, we set draggable to true for circle and rectangle. For a line, we only allow dragging in brush mode as we also use the line for creating the erase feature later.

In text-node.service.ts, enter the following code:

The code above will return the editable text box as shown in the Konva documentation, along with the transformer object which allows you to transform the text.

Now that we have the code to generate all the elements, we can build the UI in the whiteboard-page.component.

In whiteboard-page.component.ts, replace the existing code with:

And, in whiteboard-page.component.html, replace what is there with:

The two pieces of code above will highlight the button when it is clicked with the setSelection function. The setSelection function will set the dictionary which sets the color according to whether the button is clicked or not.

The addShape function will add the shape according to which button is clicked. It will call the service functions according to the shapes, which will return the Konva object for the shape.

This will be added to the layer object, which has already been added to the stage. The transformer object is attached to the shape objects at this time as well so you can change the size of the objects on screen.

this.layer.draw() is called which will redraw the canvas so you get the latest items displayed in the canvas.

To make the eraser for the line, it just adds another line (which is always white), on top of the existing line. The line will not be in brush mode so it will be white when created.

If we want undo functionality, we have to track the shapes and transformer objects that are added. To do this, we put them in the shapes array and the transformers array respectively after we add them.

Then, when the undo button is clicked, this is called:

In the undo function, the transformers for the shape are detached, so the transform handles for the removed shapes will go away. Then, we called remove() on the removed shape and redraw. We no longer get the shape and the handle.

Categories
Angular JavaScript TypeScript

Angular Animation Callbacks and Key Frames

Angular is a popular front-end framework made by Google. Like other popular front-end frameworks, it uses a component-based architecture to structure apps.

In this article, we look at animation callback and keyframes.

Animation Callbacks

The animation trigger emits callbacks when it starts and when it finishes.

For example, we can log the value of the event by writing the following code:

app.component.ts :

import { Component, HostBinding } from "@angular/core";  
import {  
  trigger,  
  transition,  
  style,  
  animate,  
  state  
} from "@angular/animations";

@Component({  
  selector: "app-root",  
  templateUrl: "./app.component.html",  
  styleUrls: ["./app.component.css"],  
  animations: [  
    trigger("openClose", [  
      state(  
        "true",  
        style({ height: "200px", opacity: 1, backgroundColor: "yellow" })  
      ),  
      state(  
        "false",  
        style({ height: "100px", opacity: 0.5, backgroundColor: "green" })  
      ),  
      transition("false <=> true", animate(500))  
    ])  
  ]  
})  
export class AppComponent {  
  onAnimationEvent(event: AnimationEvent) {  
    console.log(event);  
  }  
}

app.component.html :

<button (click)="show = !show">Toggle</button>  
<div  
  [@openClose]="show ? true: false"  
  (@openClose.start)="onAnimationEvent($event)"  
  (@openClose.done)="onAnimationEvent($event)"  
>  
  {{show ? 'foo' : ''}}  
</div>

In the code above, we have:

(@openClose.start)="onAnimationEvent($event)"  
(@openClose.done)="onAnimationEvent($event)"

to call the onAnimationEvent callback when the animation begins and ends respectively.

Then in our onAnimationEvent callback, we log the content of the event parameter.

It’s useful for debugging since it provides information about the states and elements of the animation.

Keyframes

We can add keyframes to our animation to create animations that are more complex than 2 stage animations.

For example, we can write the following:

app.component.ts :

import { Component } from "@angular/core";  
import {  
  trigger,  
  transition,  
  style,  
  animate,    
  keyframes  
} from "@angular/animations";

@Component({  
  selector: "app-root",  
  templateUrl: "./app.component.html",  
  styleUrls: ["./app.component.css"],  
  animations: [  
    trigger("openClose", [  
      transition('true <=> false', [  
        animate('2s', keyframes([  
          style({ backgroundColor: 'blue' }),  
          style({ backgroundColor: 'red' }),  
          style({ backgroundColor: 'orange' })  
        ]))  
    ])  
  ]  
})  
export class AppComponent {  
  onAnimationEvent(event: AnimationEvent) {  
    console.log(event);  
  }  
}

app.component.html :

<button (click)="show = !show">Toggle</button>  
<div [@openClose]="show ? true: false">  
  {{show ? 'foo' : 'bar'}}  
</div>

In the code above, we add keyframes with different styles in AppComponent .

They’ll run in the order that they’re listed for the forward state transition and reverse for the reverse state transition.

Then when we click Toggle, we’ll see the color changes as the text changes.

Offset

Keyframes include an offset that defines the point in the animation where each style change occurs.

Offsets are relative measures from zero to one. They mark the beginning and end of the animation.

These are optional. Offsets are automatically assigned when they’re omitted.

For example, we can assign offsets as follows:

app.component.ts :

import { Component } from "@angular/core";  
import {  
  trigger,  
  transition,  
  style,  
  animate,    
  keyframes  
} from "@angular/animations";

@Component({  
  selector: "app-root",  
  templateUrl: "./app.component.html",  
  styleUrls: ["./app.component.css"],  
  animations: [  
    trigger("openClose", [  
      transition('true <=> false', [  
        animate('2s', keyframes([  
          style({ backgroundColor: 'blue', offset: 0 }),  
          style({ backgroundColor: 'red', offset: 0.6 }),  
          style({ backgroundColor: 'orange', offset: 1 })  
        ]))  
    ])  
  ]  
})  
export class AppComponent {  
  onAnimationEvent(event: AnimationEvent) {  
    console.log(event);  
  }  
}

app.component.html :

<button (click)="show = !show">Toggle</button>  
<div [@openClose]="show ? true: false">  
  {{show ? 'foo' : 'bar'}}  
</div>

In the code above, we added offset properties to our style argument objects to change the timing of the color changes.

The color changes should shift slightly in timing compared to before.

Keyframes with a Pulsation

We can use keyframes to create a pulse effect by defining styles at a specific offset throughout the animation.

To add them, we can change the opacity of the keyframes as follows:

app.component.ts :

import { Component } from "@angular/core";  
import {  
  trigger,  
  transition,  
  style,  
  animate,    
  keyframes  
} from "@angular/animations";

@Component({  
  selector: "app-root",  
  templateUrl: "./app.component.html",  
  styleUrls: ["./app.component.css"],  
  animations: [  
    trigger("openClose", [  
      transition('true <=> false', [  
        animate('1s', keyframes ( [  
          style({ opacity: 0.1, offset: 0.1 }),  
          style({ opacity: 0.6, offset: 0.2 }),  
          style({ opacity: 1,   offset: 0.5 }),  
          style({ opacity: 0.2, offset: 0.7 })  
        ]))  
    ])  
  ]  
})  
export class AppComponent {  
  onAnimationEvent(event: AnimationEvent) {  
    console.log(event);  
  }  
}

app.component.html :

<button (click)="show = !show">Toggle</button>  
<div [@openClose]="show ? true: false">  
  {{show ? 'foo' : 'bar'}}  
</div>

In the code above, we have the style argument objects that have the opacity and offset properties.

The opacity difference will create a pulsating effect.

The offset will change the timing of the opacity changes.

Then when we click Toggle, we should see the pulsating effect.

Automatic Property Calculation with Wildcards

We can set CSS style properties to a wildcard to do automatic calculations.

For example, we can use wildcards as follows:

app.component.ts :

import { Component } from "@angular/core";  
import {  
  trigger,  
  transition,  
  style,  
  animate,  
  state  
} from "@angular/animations";

@Component({  
  selector: "app-root",  
  templateUrl: "./app.component.html",  
  styleUrls: ["./app.component.css"],  
  animations: [  
    trigger("openClose", [  
      state("in", style({ height: "*" })),  
      transition("true => false", [  
        style({ height: "*", backgroundColor: "pink" }),  
        animate(250, style({ height: 0 }))  
      ]),  
      transition("false => true", [  
        style({ height: "*", backgroundColor: "yellow" }),  
        animate(250, style({ height: 0 }))  
      ])  
    ])  
  ]  
})  
export class AppComponent {  
  onAnimationEvent(event: AnimationEvent) {  
    console.log(event);  
  }  
}

app.component.html :

<button (click)="show = !show">Toggle</button>  
<div [@openClose]="show ? true: false">  
  {{show ? 'foo' : 'bar'}}  
</div>

In the code above, we set the height of the styles to a wildcard because we don’t want to set the height to a fixed height.

Then when we click Toggle, we see the color box grow and shrink as the animation runs.

Conclusion

We can add callbacks to our animation to debug our animations since we can log the values there.

To make more complex animations, we can use keyframes.

Offsets can be used to change the timing of the keyframes of the animation.

We can use wildcards to automatically set CSS style values.