Categories
Vue 3

Vue 3 — Vue Instance Properties and Templates

Vue 3 is in beta and it’s subject to change.

Vue 3 is the up and coming version of Vue front end framework.

It builds on the popularity and ease of use of Vue 2.

In this article, we’ll look at Vue instance hooks and create simple templates with Vue 3.

Vue Instance Properties

The Vue instance has some properties that are built into th app.

The $data property has the data that our Vue instance has.

For instance, we can write:

<!DOCTYPE html>
<html lang="en">
  <head>
    <title>App</title>
    <script src="https://unpkg.com/vue@next"></script>
  </head>
  <body>
    <div id="app">
      {{a}}
    </div>
    <script>
      const data = { a: 1 };

      const vm = Vue.createApp({
        data() {
          return data;
        }
      }).mount("#app");

      console.log(vm.$data.a);
    </script>
  </body>
</html>

We have the vm.$data.a property which is the same as what we return in the data method.

a would be 1.

Instance Lifecycle Hooks

A Vue instance has various lifecycle hooks that it goes through from the initial load to being destroyed.

The following is the lifecycle diagram:

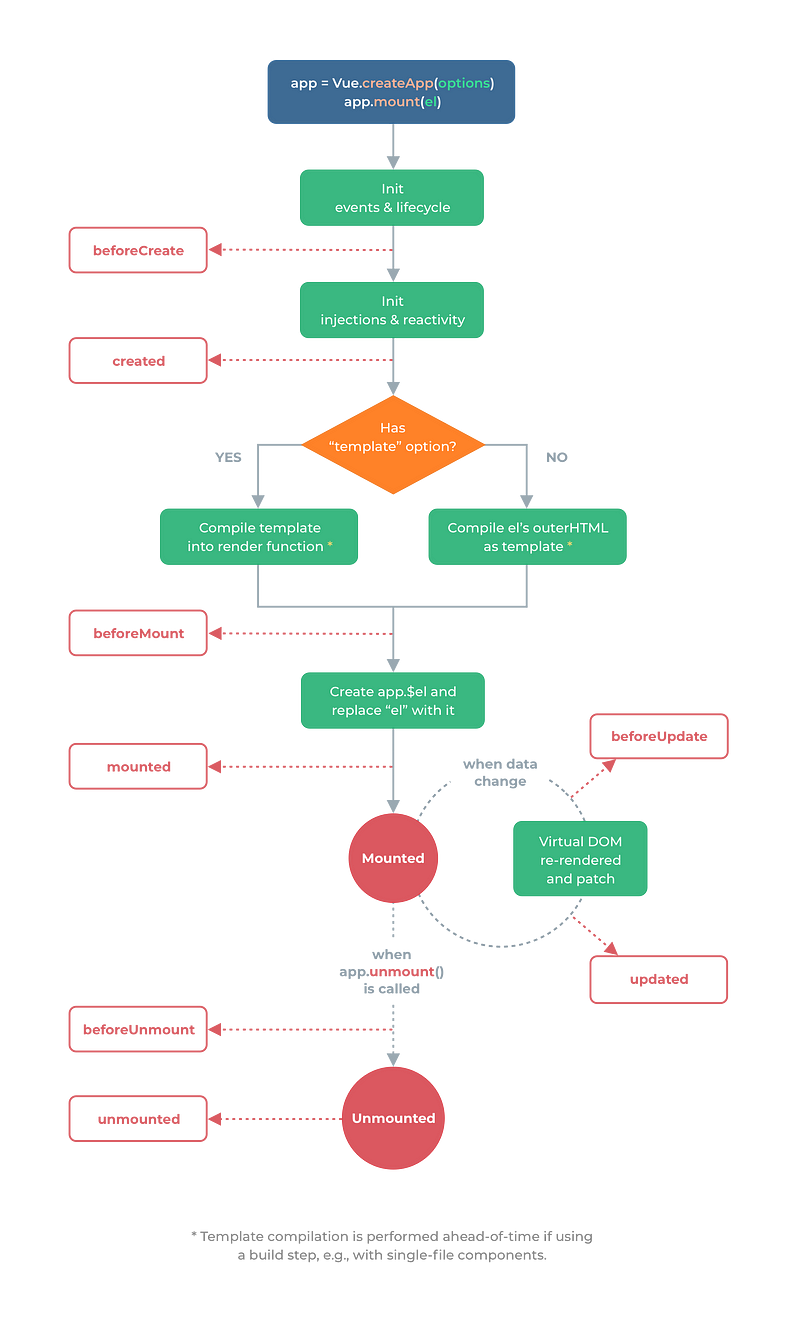
Courtesy of https://v3.vuejs.org/guide/instance.html#lifecycle-diagram

When the Vue instance is created, it starts with the init events and lifecycle stage, which calls the beforeCreate method in the Vue instance.

Event listeners are attached and the lifecycle begins at this stage.

Then it initializes the injections and reactivity stage and calls the created method.

This stage is where Vue starts listening for changes for data changes in the Vue instance.

Then one of 2 things can happen depending on if there’s a template in our Vue instance.

If there is, then template is compiled.

Otherwise, it compiles the content of the element we mounted pour Vue instance to HTML.

Once either of those is done, then beforeMount method is run.

Then the $el property is added to the Vue instance. Then element’s content is replaced with the compiled content.

The mounted method is then run.

When the state changes, then beforeUpdate is run.

Once the Virtual DOM is updated, the updated method is run.

Once app.unmount is called, which means the component will be unmounted.

Then beforeUnmount is run.

And when it’s unmounted, the unmounted method is run.

The methods are optional in our component.

We only need to add them if we want to run something in those lifecycle stages.

For example, we can write:

<!DOCTYPE html>
<html lang="en">
  <head>
    <title>App</title>
    <script src="https://unpkg.com/vue@next"></script>
  </head>
  <body>
    <div id="app">
      {{a}}
    </div>
    <script>
      const vm = Vue.createApp({
        data() {
          return {
            a: 1
          };
        },
        created() {
          console.log(this.a);
        }
      }).mount("#app");
    </script>
  </body>
</html>

to add our own code to the created hook, which runs when the component first listen to state changes.

Therefore, this.a ‘s value will be logged.

Template Syntax

Vue uses a HTML-base template syntax that lets us bind the value between the template and the Vue instance’s data.

Vue compiles the templates into Virtual DOM render functions.

This lets Vue figure out the least amount of changes to change the real DOM to render the latest data.

Interpolations

The most basic kind of data binding is text interpolation.

For example, we can write:

<!DOCTYPE html>
<html lang="en">
  <head>
    <title>App</title>
    <script src="https://unpkg.com/vue@next"></script>
  </head>
  <body>
    <div id="app">
      {{a}}
    </div>
    <script>
      const vm = Vue.createApp({
        data() {
          return {
            a: 1
          };
        }
      }).mount("#app");
    </script>
  </body>
</html>

Then we see that a is 1, which is displayed on the screen.

This interpolate is updated every time a changes.

We can make the interpolation only update once with the v-once directive.

For instance, we can write:

<!DOCTYPE html>
<html lang="en">
  <head>
    <title>App</title>
    <script src="https://unpkg.com/vue@next"></script>
  </head>
  <body>
    <div id="app">
      <div v-once>{{a}}</div>
    </div>
    <script>
      const vm = Vue.createApp({
        data() {
          return {
            a: 1
          };
        }
      }).mount("#app");
    </script>
  </body>
</html>

{{a}} will still be displayed as 1 even if the value changes.

Conclusion

The Vue instance has its own lifecycle hook.

We can add the code needed to run code during various stages of a Vue instance lifecycle.

Vue has an easy to use template syntax for rendering data.

Categories
Vue 3

Vue 3 — v-model Modifiers and Components

Vue 3 is in beta and it’s subject to change.

Vue 3 is the up and coming version of Vue front end framework.

It builds on the popularity and ease of use of Vue 2.

In this article, we’ll look at how to use the Vue 3 v-model directive and create simple Vue 3 components.

Select Options

Select option values can be objects.

For instance, we can write:

<!DOCTYPE html>
<html lang="en">
  <head>
    <title>App</title>
    <script src="https://unpkg.com/vue@next"></script>
  </head>
  <body>
    <div id="app">
      <select v-model="selected">
        <option :value="{ fruiit: 'apple' }">apple</option>
        <option :value="{ fruiit: 'orange' }">orange</option>
        <option :value="{ fruiit: 'grape' }">grape</option>
      </select>
      <p>{{ selected }}</p>
    </div>
    <script>
      const vm = Vue.createApp({
        data() {
          return { selected: {} };
        }
      }).mount("#app");
    </script>
  </body>
</html>

to create a select dropdown that has option values bound to objects.

:value accepts an object.

So when we select a value, we’ll see that selected would also be an object.

This is because we set v-model ‘s value to selected .

v-model Modifiers

v-model can take various modifiers.

.lazy

The .lazy modifier makes v-model sync with the Vue instance state after each change event.

By default, v-model syncs with the state after each input event is emitted.

We can use that by writing:

<input v-model.lazy="msg" />

.number

The .number modifier lets us convert whatever is entered to a number automatically.

For instance, we can write:

<input v-model.number="numApples" type="number" />

to convert numApples to a number automatically.

By default, an HTML input’s value is always a string, so this is a useful shorthand.

If the value can’t be parsed with parseFloat , then the original value is returned.

.trim

The .trim modifier automatically trims whitespace from user inputs.

We can use it by writing:

<input v-model.trim="msg" />

v-model with Components

v-model can be used with components as long as it emits an input event and takes in a value prop to populate the form control’s value.

This lets us make custom form control components easily.

Components Basics

We can create Vue components with the app.component method.

For example, we can write:

<!DOCTYPE html>
<html lang="en">
  <head>
    <title>App</title>
    <script src="https://unpkg.com/vue@next"></script>
  </head>
  <body>
    <div id="app">
      <button-counter />
    </div>
    <script>
      const app = Vue.createApp({});

      app.component("button-counter", {
        data() {
          return {
            count: 0
          };
        },
        template: `
          <div>
            <button @click="count++">
              increment
            </button>
            <p>{{ count }}</p>
          </div>
        `
      });

      app.mount("#app");
    </script>
  </body>
</html>

to create a component and then use it in our app.

We called app.component to with the component name as the first argument.

We called our component 'button-counter' .

The 2nd argument has the component object with the template and logic.

data returns the initial state object.

And template has the template string with the elements we want to display.

Inside it, we increment the count when a button is clicked and display the count .

Then we use the button-counter component in our app by adding the HTML for it.

Now we should see the increment button and the count value update as we click it.

Conclusion

v-model works with select options and components.

We can create simple components with the app.component method.

Categories
Vue 3

Vue 3 — v-model

Vue 3 is in beta and it’s subject to change.

Vue 3 is the up and coming version of Vue front end framework.

It builds on the popularity and ease of use of Vue 2.

In this article, we’ll look at how to use the Vue 3 v-model directive.

Multiline Text

v-model also works with multiline text.

For instance, we can write:

<!DOCTYPE html>
<html lang="en">
  <head>
    <title>App</title>
    <script src="https://unpkg.com/vue@next"></script>
  </head>
  <body>
    <div id="app">
      <textarea v-model="message" placeholder="message"></textarea>
      <p style="white-space: pre-line;">{{ message }}</p>
    </div>
    <script>
      const vm = Vue.createApp({
        data() {
          return {
            message: ""
          };
        }
      }).mount("#app");
    </script>
  </body>
</html>

And when we type in multiple lines of text, it’ll be displayed with the same formatting.

This is because we have the white-space: pre-line; style.

We shouldn’t use interpolation for text areas.

Instead, we always use v-model .

Checkbox

v-model also works with checkboxes.

For example, we can write:

<!DOCTYPE html>
<html lang="en">
  <head>
    <title>App</title>
    <script src="https://unpkg.com/vue@next"></script>
  </head>
  <body>
    <div id="app">
      <input type="checkbox" v-model="checked" />
      <label for="checkbox">{{ checked }}</label>
    </div>
    <script>
      const vm = Vue.createApp({
        data() {
          return {
            checked: true
          };
        }
      }).mount("#app");
    </script>
  </body>
</html>

to bind the checked value of the checkbox to the checked state.

We can also have multiple checkboxes bound to the same array:

<!DOCTYPE html>
<html lang="en">
  <head>
    <title>App</title>
    <script src="https://unpkg.com/vue@next"></script>
  </head>
  <body>
    <div id="app">
      <input type="checkbox" value="apple" v-model="checkedFruits" />
      <label>apple</label>
      <input type="checkbox" value="orange" v-model="checkedFruits" />
      <label>orange</label>
      <input type="checkbox" value="grape" v-model="checkedFruits" />
      <label>grape</label>
      <p>{{checkedFruits}}</p>
    </div>
    <script>
      const vm = Vue.createApp({
        data() {
          return {
            checkedFruits: []
          };
        }
      }).mount("#app");
    </script>
  </body>
</html>

v-model is smart enough to populate the checkedFruits array with the checked choices.

All we have to do is set the value attribute value and the array variable to bind to v-model and we’re set.

Now when we check or uncheck the checkboxes, the checkedFruits array will change automatically.

Radio

Like checkboxes, Vue 3’s v-model directive can bind to radio button choices.

All we need to have is the value attribute and the v-model directive on each checkbox and Vue will do the selection binding automatically.

For example, we can write:

<!DOCTYPE html>
<html lang="en">
  <head>
    <title>App</title>
    <script src="https://unpkg.com/vue@next"></script>
  </head>
  <body>
    <div id="app">
      <input type="radio" value="apple" v-model="selected" />
      <label>apple</label>
      <input type="radio" value="orange" v-model="selected" />
      <label>orange</label>
      <input type="radio" value="grape" v-model="selected" />
      <label>grape</label>
      <p>{{selected}}</p>
    </div>
    <script>
      const vm = Vue.createApp({
        data() {
          return {
            selected: ""
          };
        }
      }).mount("#app");
    </script>
  </body>
</html>

We pass in the selected property returned from data as the value of the v-model directive.

The value attribute as the value of each radio button.

Now when we click on the radio button, we’ll see the value displayed below it.

We can only click one since they’re all bound to the same variable.

Select

v-model also works with select elements.

For example, we can write:

<!DOCTYPE html>
<html lang="en">
  <head>
    <title>App</title>
    <script src="https://unpkg.com/vue@next"></script>
  </head>
  <body>
    <div id="app">
      <select v-model="selected">
        <option disabled value="">Please select one</option>
        <option>apple</option>
        <option>orange</option>
        <option>grape</option>
      </select>
      <p>{{ selected }}</p>
    </div>
    <script>
      const vm = Vue.createApp({
        data() {
          return {
            selected: ""
          };
        }
      }).mount("#app");
    </script>
  </body>
</html>

We passed the selected value to the v-model so it’ll be updated if we select a value.

If there’s no value attribute in the option, then the text between the option tags will be used as the value.

Conclusion

v-model lets us bind various form control values to Vue instance states.

Categories
Vue 3

Vue 3 — v-for and Components

Vue 3 is in beta and it’s subject to change.

Vue 3 is the up and coming version of Vue front end framework.

It builds on the popularity and ease of use of Vue 2.

In this article, we’ll look at rendering arrays with v-for .

Methods

We can use methods to render with v-for as long as the method returns an array or an object.

For instance, we can write:

<!DOCTYPE html>
<html lang="en">
  <head>
    <title>App</title>
    <script src="https://unpkg.com/vue@next"></script>
  </head>
  <body>
    <div id="app">
      <ul v-for="numbers in sets">
        <li v-for="n in odd(numbers)">{{ n }}</li>
      </ul>
    </div>
    <script>
      const vm = Vue.createApp({
        data() {
          return {
            sets: [[1, 2, 3, 4, 5], [6, 7, 8, 9, 10]]
          };
        },
        methods: {
          odd(numbers) {
            return numbers.filter(number => number % 2 === 1);
          }
        }
      }).mount("#app");
    </script>
  </body>
</html>

to get the odd numbers from each nested array and render them.

The odd method takes a number array and returns an array with the odd ones, so we can use it with v-for .

v-for with a Range

v-for can be used to render a range of numbers.

For instance, we can write:

<!DOCTYPE html>
<html lang="en">
  <head>
    <title>App</title>
    <script src="https://unpkg.com/vue@next"></script>
  </head>
  <body>
    <div id="app">
      <div id="range">
        <p v-for="n in 100">{{ n }}</p>
      </div>
    </div>
    <script>
      const vm = Vue.createApp({}).mount("#app");
    </script>
  </body>
</html>

n in 100 will render a list of numbers from 1 to 100.

v-for on a <template>

v-for can be used on the template element to let us render a group of items.

For example, we can write:

<!DOCTYPE html>
<html lang="en">
  <head>
    <title>App</title>
    <script src="https://unpkg.com/vue@next"></script>
  </head>
  <body>
    <div id="app">
      <template v-for="p in people">
        <p>{{ p.name }}</p>
        <hr />
      </template>
    </div>
    <script>
      const vm = Vue.createApp({
        data() {
          return {
            people: [
              { id: 1, name: "mary" },
              { id: 2, name: "james" },
              { id: 3, name: "jane" }
            ]
          };
        }
      }).mount("#app");
    </script>
  </body>
</html>

We have the p and hr elements rendered in a group in the template tag.

This way, we can render multiple items in a group.

v-for with a Component

v-for can be used with components.

For instance, we can write:

<!DOCTYPE html>
<html lang="en">
  <head>
    <title>App</title>
    <script src="https://unpkg.com/vue@next"></script>
  </head>
  <body>
    <div id="app">
      <person v-for="p in people" :person="p" :key="p.id"> </person>
    </div>
    <script>
      const app = Vue.createApp({
        data() {
          return {
            people: [
              { id: 1, name: "mary" },
              { id: 2, name: "james" },
              { id: 3, name: "jane" }
            ]
          };
        }
      });

      app.component("person", {
        props: ["person"],
        template: `
          <p>{{ person.name }}</p>
          <hr />
        `
      });

      app.mount("#app");
    </script>
  </body>
</html>

to create a component called person .

It takes the person prop, which are objects in the people array.

Then we pass in each people entry as the value of the person prop.

The items in the component are rendered as the v-for loop runs.

The data isn’t automatically injected into the component since it makes the coupling tight between the child and the parent component.

Conclusion

We can render arrays and objects returned from methods.

Categories
Vue 3

Vue 3 — v-for and Arrays

Vue 3 is in beta and it’s subject to change.

Vue 3 is the up and coming version of Vue front end framework.

It builds on the popularity and ease of use of Vue 2.

In this article, we’ll look at rendering arrays with v-for .

Maintaining State

When v-for re-renders a list, the items are patched in place.

When then items change, the existing items are updated.

However, this means when the items re-render, their state will be cleared.

Therefore, patching is only suitable when we render a list that doesn’t rely on child component state or temporary DOM state.

To let Vue know the identity of an item, we should add a key prop to each rendered item so that Vue can reuse and reorder existing elements.

For example, we can write:

<!DOCTYPE html>
<html lang="en">
  <head>
    <title>App</title>
    <script src="https://unpkg.com/vue@next"></script>
  </head>
  <body>
    <div id="app">
      <div v-for="p in people" :key="p.id">
        {{ p.name }}
      </div>
    </div>
    <script>
      const vm = Vue.createApp({
        data() {
          return {
            people: [
              { id: 1, name: "mary" },
              { id: 2, name: "james" },
              { id: 3, name: "jane" }
            ]
          };
        }
      }).mount("#app");
    </script>
  </body>
</html>

to render a list from the people array.

We passed in a unique ID to the key prop to make sure that the ID stays the same no matter what order the items are in.

Only primitive values should be used as key values.

So we can use strings or numbers like in the example.

Array Change Detection

Vue 3 wraps array mutation methods so they also trigger view updates.

The wrapped methods include:

  • push()
  • pop()
  • shift()
  • unshift()
  • splice()
  • sort()
  • reverse()

They’ll all trigger Vue to update the rendered list when they’re called.

Replacing an Array

Methods that return a new array don’t trigger Vue to update the rendered list because they return a new array.

Therefore, we need to assign the returned array to the original value.

For example, we can write:

<!DOCTYPE html>
<html lang="en">
  <head>
    <title>App</title>
    <script src="https://unpkg.com/vue@next"></script>
  </head>
  <body>
    <div id="app">
      <input v-model="name" @keydown="search" />
      <div v-for="p in people" :key="p.id">
        {{ p.name }}
      </div>
    </div>
    <script>
      const vm = Vue.createApp({
        data() {
          return {
            name: "",
            people: [
              { id: 1, name: "mary" },
              { id: 2, name: "james" },
              { id: 3, name: "jane" }
            ]
          };
        },
        mounted() {
          this.orig = JSON.parse(JSON.stringify(this.people));
        },
        methods: {
          search() {
            if (this.name.length > 0) {
              this.people = this.people.filter(item =>
                item.name.match(new RegExp(this.name, "g"))
              );
            } else {
              this.people = this.orig;
            }
          }
        }
      }).mount("#app");
    </script>
  </body>
</html>

We called the filter method to filter items according to the inputted value.

So we’ve set the returned value to the this.people property so that the new value will be rendered.

Displaying Filtered/Sorted Results

If we want to display filtered or sorted results, we can do this with computed properties.

For instance, we can write:

<!DOCTYPE html>
<html lang="en">
  <head>
    <title>App</title>
    <script src="https://unpkg.com/vue@next"></script>
  </head>
  <body>
    <div id="app">
      <p v-for="n in oddNumbers">{{ n }}</p>
    </div>
    <script>
      const vm = Vue.createApp({
        data() {
          return {
            numbers: [1, 2, 3, 4, 5]
          };
        },
        computed: {
          oddNumbers() {
            return this.numbers.filter(number => number % 2 === 1);
          }
        }
      }).mount("#app");
    </script>
  </body>
</html>

to return an array of odd numbers in the computed property oddNumbers .

Then we can render oddNumbers instead of the original number array and using v-if to do the filtering.

Conclusion

We can use computed properties to display filtered values.

Array methods that mutate the array will trigger re-render when they’re called.

Array methods that return the new array will need to have their returned value assigned to an instance variable for them to be rendered.