Categories
JavaScript

JavaScript Events Handlers — ondragend and ondragenter

In JavaScript, events are actions that happen in an app. They’re triggered by various things like inputs being entered, forms being submitted, and changes in an element like resizing, or errors that happen when an app is running, etc. We can assign event handler to handle these events. Events that happen to DOM elements can be handled by assigning an event handler to properties of the DOM object for the corresponding events. In this article, we look at easy ways to add drag and drop functionality with plain JavaScript code by using creating our own event handler functions for the ondragend and ondragenter event handlers.

ondragend

The ondragend event lets us set an event handler to handle the dragend event which happens when the drag operation is being completed by releasing a mouse button or hitting the escape key. For example, we can use it by writing the following HTML code to make a draggable box by setting the draggable attribute to true and box box below it to drop the draggable box into which we assigned the ID drop-zone:

<div id='drag-box' draggable="true"></div><div id='drop-zone'></div>

Then we style it with CSS by making 100 pixels wide and 100 pixels tall and fill it with a red background, and make the drop-zone div 200 pixels wide by 200 pixels tall and make its background purple:

#drag-box {  
  width: 100px;  
  height: 100px;  
  background-color: red;  
}

#drop-zone {  
  width: 200px;  
  height: 200px;  
  background-color: purple  
}

Finally, we can add the JavaScript code to track the dragging action of the box by assigning an event handler function to the ondragend property of the DOM element of our box that we created in the HTML code:

const dragBox = document.getElementById('drag-box');  
const dropZone = document.getElementById('drop-zone');

dragBox.ondragend = (e) => {  
  dropZone.appendChild(dragBox);  
}

Inside the event handler function we call appendChild on the dropZone object to put the red draggable box inside the purple box so that it looks like the red box has been dropped inside the purple box. Instead of passing the dragBox object into the appendChild method directly, we can also get the srcElement property of the e parameter and then pass that into appendChild instead like in the following code:

const dragBox = document.getElementById('drag-box');  
const dropZone = document.getElementById('drop-zone');

dragBox.ondragend = (e) => {  
  dropZone.appendChild(e.srcElement);  
}

The code above is better than passing in dragBox directly into appendChild since it’s much more generic than the original version of the event handler function. We can attach it to any draggable object we want. For example, if we have more than one draggable div element like in the following HTML code:

<div id='drag-box' draggable="true">  
</div><div id='drag-box-2' draggable="true">  
</div><div id='drop-zone'>  
</div>

And we change the CSS to style both draggable div elements like in the code below:

#drag-box {  
  width: 100px;  
  height: 100px;  
  background-color: red;  
}

#drag-box-2 {  
  width: 100px;  
  height: 100px;  
  background-color: green;  
}

#drop-zone {  
  width: 200px;  
  height: 200px;  
  background-color: purple  
}

Then we can write the following JavaScript code to use one ondragend event handler function to handle the dropping of both draggable div elements like we have in the code below:

const dragBox = document.getElementById('drag-box');  
const dragBox2 = document.getElementById('drag-box-2');  
const dropZone = document.getElementById('drop-zone');

const dragEndHandler = (e) => {  
  dropZone.appendChild(e.srcElement);  
}

dragBox.ondragend = dragEndHandler;  
dragBox2.ondragend = dragEndHandler;

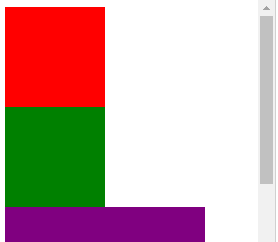
As we can see from the code above, we assigned the same event handler function to the ondragend properties of both draggable div DOM element objects. At the end, we get the following effect:

https://thewebdev.info/wp-content/uploads/2020/04/drag.gif

ondragenter

With the ondragenter property of a DOM element, we can assign an event handler function to handle the dragenter event. The dragenter event is fired when a dragged element or text selection enters a valid drop target. The target object is element that’s directly indicated by the user as the drop target or the body element. For example, we can use the ondragenter event handler function to track the element where the draggable element is entering and drop a draggable element to the element that we want to drop into by assigning an event handler function to the ondragenter property. For example, we can add the following HTML code to add a p element for displaying the ID of the element that the draggable element is dropped into, a draggable div element and 2 div elements that we can drop the draggable div element into, by writing the following code:

<p id='drop-tracker'></p>  
<div id='drag-box' draggable="true">  
</div>  
<div id='drop-zones'>  
  <div id='drop-zone'>  
  </div><div id='drop-zone-2'>  
  </div>  
</div>

Then we style the elements we have in the HTML code by changing the color and the size of each div with the following CSS code:

#drag-box {  
  width: 100px;  
  height: 100px;  
  background-color: red;  
}

#drop-zones {  
  display: flex;  
}

#drop-zone {  
  width: 200px;  
  height: 200px;  
  background-color: purple  
}

#drop-zone-2 {  
  width: 200px;  
  height: 200px;  
  background-color: green;  
}

We put the 2 div elements that we can drop our draggable div into side by side by using the display: flex property and value. Then we can assign our own event handler function to the ondragenter property of our 2 div elements where we can drop our draggable div element into by writing the following code:

const dragBox = document.getElementById('drag-box');  
const dropZone = document.getElementById('drop-zone');  
const dropZone2 = document.getElementById('drop-zone-2');  
const dropTracker = document.getElementById('drop-tracker');

const dragEnterHandler = (e) => {  
  if (e.toElement.id.includes('drop-zone')) {  
    dropTracker.innerHTML = `Dropped to ${e.toElement.id}`;  
    e.toElement.appendChild(document.getElementById('drag-box'));  
  }  
}

dropZone.ondragenter = dragEnterHandler;  
dropZone2.ondragenter = dragEnterHandler;

In the dragEnterHandler function, we check that if we dragged our drag-box div element into one of our drop-zone div elements by checking the e.toElement.id property. The toElement property has the element that we’re dragging the draggable div to. We check that the drag-box div has indeed entered the 2 drop-zone div elements by writing e.toElement.id.includes(‘drop-zone’) , so we can’t drop them in places that we don’t want them to be dropped. If the drag-box div lands in one of the drop-zone div elements, then we call the appendChild on the drop-zone div to put them inside the drop-zone div . Also, we displayed the ID of the drop-zone div that we dropped our drag-box div into by setting the innerHTML property of the drop-tracker p element. At the end, we should have something like the following:

https://thewebdev.info/wp-content/uploads/2020/04/drop.png

With the ondragenter event handler function, we can drop our draggable element in elements that we want to drop them to, which can be one or more of them.

The ondragend property of a DOM element lets us set an event handler to handle the dragend event which happens when the drag operation is being completed by releasing a mouse button or hitting the escape key. With the ondragenter property of a DOM element, we can assign an event handler function to handle the dragenter event. The dragenter event is fired when a dragged element or text selection enters a valid drop target. The target object is element that’s directly indicated by the user as the drop target or the body element. This lets us drop an draggable element into more than one possible element.

Categories
JavaScript

JavaScript Events Handlers — oncontextmenu and oncuechange

In JavaScript, events are actions that happen in an app. They’re triggered by various things like inputs being entered, forms being submitted, and changes in an element like resizing, or errors that happen when an app is running, etc. We can assign an event handler to handle these events. Events that happen to DOM elements can be handled by assigning an event handler to properties of the DOM object for the corresponding events. We will take a close look at the oncontextmenu and oncuechange event handlers.

oncontextmenu

The oncontextmenu property lets us assign an event handler function to it to handle the contextmenu event. The event is triggered when the right mouse button is clicked on the browser tab. The browser context menu will activate unless the default behavior is prevented. For example, we can disable right click by writing:

document.oncontextmenu = (event) => {  
  event.preventDefault();  
}

We can also get the position of the right-click by using the cilentX and cilentY properties of the MouseEvent object, which is the object that we from the parameter of the event handler function. For example, we can write the following HTML code to put the text of the right click position:

<p id='pos'></p>

Then we can write the following JavaScript code to get the coordinates of the right click and then set the text to display in the p element we wrote above with the cilentX and cilentY properties from the MouseEvent object that’s passed in the parameter when the event handler function is called:

const pos = document.getElementById('pos');  
document.oncontextmenu = (e) => {  
  console.log(e);  
  pos.innerHTML = `You right clicked on (${e.clientX}, ${e.clientY})`;  
}

The MouseEvent object has many properties. They are the following:

  • altKey — a boolean read-only property that returns true if the Qlt key was down when the mouse event was fired.
  • button — a read-only property that indicates the button number that was pressed (if applicable) when the mouse event was fired.
  • buttons — a read-only property that has the buttons being depressed (if any) when the mouse event was fired.
  • clientX — a read-only property that has the X coordinate of the mouse pointer in the document coordinates.
  • clientY — a read-only property that has the Y coordinate of the mouse pointer in the local document coordinates.
  • ctrlKey — a boolean read-only that returns true if the control key was down when the mouse event was fired.
  • metaKey — a boolean read-only that returns true if the meta key was down when the mouse event was fired. The meta key is the command or Apple key on Macintosh keyboards and the Windows key on Windows keyboards.
  • movementX — a read-only that has the X coordinate of the mouse pointer relative to the position of the last mousemove event.
  • movementY — a read-only property that has the Y coordinate of the mouse pointer relative to the position of the last mousemove event.
  • offsetX — a read-only property that has the X coordinate of the mouse pointer relative to the position of the padding edge of the target node
  • offsetY — a read-only property that has the Y coordinate of the mouse pointer relative to the position of the padding edge of the target node
  • pageX — a read-only property that has the X coordinate of the mouse pointer relative to the whole document.
  • pageY — a read-only property the Y coordinate of the mouse pointer relative to the whole document.
  • region — a read-only property that returns the ID of the hit region affected by the event. If no hit region is affected, null is returned.
  • relatedTarget — a read-only property that has the secondary target for the event, if there is one.
  • screenX — a read-only property that has the X coordinate of the mouse pointer in global (screen) coordinates.
  • screenY — a read-only property that has the Y coordinate of the mouse pointer in global (screen) coordinates.
  • shiftKey — a boolean read-only property that returns true if the shift key was down when the mouse event was fired.
  • which — a read-only that has the button being pressed when the mouse event was fired.
  • mozPressure — a read-only that has the amount of pressure applied to a touch or tablet device when generating the event. This value ranges between 0.0 (minimum pressure) and 1.0 (maximum pressure). This is a deprecated (and non-standard) property. We should instead use the PointerEvent object’s pressure property.
  • mozInputSource — a read-only property that has the type of device that generated the event (one of the MOZ_SOURCE_* constants listed below). We can determine whether a mouse event was generated by an actual mouse or by a touch event, or detect other input sources the user is interacting with with this property.
  • webkitForce — a read-only property that has the amount of pressure applied when clicking
  • x — a read-only property that is an alias for clientX.
  • y — a read-only property that is an alias for clientY.

oncuechange

The oncuechange property let us assign an event handler to handle the cuechange event, which is fired when a TextTrack has changed the currently displaying cues. This event is sent to both the TextTrack and track element the track is presented by. For instance, we can use it for logging the caption that’s being displayed in a video like in the following code. First, we add the HTML code for the video and the caption track for the video:

<!DOCTYPE html>  
<html>  
  <head>  
    <title>Cue Change</title>  
    <link href="main.css" rel="stylesheet" />  
  </head>  
  <body>  
    <video controls width="250" src="./media/friday.mp4">  
      <track  
        default  
        kind="captions"  
        srclang="en"  
        src="./media/friday.vtt"  
        id="video-track"  
      />Sorry, your browser doesn't support embedded videos.  
    </video><script src="main.js"></script>  
  </body>  
</html>

Then in main.js , we add the following JavaScript code:

const videoTrack = document.getElementById("video-track");  
videoTrack.oncuechange = e => {  
  console.log(e);  
};

From the console.log output of the code above, we should get something like the following:

bubbles: false  
cancelBubble: false  
cancelable: false  
composed: false  
currentTarget: null  
defaultPrevented: false  
eventPhase: 0  
isTrusted: true  
path: (6) \[track#video-track, video, body, html, document, Window\]  
returnValue: true  
srcElement: track#video-track  
target: track#video-track  
timeStamp: 11405.27500025928  
type: "cuechange"

New console.log output should appear as new caption is being displayed which is the same as the cues being changed and when the cuechanged event is fired. We can get the caption / cue text from the target.track.activeCues property. The activeCues property is a TextTrackCueList , which is an array like object, so we can iterate through it with the for...of and use the spread operator with it. For example, we can write the following code:

const videoTrack = document.getElementById("video-track");  
videoTrack.oncuechange = e => {  
  console.log([...e.target.track.activeCues].map(t => t.text).join(" "));  
};

Then we would get the lines of the caption track for the video above:

Hildy!  
How are you?  
Tell me, is the lord of the universe in?  
Yes, he's in - in a bad humor  
Somebody must've stolen the crown jewels  
...

The console.log output lines go on until the end of the video.

The oncontextmenu property lets us assign an event handler function to it to handle the contextmenu event. The event is triggered when the right mouse button is clicked on the browser tab. It’s handy for detecting right-click events and disabling right-click on pages. The oncuechange property let us assign an event handler to handle the cuechange event, which is fired when a TextTrack has changed the currently displaying cues. This event is sent to both the TextTrack and track element the track is presented by. We can get the track data with the event.target.track property, which available to Event objects passed into the oncurchange event handler.

Categories
JavaScript React

Built-in React Hooks —useLayoutEffect and useDebugValue

React is a library for creating front end views. It has a big ecosystem of libraries that work with it. Also, we can use it to enhance existing apps.

In this article, we look at the useLayoutEffect and useDebugValue hooks.

useLayoutEffect

useLayoutEffect has an identical signature to useEffect , but it fires synchronously after all DOM mutations are done.

This is useful for reading layout from the DOM and synchronously re-render.

Updates inside useLayoutEffect will be flushed synchronously before the browser has a chance to paint.

To prevent blocking visual updates, we should use useEffect whenever possible.

useLayoutEffect fires in the same phase as componentDidMount and componentDidUpdate .

We should only use useLayoutEffect if useEffect isn’t working properly.

If server rendering is used, the useLayoutEffect nor useEffect are run until the JavaScript is downloaded.

React warns when server-rendered component contains useLayourEffect .

To exclude components that need layout effects from server-rendered HTML, we render it conditionally with showChild && <Child /> and defer showing it with useEffect(() => { setShowChild(true); }, []).

Then the UI won’t appear broken before rendering is done.

For example, we can render synchronous with useLayoutEffect as follows:

function App() {  
  const [value, setValue] = React.useState(0);  
  React.useLayoutEffect(() => {  
    if (value === 0) {  
      setValue(10 + Math.random() * 200);  
    }  
  }, [value]); 

  return (  
    <>  
      <button onClick={() => setValue(0)}>Random Value</button>  
      <p>{value}</p>  
    </>  
  );  
}

Since value is set initially to 0, we want to update that first before rendering, so we use useLayoutEffect hook and call setValue in the callback.

Also, since we set value to 0 when clicking the button, we want to only show the value when value when it’s not 0, so useLayoutEffect will prevent 0 from being shown.

useDebugValue

useDebugValue is used to display a label for custom hooks in React DevTools.

It takes any value that we want to display.

For example, we can use it as follows:

import React, { useEffect, useState } from "react";  
import ReactDOM from "react-dom";  
const useDelayedMessage = (msg, delay) => {  
  const [message, setMessage] = useState("");  
  useEffect(() => {  
    setTimeout(() => {  
      setMessage(msg);  
    }, delay);  
  });  
  React.useDebugValue(message ? "Message Set" : "Message not set");  
  return message;  
};

function App() {  
  const delayedMessage = useDelayedMessage("foo", 1500);  
  return <div>{delayedMessage}</div>;  
}

Since we have:

React.useDebugValue(message ? "Message Set" : "Message not set");

in React DevTools, we’ll see the Message not set message when the page first loads, and then when message is set after the delay , then we see Message set .

This hook is useful for custom hooks that are part of shared libraries

Defer formatting debug values

In some cases formatting, a value for display may be an expensive operation.

Therefore, useDebugValue accepts a formatting function as an optional second parameter. The function is only called if the hooks are inspected.

It receives the debug value as a parameter and returns the formatted display value.

For example, we can write:

import React, { useEffect, useState } from "react";  
import ReactDOM from "react-dom";  
const useDelayedMessage = (msg, delay) => {  
  const [message, setMessage] = useState("");  
  useEffect(() => {  
    setTimeout(() => {  
      setMessage(msg);  
    }, delay);  
  });  
  React.useDebugValue(message, message =>  
    message ? "Message Set" : "Message not set"  
  );  
  return message;  
};

function App() {  
  const delayedMessage = useDelayedMessage("foo", 1500);  
  return <div>{delayedMessage}</div>;  
}

In the code above, we have:

React.useDebugValue(message, message =>  
    message ? "Message Set" : "Message not set"  
  );

which runs the formatting function in the second argument when it’s inspected.

The message parameter has the same value as message returned from useState .

Conclusion

We can use the useLayoutEffect hook to synchronous run code after all DOM mutations are done.

useDebugValue hook is handy for debugging with React DevTools since it lets us display something in the DevTools console as the hook runs.

Categories
JavaScript TypeScript Vue

Writing Vue.js Apps with TypeScript

Vue.js is an easy to use web app framework that we can use to develop interactive front end apps.

In this article, we’ll look at how to write Vue.js apps with TypeScript.

Support for TypeScript

Vue.js has built-in support for TypeScript. It provides us with a mostly static type system that reduces the chances for run-time errors in our code.

Vue ships with official type declarations for TypeScript. It’s included in Vue, Vue Router and Vuex.

TypeScript can resolve types declarations in NPM packages, so we don’t have to worry about them resolving them ourselves.

Using Vue CLI

We can use the Vue CLI to create a Vue TypeScript project. To do this, we have to run Vue CLI by running:

npx vue create .

in our project directory.

Then we select ‘Manually select features’ and then TypeScript. The rest can stay with the default options.

Then we run npm run serve to run the project hot reload.

If we want, we can also set the following recommended options in tsconfig.json :

{  
  "compilerOptions": {  
    "target": "es5",  
    "strict": true,  
    "module": "es2015",  
    "moduleResolution": "node"  
  }  
}

target is the build target. Setting it to es5 maximizes support for browsers.

strict enables or disables strict type check. Setting it to true will enable it.

“module”: “es2015” leverage tree shaking capabilities of Webpack 2+ or Rollup to reduce bundle size and speed up loading.

Defining and Using Components

We can define components by using the class syntax. For example, with the TypeScript project that we created with Vue CLI, we can do this as follows:

src/components/Message.vue :

<template>  
  <div class="hello">  
    <h1>{{ msg }}</h1>  
  </div>  
</template><script lang="ts">  
import { Component, Prop, Vue } from 'vue-property-decorator';

@Component 
export default class Message extends Vue {  
  @Prop() private msg!: string;  
}  
</script>

In the code above, we have the @Prop decorator to define the message prop. The exclamation mark after msg makes msg required. To the right of the colon, we have the type of the prop, which is a string.

src/App.vue :

<template>  
  <div id="app">  
    <input v-model="message">  
    <Message :msg="message"/>  
    <button @click="showMessage">Show Message</button>  
  </div>  
</template>

<script lang="ts">  
import { Component, Vue } from 'vue-property-decorator';  
import Message from './components/Message.vue';

@Component({  
  components: {  
    Message,  
  },  
})  
export default class App extends Vue {  
  message: string = ''; showMessage(): void{  
    alert(this.message)  
  }  
}  
</script><style>  
#app {  
  font-family: 'Segoe UI', Tahoma, Geneva, Verdana, sans-serif  
}  
</style>

In the code above, we defined the message field, which is bound to the template with v-model .

We also have a showMessage method that’s run when the Show Message button is clicked.

Then we can see an input box where we can type things in. What we type will show in below the input box in the Message component, and when we click Show Message, we get what we typed is shown in the alert box.

Use Vue.extend to Create Components

We can also use Vue.extend to create components.

For example, we can replace src/components/Message.ts with the following”

import Vue, { VNode } from 'vue'
const Component = Vue.extend({  
  props: ['msg'],  
  computed: {  
    greeting(): string {  
      return `Hi. ${this.msg}`;  
    }  
  },  
  render(createElement): VNode {  
    return createElement('div', [  
      createElement('p', this.msg),  
      createElement('p', this.greeting),  
    ])  
  }  
})export default Component;

In the code above, we render a div with the msg prop and greeting computed property.

Note that we have VNode return type for render . This will ensure that we return the right type of data. TypeScript can’t infer types in many cases.

Since we use Vue.extend , we’ll get type inference and autocomplete.

We have to export by writing:

export default Component;

so that it’ll be available to other components.

Then we can import it as usual in src/App.vue :

<template>  
  <div id="app">  
    <input v-model="message">  
    <Message :msg="message"/>  
    <button @click"showMessage">Show Message</button>  
  </div>  
</template><script lang="ts">  
import { Component, Vue } from 'vue-property-decorator';  
import Message from './components/Message';

@Component({  
  components: {  
    Message,  
  },  
})  
export default class App extends Vue {  
  message: string = ''; showMessage(): void{  
    alert(this.message)  
  }  
}  
</script><style>  
#app {  
  font-family: 'Segoe UI', Tahoma, Geneva, Verdana, sans-serif  
}  
</style>

Then we the input where we can type in something and it’ll show up with and without Hi added before it.

We keep the Show Message button acting the way before.

Augmenting Types for Use with Plugins

We can add our own properties to existing types by writing the following:

import Vue from 'vue'declare module 'vue/types/vue' {  
  interface Vue {  
    $myProperty: string  
  }  
}

The code above imports Vue and then add the $myProperty string property as a valid property.

This should make TypeScript compiler be aware of the code and it should compile successfully.

Conclusion

We can create a new project with TypeScript by using the Vue CLI. To do this, we choose Manually Select Features and then TypeScript. We can keep the default option for the rest or we can choose what we want if we know we want it.

To get type inference and autocomplete, we can define components with the Vue.extend method or define it as a class.

We can augment existing Vue types by using the declare module syntax and adding what we want inside it.

TypeScript can’t infer return types of functions in many cases. Therefore, we should annotate the return type so that we get autocomplete and type checking.

Categories
JavaScript Vue

Introduction to Vue.js Routing

Vue.js is an easy to use web app framework that we can use to develop interactive front end apps.

In order to create a single-page app with Vue.js, we have to map URLs to components so that when users go to a URL, it’ll show the corresponding component.

In this article, we’ll look at how to create some simple routes with the Vue Router.

Getting Started

We can use by Vue Router by adding a script tag with the URL for the Vue Router library.

We can make a simple app as follows:

src/index.js :

const Foo = { template: "<div>foo</div>" };  
const Bar = { template: "<div>bar</div>" };

const routes = [  
  { path: "/foo", component: Foo },  
  { path: "/bar", component: Bar }  
];

const router = new VueRouter({  
  routes  
});

new Vue({  
  el: "#app",  
  router  
});

index.html :

<!DOCTYPE html>  
<html>  
  <head>  
    <title>App</title>  
    <meta charset="UTF-8" />  
    <script src="[https://unpkg.com/vue/dist/vue.js](https://unpkg.com/vue/dist/vue.js)"></script>  
    <script src="[https://unpkg.com/vue-router/dist/vue-router.js](https://unpkg.com/vue-router/dist/vue-router.js)"></script>  
  </head>  
  <body>  
    <div id="app">  
      <div>  
        <router-link to="/foo">Foo</router-link>  
        <router-link to="/bar">Bar</router-link>  
      </div>  
      <router-view></router-view>  
    </div>  
    <script src="src/index.js"></script>  
  </body>  
</html>

In the code above, we defined 2 components Foo and Bar in src/index.js .

Then we mapped them to routes with:

const routes = [  
  { path: "/foo", component: Foo },  
  { path: "/bar", component: Bar }  
];

const router = new VueRouter({  
  routes  
});

Then we created a new Vue instance with:

new Vue({  
  el: "#app",  
  router  
});

In the template, we have router-links to map the routes to a tags with the URLs to correspond to the routes we define:

<router-link to="/foo">Foo</router-link>  
<router-link to="/bar">Bar</router-link>

Then we have router-view to show the components that are mapped to routes:

<router-view></router-view>

In the end, we should get:

Foo Link Bar Linkfoo

when we click on Foo Link .

and:

Foo Link Bar Linkbar

when we click on Bar Link .

Once we injected the router, we also get access to this.$router .

We can use it to navigate between routes. For example, we can write the following:

src/index.js :

const Foo = { template: "<div>foo</div>" };  
const Bar = { template: "<div>bar</div>" };

const routes = [  
  { path: "/foo", component: Foo },  
  { path: "/bar", component: Bar }  
];

const router = new VueRouter({  
  routes  
});

new Vue({  
  el: "#app",  
  router,  
  methods: {  
    goBack() {  
      window.history.length > 1 ? this.$router.go(-1) : this.$router.push("/");  
    }  
  }  
});

index.html :

<!DOCTYPE html>  
<html>  
  <head>  
    <title>App</title>  
    <meta charset="UTF-8" />  
    <script src="https://unpkg.com/vue/dist/vue.js"></script>  
    <script src="https://unpkg.com/vue-router/dist/vue-router.js"></script>  
  </head>  
  <body>  
    <div id="app">  
      <div>  
        <router-link to="/foo">Foo Link</router-link>  
        <router-link to="/bar">Bar Link</router-link>  
        <a href="#" @click="goBack">Go Back</a>  
      </div>  
      <router-view></router-view>  
    </div>  
    <script src="src/index.js"></script>  
  </body>  
</html>

Then when we click the Foo Link and Bar Link links a few times then click Go Back , we’ll see it’ll go back to the previous routes that we navigated to.

Route Parameters

We can get route parameters with the this.$route.params object.

For example, we can write an app that shows the URL parameter that’s passed in as follows:

src/index.js :

const User = {  
  computed: {  
    username() {  
      return this.$route.params.username;  
    }  
  },  
  template: `<div>{{username}}</div>`  
};

const routes = [{ path: "/user/:username", component: User }];
const router = new VueRouter({  
  routes  
});

new Vue({  
  el: "#app",  
  router  
});

index.html :

<!DOCTYPE html>  
<html>  
  <head>  
    <title>App</title>  
    <meta charset="UTF-8" />  
    <script src="https://unpkg.com/vue/dist/vue.js"></script>  
    <script src="https://unpkg.com/vue-router/dist/vue-router.js"></script>  
  </head>  
  <body>  
    <div id="app">  
      <div>  
        <router-link to="/user/foo">Foo</router-link>  
        <router-link to="/user/bar">Bar</router-link>  
      </div>  
      <router-view></router-view>  
    </div>  
    <script src="src/index.js"></script>  
  </body>  
</html>

The :username in “/user/:username” is the parameter, so we can get what passed in after /user/ by using this.$route.params.username .

We added a computed property username which returns this.$route.params.username so we can use:

`<div>{{username}}</div>`

to show the username URL parameter.

Conclusion

We can map URLs to components by using Vue Router.

Once we included it, we can define routes which map URLs to components. They can also take parameters, which can be retrieved with the this.$route object that’s made available by injecting the Vue router into our app.

To display links that link to Vue Router routes, we use router-link , and to display the components mapped to routes, we use router-view .