Categories
JavaScript Vue

Introduction to Vue.js Templates

Vue.js is an easy to use web app framework that we can use to develop interactive front end apps.

In this article, we’ll look at how to create and use templates to display data and handle events.

How it Works

Vue templates let us bind data to the DOM.

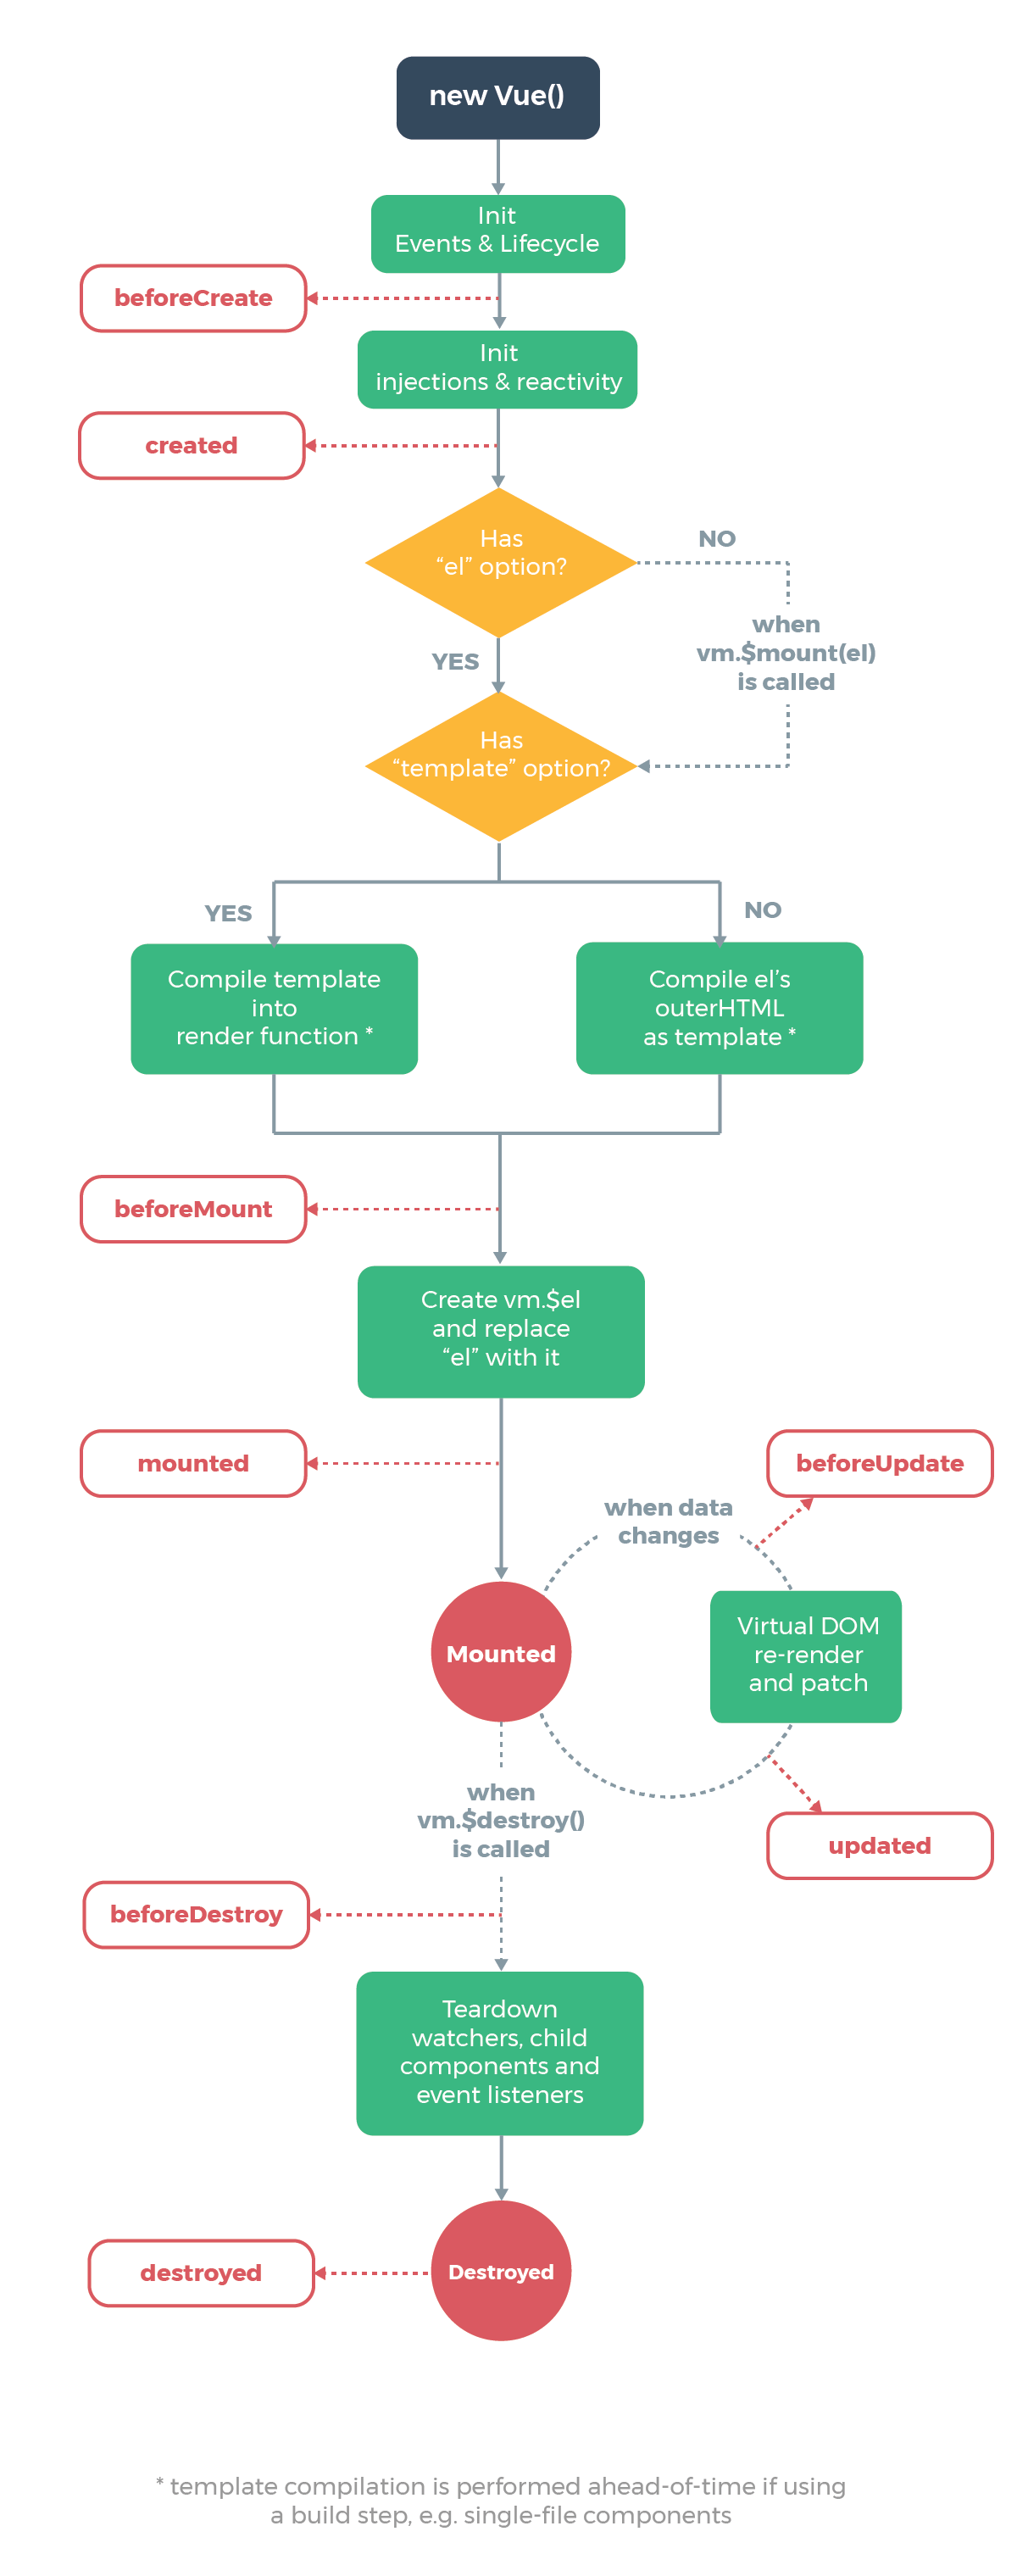
Vue compiles the template into Virtual DOM render functions. It can figure out the minimal number of components to re-render and minimize DOM manipulation when data changes.

Interpolations

The most basic form of data binding is text interpolation with double curly braces.

For example, we can write:

<p>{{foo}}</p>

To show the value of foo from a Vue instance or component.

The code above will be updated when foo updates.

We can keep it from updating after the first render by using the v-once directive as follows:

<p v-once>{{foo}}</p>

Raw HTML

We can also put raw HTML into an element with the v-html directive.

This lets us add HTML elements and formatting into an element.

For example, if we have the following in src/index.js :

new Vue({  
  el: "#app",  
  data: {  
    rawHtml: "<b>bar</b>"  
  }  
});

and the following in index.html :

<!DOCTYPE html>  
<html>  
  <head>  
    <title>Hello</title>  
    <meta charset="UTF-8" />  
    <script src="https://cdn.jsdelivr.net/npm/vue/dist/vue.js"></script>  
  </head> 
  <body>  
    <div id="app">  
      <p v-html="rawHtml"></p>  
    </div>  
    <script src="./src/index.js"></script>  
  </body>  
</html>

Then we get bar bolded displayed since the inner HTML of the p element is <b>bar</b> .

When we’re using this, we have to sanitize the HTML so that it won’t contain any code. This is to prevent cross-site scripting attacks since code will be run if there are any when we pass in a value to the v-html directive.

Attributes

We can set values of HTML element attributes dynamically with v-bind as follows.

In src/index.js , we write:

new Vue({  
  el: "#app",  
  data: {  
    isButtonDisabled: true  
  }  
});

Then when we write the following in index.html :

<!DOCTYPE html>  
<html>  
  <head>  
    <title>Hello</title>  
    <meta charset="UTF-8" />  
    <script src="https://cdn.jsdelivr.net/npm/vue/dist/vue.js"></script>  
  </head> 
  <body>  
    <div id="app">  
      <button v-bind:disabled="isButtonDisabled">Button</button>  
    </div>  
    <script src="./src/index.js"></script>  
  </body>  
</html>

Then since we set the isButtonDisabled property to true , the button will be disabled. This also apply to any other truthy value.

On the other hand, if we set it to false , we see that the button is disabled. This also applies to other falsy values like null , undefined , 0 and empty string.

JavaScript Expressions

We can add any other JavaScript expressions between the curly braces.

For example, we can write:

{{ number + 10 }}  
{{ yes ? 'YES' : 'NO' }}  
{{ str.split('').reverse('').join('') }}

Also, we can write expressions as the value of the v-bind directive as follows:

<div v-bind:id="`div-${id}`"></div>

Statements will not run inside the curly braces. For example:

{{ let a = 1 }}

will give us an error. We’ll get the error ‘avoid using JavaScript keyword as the property name: “let”’ in the console.

We also can’t run conditional statements within curly braces:

{{ if (id) { return id } }}

We’ll get the error ‘avoid using JavaScript keyword as the property name: “if”’.

Directives

Directives are special attributes with the v- prefix. We can pass in a single JavaScript expression as the value.

v-for can accept more than one expression separated by ; .

For example, we can conditionally display content with v-if :

<p v-if="show">Hello</p>

If show is truthy, then we’ll see Hello . Otherwise, it won’t be shown.

Arguments

Some directive takes an argument, which is denoted by a colon after the directive name.

For example, we can set the href value of an a element by writing:

<a v-bind:href="'https://medium.com'">Medium </a>

The v-on directive also takes an argument. For example, we can handle the click event of an element by writing:

<a v-on:click="onClick"> Click Me </a>

Then the onClick method in our Vue instance or component will be run when we click on the a element.

Dynamic Arguments

Since Vue.js 2.6.0, we can use a JavaScript expression as an argument for a directive.

For example, we can use it as follows. In src/index.js , we write:

new Vue({  
  el: "#app",  
  data: {  
    click: `${"cl"}${"ick"}`  
  },  
  methods: {  
    onClick() {  
      alert("clicked");  
    }  
  }  
});

Then in index.html , we can use a dynamic argument as follows:

<!DOCTYPE html>  
<html>  
  <head>  
    <title>Hello</title>  
    <meta charset="UTF-8" />  
    <script src="https://cdn.jsdelivr.net/npm/vue/dist/vue.js"></script>  
  </head> 
  <body>  
    <div id="app">  
      <a v-on:click="onClick"> Click Me </a>  
    </div>  
    <script src="./src/index.js"></script>  
  </body>  
</html>

This will reference the value of the click property of the data property in our Vue instance, and so we actually have v-on:click .

And therefore, when we click the a tag, we get an alert box with the clicked text displayed.

Dynamic argument expressions must evaluate to a string or null .

Spaces and quotes also aren’t valid inside the brackets.

Conclusion

We can create templates in various ways. The most basic is interpolation with the double curly brace syntax. We can put any JavaScript expression between the braces.

To set the values of attributes dynamically, we can use the v-bind directive. The value can be any JavaScript expression.

Some directives take an argument, which is the part of the directive name after the colon. Again the directive’s value can be any JavaScript expression in this case.

Dynamic arguments can be used since Vue 2.6.0. We can use it by putting an expression in square brackets.

Categories
JavaScript JavaScript Basics

Why Should We Be Careful When Using the const JavaScript Keyword?

Since ES6 was released, lots of new features have been added to the JavaScript. One of them is the const keyword for declaring constants. It lets is create constants that can’t be reassigned to something else.

However, we can still change it in other ways. In this article, we’ll look at the often-overlooked characteristics of const and how to deal with the pitfalls.

Characteristics of const

const is a block-scope keyword for declaring constants that’s available within the block that it’s defined in. It can’t be used before it’s declared. This means that there’s no hoisting.

They can’t be reassigned and can’t be declared.

For example, we can declare a constant as follows:

const foo = 1;

We can’t access it before declaration, so:

console.log(foo);  
const foo = 1;

will get us the error “Uncaught ReferenceError: Cannot access ‘foo’ before initialization”

The scope can be global or local. However, when it’s global, it’s not a property of the window object, so it can’t be accessed from other scripts within the app.

It’s a read-only reference to a value. This means that it’s important to note that the object may still be mutable. This is something that’s often overlooked when we declare constants. The properties of objects declared with const can still be changed, and for arrays, we can add and remove entries from them.

For example, we can write:

const foo = {  
  a: 1  
};  
foo.a = 1;  
console.log(foo.a);

Then we get 1 from the console.log .

We can also add properties to an existing object declared with const :

const foo = {  
  a: 1  
};  
foo.b = 1;  
console.log(foo.b);

Again, we get 1 from the console.log .

Another example would be array manipulation. We can still manipulate arrays declared with const , just like any other object:

const arr = [1, 2, 3];  
arr[1] = 5;  
console.log(arr)

The console.log will be us [1, 5, 3] .

We can also add entries to it by writing:

const arr = [1, 2, 3];  
arr[5] = 5;  
console.log(arr)

then we get:

[1, 2, 3, empty × 2, 5]

As we can see, objects declared with const are still mutable. Therefore, if we want to prevent accidentally changing objects declared with const , we have to make them immutable.

Making Objects Immutable

We can make objects immutable with the Object.freeze method. It takes one argument, which is the object that we want to freeze. Freezing means that rhe properties and values can’t be changed.

Property descriptors of each property also can’t be changed. This means the enumerability, configurability, and writability also can’t be changed, in addition to the value.

A property being configurable means that the properties descriptors above can be changed and the property can be deleted.

Enumerability means that we can loop through the property with the for...in loop.

Writability means that the property value can be assigned.

Object.freeze prevents all that from happening by setting everything except enumerable to false .

For example, we can use it as follows:

const obj = {  
  prop: 1  
};Object.freeze(obj);  
obj.prop = 3;

In strict mode, the code above will get us an error. Otherwise, obj will stay unchanged after the last line.

Note that Object.freeze only freeze the properties at the top level of an object, so if we run:

/* 'use strict'; */  
const obj = {  
  prop: 1,  
  foo: {  
    a: 2  
  }  
};  
Object.freeze(obj);  
obj.foo.a = 3;

We’ll get:

{  
  "prop": 1,  
  "foo": {  
    "a": 3  
  }  
}

As we can see, obj.foo.a still changed after we called Object.freeze on it.

Therefore, to make the whole object immutable, we have to recursively call Object.freeze on every level.

We can define a simple recursive function to do this:

const deepFreeze = (obj) => {  
  for (let prop of Object.keys(obj)) {  
    if (typeof obj[prop] === 'object') {  
      Object.freeze(obj[prop]);  
      deepFreeze(obj[prop]);  
    }  
  }  
}

Then when we call deepFreeze instead of Object.freeze as follows:

const obj = {  
  prop: 1,  
  foo: {  
    a: 2  
  }  
};  
deepFreeze(obj);  
obj.foo.a = 3;

We get that that obj stays unchanged:

{  
  "prop": 1,  
  "foo": {  
    "a": 2  
  }  
}

The deepFreeze function just loops through all the own properties of obj and then call Object.freeze on it, if the value of the property is an object, then it calls deepFreeze on deeper levels of the object.

Primitive values are always immutable including strings, so we don’t have to worry about them.

Another good thing about freezing an object with Object.freeze is that there’s no way to unfreeze it since the configurability of the properties is set to false , so no more changes can be made to the structure of the object.

To make an object mutable again, we’ve to make a copy of it and assign it to another object.

Now that we know that const doesn’t actually make everything constant, we’ve to be careful when we use const . We can’t assign new values to an existing constant. However, we can still change the property values of an existing object assigned to a constant.

Constants declared with const aren’t actually constant. To make it actually constant, or immutable, we’ve to call Object.freeze on each level of the object declared with const to make sure it’s actually constant.

This only applies to object-valued properties. Primitives are immutable by definition so we don’t have to worry about them.

Categories
JavaScript Vue

Lifecycle Hooks of the Vue Instance

Vue.js is an easy to use web app framework that we can use to develop interactive front end apps.

In this article, we’ll look at the lifecycle hooks of a Vue instance.

Vue Instance Lifecycle Hooks

Each Vue instance goes through a lifecycle. The lifecycle events can be handled with functions, which are the lifecycle hooks.

For example, when a Vue instance is created, the created hook is called.

We can handle the created event emitted by Vue.js as follows:

new Vue({  
  data: {  
    foo: "bar"  
  },  
  created() {  
    console.log(`foo is ${this.foo}\`);  
  }  
});

Then we should see foo is bar from the console.log . Once the Vue instance is created and the initial data is set, the created hook is called.

This is why we see such output from the console.log .

Note that we can’t use arrow functions for lifecycle hooks since we reference the properties from this , which is the Vue instance.

There’re also other lifecycle hooks like mounted , updated , destroyed .

Lifecycle Diagram

The full lifecycle diagram is below. It outlines the whole workflow for creating a new Vue instance.

The red rounded rectangles have the hooks that are called.

Courtesy of vuejs.org

Creation Hooks

Creation hooks are called when the Vue instance begins its initialization process. It lets us do things before the Vue instance is added to the DOM.

This hook is also run during server-side rendering

We don’t have access to this.$el (the target mounting element) or the DOM within this hook since no DOM manipulation is done at this point.

beforeCreate

The beforeCreate hook runs during initialization. data has been made reactive and events aren’t set up yet.

For example, if we have:

new Vue({  
  data: {  
    foo: "bar"  
  },  
  beforeCreate() {  
    console.log("beforeCreated called");  
  },  
  created() {  
    console.log(`foo is ${this.foo}`);  
  }  
});

Then we see:

beforeCreated called  
foo is bar

which confirms that beforeCreate is called before created .

created

data and events are available in the created hook since the Vue instance has been initialized.

For example, if we write:

new Vue({  
  data: {  
    foo: "bar"  
  },  
  created() {  
    this.foo = "baz";  
    console.log(`foo is ${this.foo}`);  
  }  
});

Then we get:

foo is baz

since we changed the value of this.foo in the created hook before logging its value.

Mounting Hooks

The mounting hooks are run when DOM manipulation is being done, including mounting the Vue instance to the specified element.

We can use it to access or modify the DOM of our component.

beforeMount

The beforeMount hook runs before the initial render happens and after the template or render functions are compiled.

It doesn’t get called during server-side rendering.

For instance, if we write:

new Vue({  
  el: "#app",  
  data: {  
    foo: "bar"  
  },  
  created() {  
    console.log(`created called`);  
  },  
  beforeMount() {  
    console.log(`beforeMount called`);  
  }  
});

Then we get:

created called  
beforeMount called

mounted

When the mounted hook is called, we have access to the component, template, and the DOM.

It’s used frequently for the initialization of our own data like fetching data over the network and integrate non-Vue libraries.

For example, if we have the following in src/index.js:

new Vue({  
  el: "#app",  
  data: {  
    foo: "bar"  
  },  
  beforeMount() {  
    console.log(this.$el.textContent);  
  }  
});

and the following in index.html :

<!DOCTYPE html>  
<html>  
  <head>  
    <title>Hello</title>  
    <meta charset="UTF-8" />  
    <script src="https://cdn.jsdelivr.net/npm/vue/dist/vue.js"></script>  
  </head> 
  <body>  
    <div id="app">foo</div>  
    <script src="./src/index.js"></script>  
  </body>  
</html>

Then we get foo logged since we have foo in the div with ID app .

Updating Hooks

Updating hooks are called when a reactive property used by our component changes or we some triggers re-rendering manually.

They’re useful for checking when a component is re-rendering.

However, we should use computed properties or watchers to track reactive property changes.

beforeUpdate

beforeUpdate runs after data changes in our component, right before the DOM is updated and re-rendered.

It lets us get the new state before the DOM is re-rendered.

For example, if we have the following in src/index.html :

new Vue({  
  el: "#app",  
  data: {  
    foo: "bar"  
  },  
  beforeUpdate() {  
    console.log(this.foo);  
  },  
  methods: {  
    toggle() {  
      this.foo = this.foo === "bar" ? "baz" : "bar";  
    }  
  }  
});

and the following in index.html :

<!DOCTYPE html>  
<html>  
  <head>  
    <title>Hello</title>  
    <meta charset="UTF-8" />  
    <script src="https://cdn.jsdelivr.net/npm/vue/dist/vue.js"></script>  
  </head> <body>  
    <div id="app">  
      <p>{{foo}}</p>  
      <button @click="toggle">Toggle</button>  
    </div>  
    <script src="./src/index.js"></script>  
  </body>  
</html>

Then when we click the Toggle button, we can see the value changes logged in the console.log call of the beforeUpdate method.

updated

The updated hook runs after data changes on our Vue instance and the DOM re-renders.

For example, if we have the following in src/index.js:

new Vue({  
  el: "#app",  
  data: {  
    foo: "bar"  
  },  
  updated() {  
    console.log(this.$refs.foo.textContent);  
  },  
  methods: {  
    toggle() {  
      this.foo = this.foo === "bar" ? "baz" : "bar";  
    }  
  }  
});

and the following in index.html :

<!DOCTYPE html>  
<html>  
  <head>  
    <title>Hello</title>  
    <meta charset="UTF-8" />  
    <script src="https://cdn.jsdelivr.net/npm/vue/dist/vue.js"></script>  
  </head> <body>  
    <div id="app">  
      <p ref="foo">{{foo}}</p>  
      <button @click="toggle">Toggle</button>  
    </div>  
    <script src="./src/index.js"></script>  
  </body>  
</html>

Then we can get the text content of the p element with ref set to foo by logging the value as follows:

console.log(this.$refs.foo.textContent);

in the updated hook and we can see the new value for it as we click the Toggle button.

Destruction Hooks

These hooks are run when the Vue instance is destroyed. Therefore, we can run clean up code in there.

These hooks aren’t run during server-side rendering.

beforeDestroy

beforeDestroy is run before teardown. Our Vue instance is still present and functional.

Therefore, we can run our clean up code in here.

For example, we can use it as follows:

new Vue({  
  el: "#app",  
  data: {  
    foo: "bar"  
  },  
  beforeDestroy() {  
    this.foo = null;  
  }  
});

destroyed

This is called after the Vue instance is destroyed. All the directives are unbound, event listeners are removed and child Vue instances are destroyed.

For example, we can use it as follows:

new Vue({  
  el: "#app",  
  data: {  
    foo: "bar"  
  },  
  destroyed() {  
    this.foo = null;  
  }  
});

Conclusion

The lifecycle hooks are useful for doing things during the lifecycle of the Vue instance.

The creation hooks can be used to run any initialization code.

The mounting hooks are run when the Vue instance is being mounted into the DOM.

The update hooks whenever data of the Vue instance updates, and the destroy hooks are run when the Vue instance is being destroyed.

Categories
JavaScript Vue

Vue.js Basics — The Vue Instance

Vue.js is an easy to use web app framework that we can use to develop interactive front end apps.

In this article, we’ll look more closely at the Vue instance, including how to define it and some properties of it.

Characteristics of the Vue Instance

Each Vue.js app begins by defining a new Vue instance. The Vue constructor takes an options object that takes various properties.

We often use vm to refer to a Vue instance, where vm stands for ViewModel.

A Vue app roughly follows the Model-View-ViewModel pattern, where the ViewModel has the business logic of the app, View has the markup that users see, and Model has the data.

For example, we can define a Vue instance as follows:

const vm = new Vue({ });

Each Vue app consists of a root Vue instance and it’s created with new Vue . We can organize it in a tree for easier maintenance.

Data and Methods

The options object that pass into the Vue constructor can have data and methods.

For example, if we define a Vue instance as follows:

const vm = new Vue({  
  el: "#app",  
  data: { foo: "bar" }  
});

Then when we add:

console.log(vm.foo);

below our vm definition, we get 'bar' since data.foo has the value 'bar' .

In other words, if we have:

const data = { foo: "bar" };  
const vm = new Vue({  
  el: "#app",  
  data  
});  
console.log(vm.foo === data.foo);

Then the console.log will log true .

When the data changes, the app will re-render with the new data.

If we create a new property in vm and set it as follows:

let data = { foo: "bar" };  
const vm = new Vue({  
  el: "#app",  
  data  
});  
vm.a = 1;

The app won’t re-render. On the other hand, if we write:

let data = { foo: "bar", a: 1 };  
const vm = new Vue({  
  el: "#app",  
  data  
});

Then the app will re-render. This means that we have to put our data that we want to render in the data field.

If we freeze the object that we pass to data with Object.freeze() , then the Vue app won’t re-render since properties can’t be changed, so new changes can’t propagate since they aren’t set in the object.

So if we have:

let data = { foo: "bar", a: 1 };  
Object.freeze(data);  
const vm = new Vue({  
  el: "#app",  
  data  
});

No changes can be made after the initial render since we froze data with Object.freeze .

The Vue instance also exposes a number of instance properties and methods.

They’re prefixed with the $ so that we know they’re part of the Vue instance.

$el

We have the $el property to get the DOM element that the Vue instance resides in.

For example, if we have:

let data = { foo: "bar" };  
const vm = new Vue({  
  el: "#app",  
  data  
});

console.log(vm.$el === document.getElementById("app"));

Then the console.log will log true since our Vue instance resides in an element with ID app .

$data

The $data property will get us the value of the data property that we set in the options object that we passed into the Vue constructor.

So if we have:

let data = { foo: "bar" };  
const vm = new Vue({  
  el: "#app",  
  data  
});

console.log(vm.$data === data);

Then we get true from the console.log since data references the same object as vm.$data since we set it as the value of the data property of the options object that we passed into the Vue constructor.

$watch

$watch is an instance method that lets us watch for changes in the data object that we set as the value of the options object.

For example, if we have:

let data = { foo: "bar" };  
const vm = new Vue({  
  el: "#app",  
  data  
});

vm.$watch("foo", (newValue, oldValue) => {  
  console.log(newValue, oldValue);  
});

in src/index.js and:

<!DOCTYPE html>  
<html>  
  <head>  
    <title>Hello</title>  
    <meta charset="UTF-8" />  
    <script src="https://cdn.jsdelivr.net/npm/vue/dist/vue.js"></script>  
  </head> <body>  
    <div id="app">  
      <input type="text" v-model="foo" />  
    </div>  
    <script src="./src/index.js"></script>  
  </body>  
</html>

in index.html . Then when we type in something to the input box, we should get some console.log output from:

vm.$watch("foo", (newValue, oldValue) => {  
  console.log(newValue, oldValue);  
});

This is because changes are constantly being watched in the data.foo property. v-model automatically updates the value for foo as we type into the box.

So as we’re typing, the changes to foo are being watched and it’s logged by the handler function that we passed into the $watch method.

Conclusion

The Vue instance is created by passing in an options object with the data , el , and methods properties to the Vue constructor. It returns an instance of our Vue app.

The instance has the $el property to get the DOM element that our app resides in.

Also, there’s the $data property to get the value of the data property to get the data that we set when we pass it in as the value of the data property of the options object.

Finally, we have the $watch method to watch for changes in our data.

Categories
JavaScript Nodejs

How To Build a Reverse Proxy With Express

If you use microservices architecture for your distributed system, there is a need for an API gateway. One good way to build an API gateway is to use a reverse proxy. Node.js is good for a reverse proxy because it’s fast and has lots of libraries to make a reverse proxy.

Express is the most popular framework for building web apps. It’s also very good for building a reverse proxy because there are add-ons to Express that can do the routing for the reverse proxy.

The design will be very simple. It will only redirect traffic to our different back-end apps according to the URL of the request. Also, it has to be able to pass header data, files, and cookies into our services in addition to the request payload.

To do all this, we first scaffold our app by running the Express application generator by following the instructions at https://expressjs.com/en/starter/generator.html

We have to run npx express-generator to generate the code that we need.

I suggest using nodemon to run our app in a development environment so that it restarts whenever our code changes.

Next, we have to install some packages to do the reverse proxy function and to enable CORS so that front end apps can use the reverse proxy. To do this, run npm i express-http-proxy glob node-env-file cookie-parser babel-register body-parser .

express-http-proxy is the HTTP reverse proxy library. cors is an add-on for Express that enables CORS. cookie-parser is an add-on allows Express to parse cookies. babel-register allows us to use the latest JavaScript features. node-env-file allows us to use .env file for storing environment variables. body-parser will be used to check for multipart requests. Multipart requests are requests that have files. The requests with files will not go through body-parser before redirecting.

Now we are ready to write code. We make a new file called helper.js in the helpers folder that we create.

In there, we add:

module.exports = {  
    isMultipartRequest: (req) => {  
        let contentTypeHeader = req.headers['content-type'];  
        return contentTypeHeader && contentTypeHeader.indexOf('multipart') > -1;  
    }  
}

This function checks for multipart requests, which are requests that are sent in as form data. It can include text or files.

In app.js , we write:

require("babel-register");  
let express = require('express');  
let cors = require('cors')  
let config = require('./config/config');  
let env = require('node-env-file');  
let helpers = require('./app/helpers/helpers');  
let bodyParser = require('body-parser');  
env(__dirname + '/.env');
let app = express();

app.use(cors({  
  credentials: true,  
  origin: true  
}));

const bodyParserJsonMiddleware = function () {  
  return function (req, res, next) {  
    if (helpers.isMultipartRequest(req)) {  
      return next();  
    }  
    return bodyParser.json()(req, res, next);  
  };  
};

app.use(bodyParserJsonMiddleware());

app.all('*', (req, res, next) => {  
  let origin = req.get('origin');  
  res.header('Access-Control-Allow-Origin', origin);  
  res.header("Access-Control-Allow-Headers", "X-Requested-With");  
  res.header('Access-Control-Allow-Headers', 'Content-Type');  
  next();  
});

module.exports = require('./config/express')(app, config);

app.listen(config.port, () => {  
  console.log('Express server listening on port ' + config.port);  
});

The code works by passing on server-side cookies and allows multipart requests to not pass through body-parser since it is not JSON.

Also, we allow CORS in the block below:

app.all('*', (req, res, next) => {  
  let origin = req.get('origin');  
  res.header('Access-Control-Allow-Origin', origin);  
  res.header("Access-Control-Allow-Headers", "X-Requested-With");  
  res.header('Access-Control-Allow-Headers', 'Content-Type');  
  next();  
});

It allows requests from all origins to be accepted. By default, only requests from the same host as the back end are accepted since it is insecure to allow requests from other hosts. However, if we allow mobile and standalone front-end web apps to make requests through our reverse proxy, we have to allow all origins. It gets the origin from the header and allows the request from that origin to proceed.

Then we add the code for proxying requests in controllers/home.js:

const express = require('express');  
let proxy = require("express-http-proxy");  
let helpers = require('../helpers/helpers');
let loginAppRoutes =[  
  '/login*',  
  '/loginms',  
  '/register',  
  '/resetPassword',  
  '/getActivationKey*',  
  '/activateAccount',  
  '/logout',  
  '/reports',  
  '/'  
]

let uploadRoutes = [  
  '/uploadlogo*',  
]

module.exports = (app) => {  
  const proxyMiddleware = () => {  
    return (req, res, next) => {  
      let reqAsBuffer = false;  
      let reqBodyEncoding = true;  
      let contentTypeHeader = req.headers['content-type'];  
      if (helpers.isMultipartRequest(req)) {  
        reqAsBuffer = true;  
        reqBodyEncoding = null;  
      }  
      return proxy(process.env.UPLOAD_URL, {  
        reqAsBuffer: reqAsBuffer,  
        reqBodyEncoding: reqBodyEncoding,  
        parseReqBody: false,  
        proxyReqOptDecorator: (proxyReq) => {  
          return proxyReq;  
        }, 

        proxyReqPathResolver: (req) => {  
          return `${process.env.UPLOAD_APP_URL}/${req.baseUrl}${req.url.slice(1)}`;  
        }, 

        userResDecorator: (rsp, data, req, res) => {  
          res.set('Access-Control-Allow-Origin', req.headers.origin);  
          return data.toString('utf-8');  
        }  
      })(req, res, next);  
    };  
  } 

  uploadRoutes.forEach(r => {  
    app.use(r, proxyMiddleware());  
  }) 

  loginAppRoutes.forEach(r => {  
    app.use(r, proxy(process.env.LOGIN_URL, {  
      proxyReqOptDecorator: (proxyReq) => {  
        return proxyReq;  
      },

      proxyReqPathResolver: (req) => {  
        return `${process.env.LOGIN_URL}/${req.baseUrl}${req.url.slice(1)}`;  
      }, 

      userResDecorator: (rsp, data, req, res) => {  
        res.set('Access-Control-Allow-Origin', req.headers.origin);  
        return data.toString('utf-8');  
      }  
    }));  
  })  
};

We check for multipart form requests with:

if (helpers.isMultipartRequest(req)) {  
  reqAsBuffer = true;  
  reqBodyEncoding = null;  
}

The will pass requests with files straight through to our internal APIs.

The following:

proxyReqPathResolver: (req) => {  
  return `${process.env.LOGIN_URL}/${req.baseUrl}${req.url.slice(1)}`;  
},

is where the actual redirect URL from the proxy to internal API is set. Note that parseReqBody is false , so that multipart form requests are not parsed as JSON.

The process.env variables are set in the .env file.

In the .env file, we have:

LOGIN_URL='http://urlForYourLoginApp'  
UPLOAD_URL='http://anotherUrlForYourUploadApp'

With reverse proxy add-on, Express is one of the best choices for building a reverse proxy in Node.