Categories
JavaScript Best Practices

JavaScript Best Practices — Variables

Like any other programming language, JavaScript has its own list of best practices to make programs easier to read and maintain. There are lots of tricky parts to JavaScript, so there are many things to avoid.

We can follow some best practices to make our JavaScript code easy to read.

In this article, we look at how to declare variables in an easy-to-read way. Also, we look at ways to avoid declaring global variables and hiding private variables from the outside.


Avoid Global Variables

We should avoid the use of global variables as much as possible for various reasons.

One is that they’re easy to overwrite in different places since they’re available everywhere. They can also overwrite things in the window object since global variables are properties of the window object.

These two are real issues that make our code hard to follow. Therefore, we should define local variables as much as possible. We can define local variables by using the var, let, or const keywords.

Variables defined with var are available at the level where they are defined and below before they are defined. For example, if we write:

Then we get undefined for the first console.log and one for the second log.

It’s the same as writing:

Variables declared with let are available only after they’re defined, so if we gave:

We get the error:

Uncaught ReferenceError: Cannot access ‘x’ before initialization

With the const keyword, we define constants that can only be assigned once and never again. It’s also available only after it’s declared, unlike var.

For example, we can write:

const log = () => {  
  console.log(x);  
}

const x = 1;
log();


Calling `log` before `const x = 1` will also get us:

Uncaught ReferenceError: Cannot access ‘x’ before initialization


If we want variables that are available in different parts of a program, we should use JavaScript modules and then build the modules into one or several large files when we release our code. This is available since ES6.

We can `export` our variables and `import` it in other modules. There’s also `export default` to export the whole module. This way, we only export things that should be available outside the module and keep everything else private.

We can also use closures to keep variables inside a function so they can’t be accessed outside. An example of a simple closure would be:

const multiply = () => {
const x = 3;
return () => x * 2;
}


We keep `x` inside the `multiply` function so that it can’t be accessed outside and return a function that does something with it.

Then, we call it by writing:

console.log(multiply()());


* * *

### Always Declare Local Variables

As a corollary, we should always declare local variables. We should always declare local variables and constants with `var`, `let`, or `const`.

Otherwise, it’ll be declared as a global variable as a property of `window` which we definitely don’t want.

For example, we should never write:

x = 1;


Instead, we should write:

let x = 1;


Fortunately, JavaScript strict mode doesn’t allow undeclared variables, so we can’t accidentally create global variables.

Also, JavaScript modules have strict mode enabled by default so we also can’t define global variables accidentally in there.

![](https://cdn-images-1.medium.com/max/800/0*XDF6_FrkR3Js4-Cw)Photo by [Francesco De Tommaso](https://unsplash.com/@detpho?utm_source=medium&utm_medium=referral) on [Unsplash](https://unsplash.com?utm_source=medium&utm_medium=referral)

* * *

### Putting Variables and Constant Declarations on Top

Putting variable and constant declarations on top makes our code cleaner as everything is on top. It also stops us from accidentally referencing things declared with `let` or `const` before they are defined.

If strict mode is off, we also avoid defining global variables. And we also avoid accidental re-declarations of variables. Re-declarations should be caught by many text editors, but it’s still a possibility.

We can make multiple variable declarations in one line by separating variable names with commas. For example, we can write:

let x, y;
x = 1;
y = 1;
console.log(x, y);


Then we get:

1 1


From the `console.log`.

We can do the same for loops:

let i;

for (i = 0; i < 10; i++) {  
  console.log(i);  
}
```

* * *

### Initialize Variables When Declaring Them

It’s a good idea to initialize our variables or constants with values when declaring them. It prevents undefined value errors, and we can both declare the variable or constant and set an initial value to it all in one line.

Otherwise, we have one line for declaring the variable or constant and another line for setting its value.

For example, we can write:

```
let x = 1,  
  y = 1;
```

To declare both `x` and `y`.

This is much shorter than writing:

```
let x;  
let y;  
x = 1;  
y = 1;
```

We can declare and initialize multiple variables by separating each declaration and assignment with a comma.

* * *

### Conclusion

Here are some basic best practices for declaring and initializing variables.

We looked at how to declare variables cleanly and how to avoid declaring global variables. There is a lot more to writing clean JavaScript programs so stay tuned for more.
Categories
Angular

How to Make Android Text Based Games with Ionic

Ionic is a hybrid application framework that converts a web app into an Android or iOS app. It is handy for making mobile applications quickly with decent performance. It can easily be extended to create simple text games for entertainment.

If you don’t know how to create apps with Angular and Ionic, see:

In this story, we will build a game where you guess the number until you guessed it right, akin to the Bulls and Cows game or Mastermind game. The game provides you with a number guessing game, and you can change the settings for the number of digits of the number that you’re guessing. It will also be able to save the fastest time.

Building the Game

As usual, we start with the boilerplate code.

To start building, we can use Ionic’s CLI. If you used Angular CLI, then it should be familiar to you. To install the Ionic CLI, run npm install -g ionic.

Then to make generate skeleton code for our app, run ionic start guess-the-number-game sidemenu . guess-the-number-game is our app’s name and sidemenu specifies that we want a side menu in our app.

We need to install some libraries. We can do that by running npm i moment random-js .

Now we can build the game. We make 2 pages by running ionic g component HomePage , andionic g SettingsPage . After that we get 2 empty pages.

In home-page.component.ts , we replace the default code with the following:

import { Component, OnInit } from '@angular/core';
import { Random, browserCrypto } from "random-js";
import * as moment from 'moment';
import { NgForm } from '@angular/forms';
declare const require: any;
const words = require('an-array-of-english-words');

@Component({
  selector: 'app-home-page',
  templateUrl: './home-page.component.html',
  styleUrls: ['./home-page.component.scss'],
})
export class HomePageComponent implements OnInit {
  question: any = <any>{};
  answer: string;
  timer;
  started: boolean;
  rightNumber: number;
  inputtedAnswers: string[] = [];
  elapsedTime;
  message: string;
  numDigits: number;

constructor() { }

  ngOnInit() {
    if (!localStorage.getItem('numDigits')) {
      localStorage.setItem('numDigits', '4');
    }
  }

  ngOnDestroy() {
    this.stop();
  }

  start() {
    this.message = '';
    this.started = true;
    const random = new Random(browserCrypto);
    this.numDigits = +localStorage.getItem('numDigits');
    this.rightNumber = random.integer(Math.pow(10, (this.numDigits - 1)), Math.pow(10, this.numDigits) - 1);
    console.log(this.rightNumber);
    let numSeconds = 0;
    this.timer = setInterval(() => {
      numSeconds++;
      this.elapsedTime = moment.utc(numSeconds * 1000).format('H:mm:ss');
    }, 1000)
  }

  recordFastestTime() {
    const currentFastTime = moment(this.getFastestTime(), 'H:mm:ss');
    const newFastestTime = moment(this.elapsedTime, 'H:mm:ss')
    if (currentFastTime > newFastestTime) {
      localStorage.setItem(
        'fastestTime',
        this.elapsedTime
      );
    }
  }

  stop() {
    this.started = false;
    this.inputtedAnswers = [];
    clearInterval(this.timer);
  }

  checkAnswer(answerForm: NgForm) {
    if (answerForm.invalid) {
      return;
    }
    this.inputtedAnswers.push(this.answer);
    if (+this.answer == this.rightNumber) {
      this.stop();
      this.recordFastestTime();
      this.message = `You win! The correct number is ${this.rightNumber}`;
    }
    this.answer = '';
  }

  getFastestTime() {
    return localStorage.getItem('fastestTime') || '1000000:00:00';
  }

  getNumBullsandCows(answer: number) {
    const rightAnsStr = this.rightNumber.toString().split('');
    const answerStr = answer.toString().split('');
    const numBulls = rightAnsStr.filter((r, i) => rightAnsStr[i] == answer[i]).length;
    const numCows = answerStr.length - numBulls;
    return `${numBulls} bulls, ${numCows} cows`;
  }
}

The code above will generate the number you guess according to the numDigits setting stored in local storage. By default, the number will have 4 digits. After the number is generated, it will start a timer to start calculating the time. Both are in the start function.

inputtedAnswers store the answers you entered. The checkAnswer function checks if you entered anything, then calls the stop function which calls clearInterval on the timer object returned by the setInterval function if your answer is right. The getNumBullsandCows function checks which digits are right and which one are wrong. numBulls is the number of correct digits and numCows the number of wrong digits in your guess. When the guess is right, the fastest time will be computer by comparing with the last fastest time, which is store in local storage by calling the recordFastestTime function and if the current elapsed time is shorter than the saved one, will save the shorter one into the local storage.

Then in home-page.component.html , replace what’s there with the following:

<form #answerForm='ngForm' (ngSubmit)='checkAnswer(answerForm)'>
  <ion-list>
    <ion-item no-padding *ngIf='started' id='instruction'>
      How to Play: Guess the correct number. The closeness to the correct number will be indicated by the number of
      bulls and cows. The number of bulls means the number of digits with the right value and position in your guess.
      The number of cows is the
      number of digits with the wrong value and position in your guess.
    </ion-item>
    <ion-item no-padding *ngIf='started && getFastestTime()'>
      <ion-label class="ion-float-left">
        <h2>Your Fastest Time {{getFastestTime()}}</h2>
      </ion-label>
    </ion-item>
    <ion-item no-padding *ngIf='started'>
      <ion-label class="ion-float-left">
        <h2>Time {{elapsedTime}}</h2>
      </ion-label>
    </ion-item>
    <ion-item no-padding *ngIf='started'>
      <ion-label>Answer</ion-label>
      <ion-input [(ngModel)]='answer' #ans='ngModel' name='ans' required type="text" pattern="d*"
        [minlength]='numDigits' [maxlength]='numDigits'></ion-input>
    </ion-item>
  </ion-list>
  <ion-button type='submit' *ngIf='started'>Answer</ion-button>
  <ion-button (click)='start();' *ngIf='!started'>Start Game</ion-button>
  <ion-button (click)='stop(); started = false' *ngIf='started'>Stop Game</ion-button>
</form>
<ion-content [scrollEvents]="false">
  <ion-list *ngIf='started'>
    <ion-item no-padding *ngFor='let a of inputtedAnswers; let i = index'>
      <ion-label>
        {{i+1}}
      </ion-label>
      <ion-label>
        {{a}}
      </ion-label>
      <ion-label>
        {{getNumBullsandCows(a)}}
      </ion-label>
    </ion-item>
  </ion-list>
  <ion-list *ngIf='message'>
    <ion-item no-padding>
      {{message}}
    </ion-item>
  </ion-list>
</ion-content>

This creates a form for you to enter your number guess and list your guesses, along with the number of right and wrong digits for each guess.

Next we build the settings page. To do this, add the following to settings-page.component.ts :

import { Component, OnInit } from '@angular/core';
import { NgForm } from '@angular/forms';
import { ToastController } from '@ionic/angular';

@Component({
  selector: 'app-settings-page',
  templateUrl: './settings-page.component.html',
  styleUrls: ['./settings-page.component.scss'],
})
export class SettingsPageComponent implements OnInit {
  settings: any = <any>{};
  fastestTime: string;

  constructor(
    public toastController: ToastController
  ) { }

  ngOnInit() {
    if (!localStorage.getItem('numDigits')) {
      localStorage.setItem('numDigits', '4');
    }
    this.settings.numDigits = +localStorage.getItem('numDigits');
    this.fastestTime = localStorage.getItem('fastestTime');
  }

  save(settingsForm: NgForm) {
    if (settingsForm.invalid) {
      return;
    }
    localStorage.setItem('numDigits', this.settings.numDigits || 4);
    this.presentToast();
  }

  clear() {
    localStorage.removeItem('fastestTime');
    this.fastestTime = localStorage.getItem('fastestTime');
  }

  async presentToast() {
    const toast = await this.toastController.create({
      message: 'Your settings have been saved.',
      duration: 2000
    });
    toast.present();
  }
}

In settings-page.component.html , we replace what’s there with:

<ion-content [scrollEvents]="true">
  <form #settingsForm='ngForm' (ngSubmit)='save(settingsForm)'>
    <ion-list>
      <ion-item no-padding>
        <ion-label>Number of Digits</ion-label>
        <ion-range min="4" max="8" [(ngModel)]='settings.numDigits' #numDigits='ngModel' name='numDigits'>
          <ion-label slot="start">4</ion-label>
          <ion-label slot="end">8</ion-label>
        </ion-range>
      </ion-item>
      <ion-item no-padding>
        <ion-label>Fastest Time</ion-label>
        <ion-label>{{fastestTime}}</ion-label>
        <ion-button (click)='clear()'>Clear Score</ion-button>
      </ion-item>
    </ion-list>
    <ion-button type='submit'>Save</ion-button>
  </form>
</ion-content>

You can clear local storage from the settings form and set the number of digits of the number you guess in this page. The numDigits control is a slider.

In app-routing.module.ts , add:

import { NgModule } from '@angular/core';
import { PreloadAllModules, RouterModule, Routes } from '@angular/router';
import { HomePageComponent } from './home-page/home-page.component';
import { SettingsPageComponent } from './settings-page/settings-page.component';

const routes: Routes = [
  {
    path: '',
    redirectTo: 'home',
    pathMatch: 'full'
  },
  {
    path: 'home',
    component: HomePageComponent
  },
  {
    path: 'settings',
    component: SettingsPageComponent
  }
];

@NgModule({
  imports: [
    RouterModule.forRoot(routes, { preloadingStrategy: PreloadAllModules })
  ],
  exports: [RouterModule]
})
export class AppRoutingModule {}

In app.component.ts , add:

import { Component } from '@angular/core';

import { Platform } from '@ionic/angular';
import { SplashScreen } from '@ionic-native/splash-screen/ngx';
import { StatusBar } from '@ionic-native/status-bar/ngx';

@Component({
  selector: 'app-root',
  templateUrl: 'app.component.html'
})
export class AppComponent {
  public appPages = [
    {
      title: 'Home',
      url: '/home',
      icon: 'home'
    },
    {
      title: 'Settings',
      url: '/settings',
      icon: 'settings'
    }
  ];

constructor(
    private platform: Platform,
    private splashScreen: SplashScreen,
    private statusBar: StatusBar
  ) {
    this.initializeApp();
  }

initializeApp() {
    this.platform.ready().then(() => {
      this.statusBar.styleDefault();
      this.splashScreen.hide();
    });
  }
}

The last 2 files will add the menu entries for the side menu and allow us to visit the pages that we created.

In app.module.ts , write:

import { NgModule } from '@angular/core';
import { BrowserModule } from '@angular/platform-browser';
import { RouteReuseStrategy } from '@angular/router';
import { IonicModule, IonicRouteStrategy } from '@ionic/angular")';
import { SplashScreen } from '@ionic-native/splash-screen/ngx';
import { StatusBar } from '@ionic-native/status-bar/ngx';

import { AppComponent } from './app.component';
import { AppRoutingModule } from './app-routing.module';
import { HomePageComponent } from './home-page/home-page.component';
import { AdMobFree } from '@ionic-native/admob-free/ngx';
import { SettingsPageComponent } from './settings-page/settings-page.component';
import { FormsModule } from '@angular/forms")';

@NgModule({
  declarations: [
    AppComponent,
    HomePageComponent,
    SettingsPageComponent
  ],
  entryComponents: [],
  imports: [
    BrowserModule,
    IonicModule.forRoot(),
    AppRoutingModule,
    FormsModule
  ],
  providers: [
    StatusBar,
    SplashScreen,
    { provide: RouteReuseStrategy, useClass: IonicRouteStrategy }
  ],
  bootstrap: [AppComponent]
})
export class AppModule { }

This is the final wiring that allows all the pages to be seen.

Categories
Angular

How To Build Android Apps With the Ionic Framework

Building Android apps can be a pain. You have to learn the Android SDK inside-out to be productive.

However, if you already have experience developing modern front-end web applications, then building Android apps can be fun and easy.

The Ionic framework provides an easy way for front-end developers to build their web applications using Angular components that Ionic developers provide.

Version 4 of Ionic also has components for React and Vue.js, so you can use your favorite front-end framework to build Android apps.

Ionic is used to build applications. It has components for inputs, grids, scrolling, date and time pickers, cards, and other common components that Android applications have.

In this piece, we will build a currency converter.


Building the App

To start building, we can use Ionic’s CLI. If you’ve used Angular’s CLI, it should be familiar to you.

To install the Ionic CLI, run npm install -g ionic.

Then, to generate the skeleton code for our app, run ionic start currency-converter-mobile sidemenu.

currency-converter-mobile is our app’s name and sidemenu specifies that we want a side menu in our app.

We also need to install ngx-custom-validators for form validation. We need this package because number-range validation is not built-in in Angular.

After that, we can run ionic serve to see our app in the browser. The browser tab should refresh automatically when we make changes.

Now, we can start writing code for the currency converter.

Run ng g service currency.

This will create currency.service.ts.

In this file, we add:

import { Injectable } from '@angular/core';
import { HttpClient } from '@angular/common/http';

const APIURL = 'https://api.exchangeratesapi.io'

@Injectable({
  providedIn: 'root'
})
export class CurrencyService {

  constructor(
    private httpClient: HttpClient
  ) { }

  getLatest() {
    return this.httpClient.get(`${APIURL}/latest`);
  }

  getExchangeRate(from: string, to: string) {
    return this.httpClient.get(`${APIURL}/latest?base=${from}&symbols=${to}`);
  }
}

This allows us to get currency exchange data from https://exchangeratesapi.io/.

Then, run ionic g component convertPage and ionic g component homePage to add our currency converter form and home page, respectively.

The home page is the entry point of our Android app, just like a regular web app.

Then, in app-routing.module.ts, we change the code to:

import { NgModule } from '@angular/core';
import { PreloadAllModules, RouterModule, Routes } from '@angular/router';
import { HomePageComponent } from './home-page/home-page.component';
import { ConvertPageComponent } from './convert-page/convert-page.component';

const routes: Routes = [
  {
    path: '',
    redirectTo: 'home',
    pathMatch: 'full'
  },
  {
    path: 'home',
    component: HomePageComponent
  },
  {
    path: 'convert',
    component: ConvertPageComponent
  }
];

@NgModule({
  imports: [
    RouterModule.forRoot(routes, { preloadingStrategy: PreloadAllModules })
  ],
  exports: [RouterModule]
})
export class AppRoutingModule { }

In app.component.ts, we replace what’s there with:

import { Component } from '@angular/core';

import { Platform } from '@ionic/angular';
import { SplashScreen } from '@ionic-native/splash-screen/ngx';
import { StatusBar } from '@ionic-native/status-bar/ngx';
import { environment } from 'src/environments/environment';

@Component({
  selector: 'app-root',
  templateUrl: 'app.component.html'
})
export class AppComponent {
  public appPages = [
    {
      title: 'Home',
      url: '/home',
      icon: 'home'
    },
    {
      title: 'Convert Currency',
      url: '/convert',
      icon: 'cash'
    }
  ];

  constructor(
    private platform: Platform,
    private splashScreen: SplashScreen,
    private statusBar: StatusBar,
  ) {
    this.initializeApp();
  }

  initializeApp() {
    this.platform.ready().then(() => {
      this.statusBar.styleDefault();
      this.splashScreen.hide();
    });
  }
}

And, in app.component.html, we replace the default code with:

<ion-app>
  <ion-split-pane>
    <ion-menu type="overlay">
      <ion-header>
        <ion-toolbar>
          <ion-title>Menu</ion-title>
        </ion-toolbar>
      </ion-header>
      <ion-content>
        <ion-list>
          <ion-menu-toggle auto-hide="false" *ngFor="let p of appPages">
            <ion-item [routerDirection]="'root'" [routerLink]="[p.url]">
              <ion-icon slot="start" [name]="p.icon"></ion-icon>
              <ion-label>
                {{p.title}}
              </ion-label>
            </ion-item>
          </ion-menu-toggle>
        </ion-list>
      </ion-content>
    </ion-menu>
    <div class="ion-page" main>
      <ion-header>
        <ion-toolbar>
          <ion-buttons slot="start">
            <ion-menu-button>
              <ion-icon name="menu"></ion-icon>
            </ion-menu-button>
          </ion-buttons>
          <ion-title>Currency Converter</ion-title>
        </ion-toolbar>
      </ion-header>
      <ion-content>
        <ion-router-outlet main></ion-router-outlet>
      </ion-content>
    </div>
  </ion-split-pane>
</ion-app>

In convert-page.component.ts, we replace what we have with:

import { Component, OnInit, ChangeDetectorRef } from '@angular/core")';
import { currencies as c } from '../currencies';
import { CurrencyService } from '../currency.service';
import { NgForm } from '@angular/form")';
import { ToastController } from '@ionic/angular';
import { Store, select } from '@ngrx/store")';

const currencies = c;

@Component({
  selector: 'app-convert-page',
  templateUrl: './convert-page.component.html',
  styleUrls: ['./convert-page.component.scss'],
})
export class ConvertPageComponent implements OnInit {
  currencyOptions: any = <any>{};
  fromCurrencies: any[] = Object.assign([], currencies);
  toCurrencies: any[] = Object.assign([], currencies);
  result: any = <any>{};
  showResult: boolean;

  constructor(
    private currencyService: CurrencyService,
    public toastController: ToastController,
    private store: Store<any>
  ) {
    store.pipe(select('recentCoversion'))
      .subscribe(recentCoversion => {
        if (!recentCoversion) {
          return;
        }
        this.currencyOptions = recentCoversion;
      });
  }

  ngOnInit() { }

  setToCurrencies(event) {
    if (!event.detail || !event.detail.value) {
      return;
    }
    this.toCurrencies = Object.assign([], currencies.filter(c => c.abbreviation != event.detail.value));
  }

  setFromCurrencies(event) {
    if (!event.detail || !event.detail.value) {
      return;
    }
    this.fromCurrencies = Object.assign([], currencies.filter(c => c.abbreviation != event.detail.value));
  }

  convert(convertForm: NgForm) {
    this.showResult = false;
    if (convertForm.invalid) {
      return;
    }
    this.currencyService.getExchangeRate(this.currencyOptions.from, this.currencyOptions.to)
      .subscribe((res: any) => {
        let recentConversions = [];
        if (localStorage.getItem('recentConversions')) {
          recentConversions = JSON.parse(localStorage.getItem('recentConversions'));
        }
        recentConversions.push(this.currencyOptions);
        recentConversions = Array.from(new Set(recentConversions));
        localStorage.setItem('recentConversions', JSON.stringify(recentConversions));
        const rate = res.rates[this.currencyOptions.to];
        this.result = +this.currencyOptions.amount * rate;
        this.showResult = true;
      }, err => {
        this.showError();
      })
  }

  async showError() {
    const toast = await this.toastController.create({
      message: 'Exchange rate not found.',
      duration: 2000
    });
    toast.present();
  }
}

And, in convert-page.component.html, we replace what we have with:

<ion-content [scrollEvents]="true">
  <form #convertForm='ngForm' (ngSubmit)='convert(convertForm)'>
    <ion-list>
      <ion-item no-padding>
        <h1>Convert Currency</h1>
      </ion-item>
      <ion-item no-padding>
        <ion-label>Amount</ion-label>
        <ion-input [(ngModel)]='currencyOptions.amount' name='amount' #amount='ngModel' required [min]='0'></ion-input>
      </ion-item>
      <ion-item no-padding>
        <ion-label>Currencies to Convert From</ion-label>
        <ion-select [(ngModel)]='currencyOptions.from' name='from' #from='ngModel' required
          (ionChange)='setToCurrencies($event)' (ionBlur)='setToCurrencies($event)'>
          <ion-select-option [value]='c.abbreviation' *ngFor='let c of fromCurrencies; let i = index'>
            {{c.currency}}
          </ion-select-option>
        </ion-select>
      </ion-item>
      <ion-item no-padding>
        <ion-label>Currencies to Convert To</ion-label>
        <ion-select [(ngModel)]='currencyOptions.to' name='to' #to='ngModel' required
          (ionChange)='setFromCurrencies($event)' (ionBlur)='setFromCurrencies($event)'>
          <ion-select-option [value]='c.abbreviation' *ngFor='let c of toCurrencies; let i = index'>
            {{c.currency}}
          </ion-select-option>
        </ion-select>
      </ion-item>
    </ion-list>
    <ion-button type='submit'>Convert</ion-button>
    <ion-list *ngIf='showResult'>
      <ion-item no-padding>
        {{currencyOptions.amount}} {{currencyOptions.from}} is {{result}} {{currencyOptions.to}}.
      </ion-item>
    </ion-list>
  </form>
</ion-content>

The code above will provide a form for people to enter their currency amount in the ion-input element. Then, with the two ion-select elements, you can select the currency to convert from and to.

It will also remove the currency you already selected from the choices in the drop-down that doesn’t have selection applied. This is achieved by handling the ionChanged event and then removing the value that is selected from the ion-select.

Then, in home-page.component.ts:

import { Component, OnInit } from '@angular/core';
import { CurrencyService } from '../currency.service';
import { Store } from '@ngrx/store';
import { SET_RECENT_CONVERSION } from '../reducers/recent-coverions-reducer';
import { Router } from '@angular/router';

@Component({
  selector: 'app-home-page',
  templateUrl: './home-page.component.html',
  styleUrls: ['./home-page.component.scss'],
})
export class HomePageComponent implements OnInit {
  rates: any = <any>{};
  recentConversions: any[] = []

constructor(
    private currencyService: CurrencyService,
    private store: Store<any>,
    private router: Router,
  ) {
    router.events.subscribe((val) => this.recentConversions = this.getRecentConversions())
  }

  ngOnInit() {
    this.getLatest();
    this.recentConversions = this.getRecentConversions();
  }

  getLatest() {
    this.currencyService.getLatest()
      .subscribe(res => {
        this.rates = res;
      })
  }
}

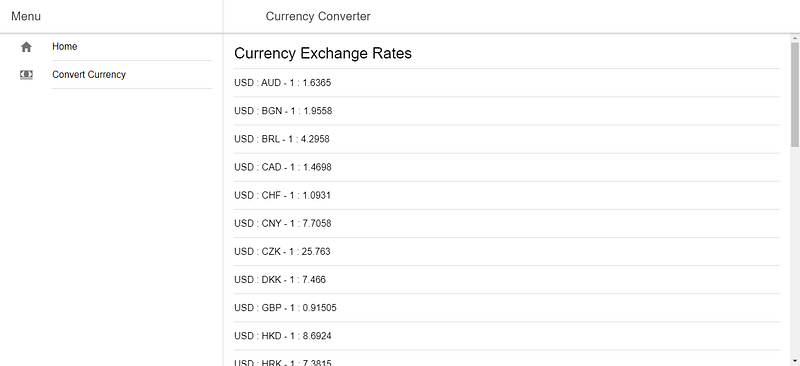
In home-page.compone.html, change to:

<ion-content [scrollEvents]="true">
  <ion-list>
    <ion-item no-padding>
      <h1>Currency Exchange Rates</h1>
    </ion-item>
    <ion-item no-padding *ngFor='let r of rates.rates | keyvalue'>
      USD : {{r.key}} - 1 : {{r.value}}
    </ion-item>
  </ion-list>
</ion-content>

Finally, in app.module.ts, replace what we have with:

import { NgModule } from '@angular/core';
import { BrowserModule } from '@angular/platform-browser';
import { RouteReuseStrategy } from '@angular/router';

import { IonicModule, IonicRouteStrategy } from '@ionic/angular';
import { SplashScreen } from '@ionic-native/splash-screen/ngx';
import { StatusBar } from '@ionic-native/status-bar/ngx';

import { AppComponent } from './app.component';
import { AppRoutingModule } from './app-routing.module';
import { HomePageComponent } from './home-page/home-page.component';
import { ConvertPageComponent } from './convert-page/convert-page.component';
import { HttpClientModule } from '@angular/common/http';
import { FormsModule } from '@angular/forms';
import { CustomFormsModule } from 'ngx-custom-validators';
import { CurrencyService } from './currency.service';
import { StoreModule } from '@ngrx/store';
import { reducers } from './reducers';
import { AdMobFree } from '@ionic-native/admob-free/ngx';

@NgModule({
  declarations: [
    AppComponent,
    HomePageComponent,
    ConvertPageComponent
  ],
  entryComponents: [],
  imports: [
    BrowserModule,
    IonicModule.forRoot(),
    AppRoutingModule,
    HttpClientModule,
    FormsModule,
    CustomFormsModule
  ],
  providers: [
    StatusBar,
    SplashScreen,
    { provide: RouteReuseStrategy, useClass: IonicRouteStrategy },
    CurrencyService
  ],
  bootstrap: [AppComponent]
})
export class AppModule { }

You should see a list of current exchanges when you go to [http://localhost:8100/home](http://localhost:8100/home).


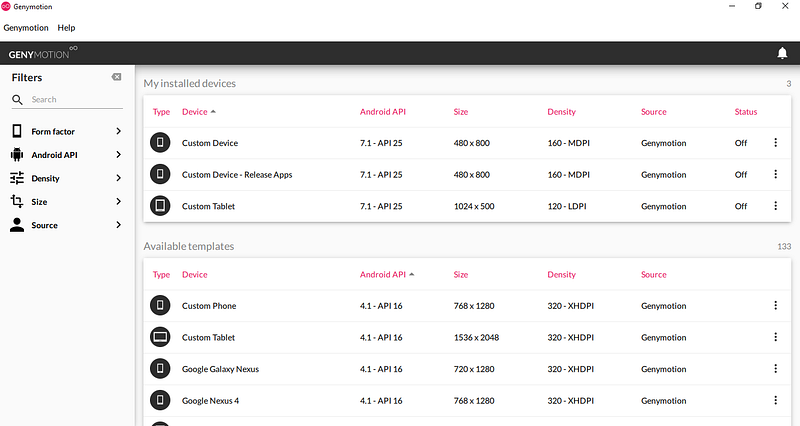
Testing in the Genymotion Emulator

It is easy to test it in Genymotion. First, sign up for a Genymotion account, download Genymotion, and install it following the instructions. Then, run the program.

Once you open Genymotion, add an emulator by selecting what is available in the available templates section.

Once you add an emulator, you should see something like this:

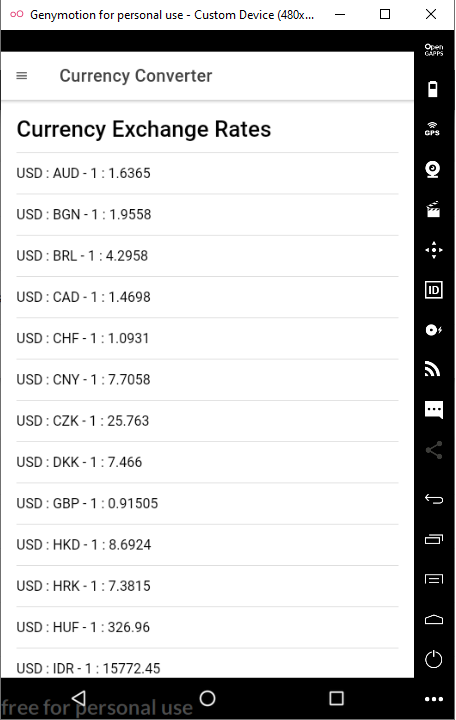
Doubling-click on your emulator. Once you do that, you should see the emulator window. Run ionic cordova run android in the Node command prompt to see the app running in Genymotion.

Once the command is finished, you should see:


Building for Production

First, you have to sign your app. To do this, you have to run a command to generate keystore:

keytool -genkey -v -keystore my-release-key.jks -keyalg RSA -keysize 2048 -validity 10000 -alias my-alias

Run ionic cordova build — prod — release android to build the app in production mode.

After that, you can sign it with your keystore by running:

jarsigner -verbose -sigalg SHA1withRSA -digestalg SHA1 -keystore path/to/my-release-key.jks path/to/app-release-unsigned.apk alias_name

Optimize the APK by running [zipalign](https://developer.android.com/studio/command-line/zipalign):

zipalign -v 4 app-release-unsigned.apk currency-converter-mobile.apk

You’ll get a signed APK that you can submit to Android app stores, such as Google Play and Amazon.

Ionic makes it easy to build Android applications that don’t require too much native functionality, such as interacting with hardware.

With recent advances in HTML APIs for interacting with hardware, such as microphones, Ionic is going to be more useful for building these kinds of apps.

Performance is decent compared to native for simple apps and it is a lot easier to develop.

Categories
Angular

Build a Whiteboard App With Konva and Angular

The HTML canvas is part of the HTML specification that allows developers to easily add graphics and interactivity to their apps.

In the HTML canvas, you can add images, text, and shapes with different colors, fills, and gradients. It is supported by almost all recent browsers.

To add something to a canvas, you first add a canvas element to your page. Then, you can add lines to your canvas in the shape that you want.

For example, to add a line and a circle to your canvas element, in your HTML file you do the following:

<canvas id="canvas" width="200" height="100" style="border:2px solid #000000;">  
</canvas>

Then, in your JavaScript file, you do this:

If you want to add anything more complex, it will be difficult to do.

Therefore, the Konva library abstracts the hard work of adding items to the canvas. It allows you to add many more shapes by simply writing a few lines of code.

You can also allow users to move and transform your shapes easily, which you would have to write yourself if you wanted to do it in the HTML Canvas API.

In this piece, Konva will be combined with Angular to create a whiteboard where the user can add circles, rectangles, lines, and text, and move them and transform them within the whiteboard.

How it works: Konva creates a stage and a layer in the stage which will allow you to add the lines, shapes, and text that you want.


Getting Started

To start, we create an Angular app by running ng new whiteboard-app. Be sure to include the routing module when asked.

I’m assuming that you have the Angular CLI installed. If not, run npm i -g @angular/cli.

After that, we need to install the Konva library and Angular Material, which will allow us to manipulate the canvas and make our UI look pretty without a lot of effort.

To do this, run npm i konva @angular/material.

Then, we need to create Angular services to abstract some of the repetitive logic by running ng g service shape and ng g service textNode.

The logic for generating shapes and text will be placed in these files.

We also need to create a page for the whiteboard. Run ng g component whiteboardPage to make the component.

In app-routing.module.ts, add:

To make sure that we can see the page when we go to http://localhost:4200/, follow the instructions below.

In app.module.js, replace what was generated with:

In shape.service.ts, add the following:

Konva is available as an ES6 module, so we can import it.

Also, TypeScript definitions are built into the library, so autocomplete is available and they are correct (for the most part).

The three functions above will return line, circle, and rectangle shapes respectively, with pre-filled colors, strokes, and dimensions.

However, they can easily be changed to dynamic ones by adding parameters to the functions and setting the values in the object.

As we want to be able to move them, we set draggable to true for circle and rectangle. For a line, we only allow dragging in brush mode as we also use the line for creating the erase feature later.

In text-node.service.ts, enter the following code:

The code above will return the editable text box as shown in the Konva documentation, along with the transformer object which allows you to transform the text.

Now that we have the code to generate all the elements, we can build the UI in the whiteboard-page.component.

In whiteboard-page.component.ts, replace the existing code with:

And, in whiteboard-page.component.html, replace what is there with:

The two pieces of code above will highlight the button when it is clicked with the setSelection function. The setSelection function will set the dictionary which sets the color according to whether the button is clicked or not.

The addShape function will add the shape according to which button is clicked. It will call the service functions according to the shapes, which will return the Konva object for the shape.

This will be added to the layer object, which has already been added to the stage. The transformer object is attached to the shape objects at this time as well so you can change the size of the objects on screen.

this.layer.draw() is called which will redraw the canvas so you get the latest items displayed in the canvas.

To make the eraser for the line, it just adds another line (which is always white), on top of the existing line. The line will not be in brush mode so it will be white when created.

If we want undo functionality, we have to track the shapes and transformer objects that are added. To do this, we put them in the shapes array and the transformers array respectively after we add them.

Then, when the undo button is clicked, this is called:

In the undo function, the transformers for the shape are detached, so the transform handles for the removed shapes will go away. Then, we called remove() on the removed shape and redraw. We no longer get the shape and the handle.

Categories
Bootstrap HTML

How to Manipulate and Iterate Arrays in JavaScript

Iterating Array

For Loop

The for loop is one of the most basic loops for looping through an array. It takes a starting index and then loops through to the ending index. Index must be an integer.

Example:

const array = [1,2,3];
for (let i = 0; i < array.length; i++){
  console.log(i);
}

The loop above should log all the numbers in the array.

Indexes do not have to be consecutive:

const array = [1,2,3];
for (let i = 0; i < array.length; i+=2){
  console.log(i);
}

The loop above will skip every second number.

While Loop

while loop will loop whenever a condition stays true.

For example, the loop below will run if the index number i is less than three:

const array = [1,2,3];

let i = 0;
while(i < array.length){
  console.log(i);
}

If the condition in the parentheses is never true, then the loop content will never run.

Do While Loop

do...while loop will always execute the first iteration.

const array = [1,2,3];

let i = 0;
do{
  console.log(i);
}
while(i < array.length)

In the example above, it will at least log 0, but it will also log 1 and 2 in this case since those two numbers are less than three.

With the above loops, you can call break to stop the loop or return before the loop is completely finished.

//do while loop
const array = [1,2,3];

let i = 0;

do{
  console.log(i);

  if (i == 1}{

    break;

  }

}
while(i < array.length)

//while loop
i = 0;

while(i < array.length){

  if (i == 1{

    break;

  }
  console.log(i);
}

//for loop
for (let j = 0; j < array.length; j++){

  if (j == 1){
    break;
  }
  console.log(j);
}

In the above examples, you will not see two logged.

An example of returning from within the loop:

const loop = ()=>{
  const array = [1,2,3];

  for (let j = 0; j < array.length; j++){

    if (j == 1){
      return j;
    }
    console.log(j);
  }
}
loop() //returns 1

You can also skip iterations with continue statement:

const array = [1,2,3];
for (let j = 0; j < array.length; j++){

  if (j == 1){
    continue;
  }
  console.log(j) // 1 will be skipped;
}

Array.forEach

forEach will iterate through every entry of the array. You cannot break out of it or return a value from it. It takes a callback function where you can execute code.

Example:

const array = [1,2,3];
array.forEach(a =>{

  console.log(a);
})

In the above example, all the numbers in the array will be logged.


Find Element in Array

Array.find

Array.find will return the element in the array with the given condition. For example, if you want to get certain numbers from the array, you do:

const array = [1,2,3];
const num = array.find(a => a == 2); // returns 2

find returns a single result.

Array.findIndex

Array.findIndex will return the index of the element in the array with the given condition. It takes a callback function that returns a given condition. For example, if you want to get the index of a certain numbers from the array, you do:

const array = [1,2,3];
const num = array.findIndex(a => a == 2); // returns 1

Array.filter

Array.filter will return an array of items that meet the given condition. It takes a callback function that returns a given condition. filter returns a new array.

For example, if you want to get the index of a certain numbers from the array, you do:

const array = [1,2,3];
const numArray = array.filter(a => a == 2); // returns [2]

Check if Element Exists in Array

Array.includes

Array.includes checks if an item exists in an array. It takes a number or string which the function can compare.

const array = [1,2,3];
const includesTwo = array.includes(2); // returns true

Array.some

Array.somechecks if some items meet the condition given. It takes a callback function which returns a boolean for the condition.

const array = [1,2,3];
const includesTwo = array.some(a => a == 2); // returns true
const includesFive = array.some(a => a == 5); // returns false

Array.every

Array.every checks if every item meet the condition given. It takes a callback function which returns a boolean for the condition.

const array = [1,2,3];
const everyElementIsTwo = array.`every`(a => a == 2); // returns false
const everyElementIsNumber = array.`every`(a => typeof a == 'number'); // returns true since every item in the array is a number

Check If an Object Is an Array

Array.isArray

Array.isArray checks if an object given is an array. It is a convenient way to check if an element is an array.

const array = [1,2,3];

const notArray = {};
let objIsArray = Array.isArray(array); // true
objIsArray = Array.isArray(notArray); // false

Remove Duplicates in Array

Array.from(new Set(array))

Set is a object that cannot have duplicate entries. You can create a new Set from an array then convert it back to an array.

const array = [1,2,2,3];
const arrayWithDups = Array.from(new Set(array)); //returns new array without duplicates, [1,2,3]